LAST UPDATED: 9/17/21
Marketing Templates
All Insureio templates are located in the Marketing section. The Insureio marketing library includes templates for emails, email marketing campaigns, and agent scripts. You can send these emails to your clients using our SMTP email integration. In this article, we'll explain how to find, view, edit, create, clone, and delete templates, as well as how to send marketing emails using the templates.
Here's a quick video overview of our marketing templates.
Jump to a section:
Search for a Template
Preview a Template
Edit a Template
Create a Template
Clone a Template
Delete a Template
Sending Options
☑️ Search for a Template
You can browse the entire stock of templates in the Marketing / Marketing Templates section.

Navigate the template list using the pagination buttons at the bottom of the page or, to narrow your search, use one or more of the search/filter criteria on the right.

To use a filter, select the criteria as described below, then click Apply Filters to view your results.
- Name. If you know the name of a specific template you're looking for, enter it here. Click the magnifying glass icon and Insureio will show you a list of matching templates. Click the template name to view it in a new browser tab.
- Medium. Choose email, SMS, print, or any of the above.
- Purpose. Choose status, consumer marketing, agent marketing, or any of the above. Status emails update a lead, client, or prospect on the status of their quote request, app request, submitted application, and/or in-force policy. Marketing emails can be sent to clients or prospects at any time, regardless of case status. If you have an Agency Management subscription, you'll also see agent marketing emails, which let you market to agents you want to recruit to your agency.
- Planning Need. Choose from Business & Executive Planning, Charitable Planning, Estate Planning, Family Planning, Financed Arrangements, Liability Protection, Policy Review, Retirement Planning, Health & Long-Term Care Planning, or choose "any."
- Product Category. Choose from life, annuities, LTC, disability, critical illness, Medicare supplement, dental, vision, health, home, auto, or choose "any."
☑️ Preview a Template
Want to see what a template looks like before selecting it? Click the template title to open it in a new browser tab.

NOTE: The template preview will contain merge fields that you'll see without your customized information. Merge fields look like this: { { header } }, { { agent.phone } }, etc. When you send the template through Insureio, those fields will be auto-populated with the information you entered in the My Account and Branding tabs. This is why it's so important to fill in all your information correctly.
Back to top☑️ Edit a Template
If your account's permission settings allow it, you'll see an Edit button in the dropdown menu to the right of each template listing. Click the arrow to reveal your dropdown menu. If you don't see the Edit button, click Clone to create a copy of the template that you can edit.

Whether you're editing or cloning, your WYSIWIG editor will look the same. The top half of the screen will contain your template's metadata, while the bottom half contains the text editor for the body of the template.

While in the editing screen, you can also choose to delete the template or duplicate it.
- Delete: Click the trashcan icon in the top right of your screen to delete the template.
- Edit: Click the paper icon in the top right of your screen to duplicate the template and make further edits to the duplicate.
➡️ Should you Edit or Clone a Template?
Take a look at the template's Ownership box before you make or save any edits.
If it says user, no one else has access to your template - any changes you make won't affect other users. If it says user and descendants, any sub-users in your organization may also be using this template. If you want to make changes that would render it unsuitable for any of your sub-users, clone the template instead.

➡️ Template Metadata Editing Options
- Template Name. The template name is not visible to clients - it's simply the name that appears in the list of templates available within Insureio.
- Description. The description is not visible to clients - it's the brief text description of the template you see within Insureio while browsing available templates.
- Subject. This is the subject line your recipient sees when they receive the email. Be sure there are no spelling errors in your subject line, and be sure it's brief and on-topic. You may want to experiment with fun or catchy headlines for marketing emails.
- Purpose. Use the dropdown menu to assign a specific purpose to this template. Choose status, consumer marketing, or agent marketing.
- Planning Need. Use the dropdown menu to assign a specific planning need to this template. It's not required, but if you do, the template will show up when you search using the "Planning Need" dropdown box.
- Product Category. Use the dropdown menu to assign a specific product category to this template. It's not required, but if you do, the template will show up when you search using the "Product Category" dropdown box.
- Ownership. Choose "user" to make the email available only to you, or choose "user and descendants" to make it available to you and your sub-users.
- Quoter Link Type. Our templates include one or more links your recipient can click to get a quote or more information. Those links aren't hard-coded into the template - Insureio adds the link on the fly, based on your selection here. Choose from three options:
- Insurance Division: Use this if you are a Marketing or Marketing & Agency Management subscriber with an Insurance Division site. If the template you've chosen has a specially written corresponding page on Insurance Division, that URL will be filled in for you. If not, the recipient will be directed to your Insurance Division home page.
- Insureio: This adds your unique Insureio Application Link, giving the recipient access to the quote path in order to complete the process themselves. The recipient can run the health analyzer, receive quotes, select a product and carrier, and complete the Insureio application. When they finish, you'll be notified via email to review, edit, and submit the application. Best used with recipients who are able to follow the process without your help.
- Custom URL: Enter a custom URL (i.e., a landing page) that you want recipients to visit in order to get quotes or more information.
- Body. This dropdown menu reveals a list of dynamic fields you can add to your template. When you select one, it will be added at the cursor in the body of the template. You'll see something that looks like a few words of text between a double set of brackets. Think of these variables as merge tags - Insureio will pull the relevant information into the template before sending. Some variables pull in client data, while others pull in your brand data. This is why it's so important to fill in all your brand profile information correctly. Click here to learn more about marketing template variables.
- Default Footer. By default, Insureio adds a footer to every email it sends. This contains important contact and licensing information as well as an unsubscribe link. This footer is not visible (and thus not editable) in the WYSIWYG editor. If you turn this off, you are responsible for ensuring your emails include the required information to comply with the provisions of the CAN-SPAM act.
- Enabled. Make sure this box is checked to enable the template (it will be checked by default). Templates must be enabled to be sent to contacts. If a template is disabled, you will no longer see it in the list of templates (i.e., you can't access or edit it).
➡️ Template Body Text Editing Options
The WYSIWIG editor at the bottom of the editing screen is where you can edit the actual content of the email. Use the scroll bars to the right to navigate down through the template.

If you've used Microsoft Word or blogging platforms like Blogger or WordPress, this editor should be familiar to you. You can style the template's text here, as well as add pictures or video.
Use the Insert menu command, and then select link, image, or media (video). Keep in mind that you can't upload images or video directly to Insureio at this time. When you click Insert and select Image, for example, Insureio will ask for the image source (the URL of the image). This is because when sending a template, any images in that template need to be available online so your recipient's email client can download them. Online photo storage and sharing apps (Flickr, Google Photos, etc.) will allow you to store photos online, giving you the URL you need to add them to a Insureio template.

If you prefer to edit HTML, click Tools and then Source Code. The HTML code will be visible in the editing window.

IMPORTANT: Once you’re done editing, click the blue Submit button at the bottom of the screen to save your changes.
Back to top☑️ Create a Template
From the Marketing Templates screen, click the blue New Template button (in the top right). Select an email, SMS, or agent script template. See Editing a Template above for a complete description of editable fields and how to use them.

NOTE: You can create a basic text email or agent script using our WYSIWYG text editor, but for advanced styling options, we suggest:
- For the tech-savvy. Paste in the code for your own HTML-designed email.
- For the non-tech-savvy. Clone an existing template and simply change the text.
☑️ Clone a Template
If you plan on making extensive edits to a template, it may be a good idea to clone it first in case you still want to use the original at a later date. You can clone an email from the main Marketing Templates screen, or from the editing screen.
- Cloning from the Marketing Templates screen. Use the dropdown menu on the right. Select Clone.

- Cloning from the editing screen. Click the paper icon in the top right of the editing screen to duplicate the template and make further edits to the duplicate.

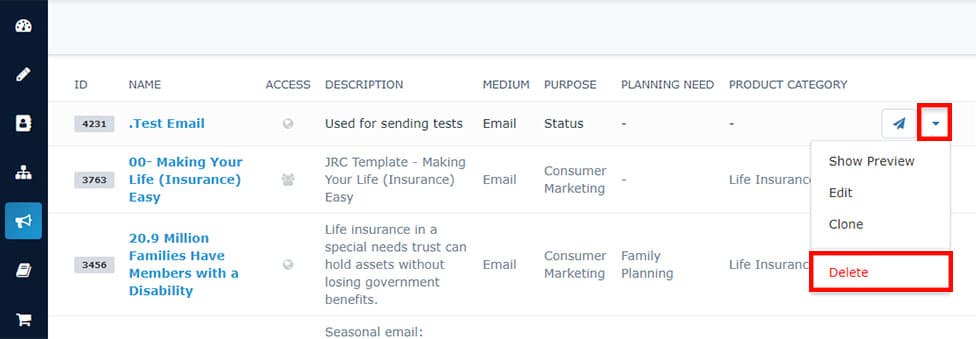
☑️ Delete a Template
From the Marketing Templates screen, click the dropdown menu icon to the right of your desired template. Choose Delete.
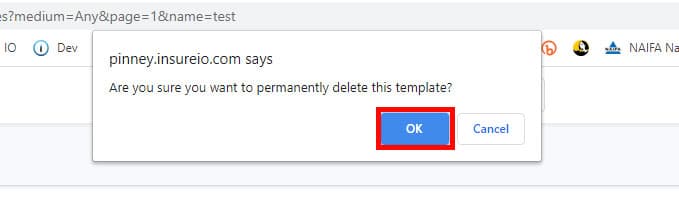
A pop-up window will ask, “Are you sure?” Click OK to proceed.
 Back to top
☑️ Sending Options
No matter which sending option you choose, Insureio will attempt to send an email to a recipient 4 times. After 4 failed delivery attempts, the system will stop sending to that email address. If that consumer is enrolled in a campaign, they will not receive the next email(s) scheduled in that campaign.
To send a template from the main Marketing Templates screen, click the paper airplane icon to the right.

Select a link type using the radio button. Where do you want the links inside this email to point? Select Insurance Division, your Insureio link, or provide a custom URL (your website or landing page, for example).

Next, select a distribution option. Here are your three options:
- Email Self. The message is only sent to you – a great way to test a template before sending it to a client.
- TIP: You cannot send a template to yourself that has variables (merge fields) that require contact/client data. If you need to test a template with client-dependent merge fields, it may be a good idea to create a "test" contact to use. Give the contact a name and your email address, then choose "Custom Distribution."
- Custom Distribution. Manually enter one or more email addresses for your recipients.
- NOTE: If you are sending to more than one contact, be sure the template doesn't have client-dependent merge fields. If it does, the template will fail to send.
- Blast Distribution. Send the message to a previously saved list of contacts (built in the Reporting section). Select this radio button and start typing your saved report name in the search box. Select it from the results.
- NOTE: When you build a report that consists of names to use for a blast distribution, Insureio will re-run that report when you click Send Email. You don't have to worry about re-building the report so that your list includes new leads, for example. Insureio will add any new contacts that fit the report criteria without you needing to take any action at all.
- TIP: To build a blast distribution list that includes all your clients, visit the Reporting section. Click New Search. Give the report a name you'll recognize. Scroll down to the Client Details section and set an age range of 1 to 99. At the bottom of the screen, click Save Search.
Once you've made your selections, click the checkbox to attest that your email is NOT being sent to a purchased list and that it complies with the CAN-SPAM Act. Click Send Email and the system will do the sending for you!
Back to topYou may also be interested in:
Create and Use an Agent Script
Email Blast Distribution
Marketing Template Variables
Marketing Links
Creating, Populating, and using Marketing Campaigns