LAST UPDATED: 10/2/20
Client Record Overview: Viewing Client Data
When you click on a name in Contacts Management, you'll be taken to the contact's profile. That profile contains personal and contact information, as well as information about the contact's policies, health, financial information, and case status notes. Check out the video below for a quick overview, or jump to a particular section by clicking one of the section links below the video.
Jump to a section on this page:
NOTE: Contacts in Insureio can't be deleted. If you end up with duplicates, we suggest selecting one record to use moving forward, and renaming the last name in the duplicate record to indicate as such (i.e., "John Doe-Duplicate").
Personal Information
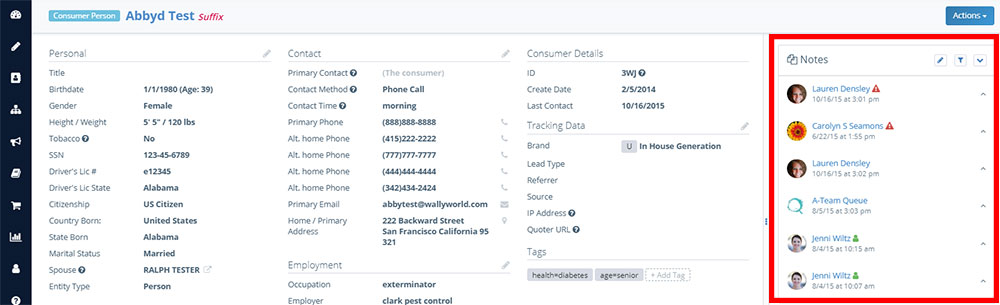
Name and Classification. At the top of the page, you'll see the client's name and a label identifying this person as a "Consumer" or "Agent."

Personal. All the client’s personal data is available here. To edit any of these fields, click the pencil icon on the top right of the column. An editing modal will appear. Just click on the information you want to change, enter the new information, and click out of the editing box. Insureio will automatically save the changes you made.

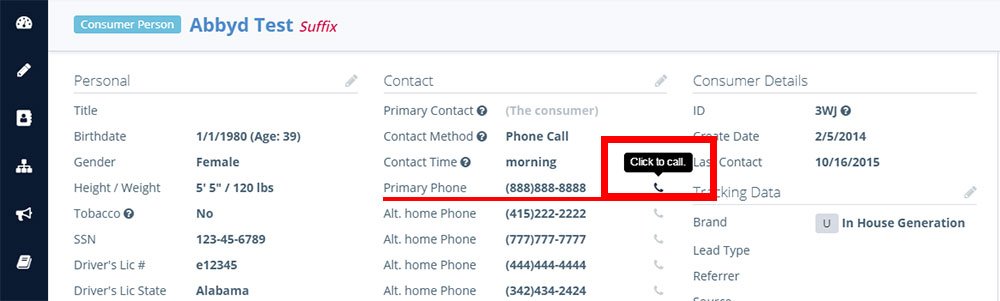
Contact. The client's contact information, including their contact preferences, is stored here. If you have click-to-call enabled, use the phone icon to the right of Primary Phone to dial that number.
Click the email icon to the right of Primary Email to pull up your email program and a new blank email addressed to that client.

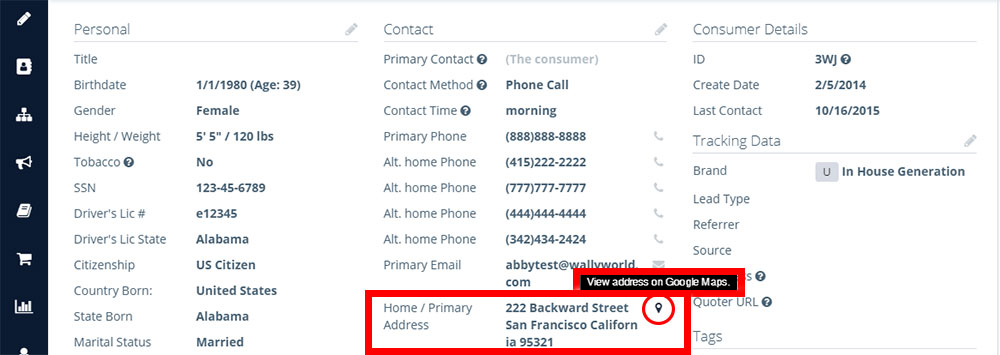
Click the icon to the right of Home / Primary Address to see their address on Google Maps.
To edit any of these fields, click the pencil icon on the top right of the column. An editing modal will appear. Just click on the information you want to change, enter the new information, and click out of the editing box. Insureio will automatically save the changes you made.

You can add multiple addresses, phone numbers, email addresses, or websites/social profiles for a contact. You can also change their primary contact or preferred method of contact. Here's how:
- Change primary contact. As a default, the contact is listed as their own primary contact. To change this, you'll need to create or add a related consumer in the Related tab of this profile (explained below). As you create a related consumer, you have the option to set that related consumer as the primary contact.
- Set or change primary phone, email, or address. Click the pencil icon at the top right of the column. In the modal window that appears, use the radio buttons to choose the primary phone number, email address, and/or address. Keep in mind that multiple numbers, emails, or addresses are needed to set one as a primary. Just click outside the modal window to exit. Insureio will automatically save your changes. (Note: You may need to refresh your browser to see your changes take effect.)
In the Web And Social Media section, you also have the option to add a client's social media profile(s). To do this, click Add A Website Or Social Media Account.

Using the dropdown menu on the left, select Website, LinkedIn, Facebook, Twitter, or Google+.

For a website, paste in the full URL. For social media profiles, only add a portion of the full URL as described below:
- LinkedIn: http://www.linkedin.com/in/ (enter this portion of the URL)
- Facebook: https://www.facebook.com/ (enter this portion of the URL)
- Twitter: https://twitter.com/ (enter this portion of the URL)
- Google+: https://plus.google.com/u/0/ (enter this portion of the URL)
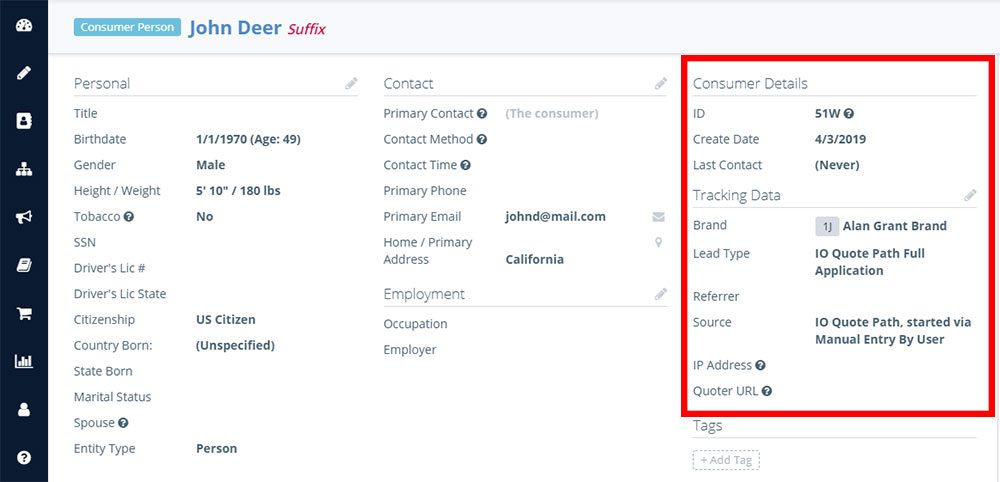
Consumer & Tracking Details. This column gives you information about when and how that consumer came into the system. The ID number is unique to that consumer, and it's automatically assigned by Insureio. View the consumer's profile creation date, the date of last contact, the brand used when communicating with that consumer, and any lead type information imported with that consumer (lead type, referrer, and source). You can also view the quoter URL and IP address of the device that lead/profile originated from, assuming it was not created manually by a user. These fields are not editable.
Tags. Any tags assigned to this client appear here. Tags can be applied manually when you access a profile (use the +Add Tag button), via CSV when the contact is uploaded to the system, or applied automatically based on the lead source (a particular landing page, for example).
 Back to top
Policies
Jump to a section within Policies:
All policy data is stored beneath the client information. Most of the data you're looking for will be in the Policies tab, located beneath the Personal section. Below, we'll go over the information contained in each tab.
Tip: The three indicators next to the Policies tab title instantly tell you: (1) how many opportunities, (2) pending policies, and (3) in-force policies are associated with that client. Hover over any of the indicators for a tooltip that will remind you what each number designates.

Policies
Here, you can view details about a client's policies. If your client has many policies, you can use the Filter button (on the right) to help sort them. The filter lets you view ONLY one type of policy: all, open, pending, placed, or closed. Once you put a filter in place, it stays active until you change it. For example, if you set your filter to "placed" and log out for the day, the next time you log in, you'll still only see placed policies. To re-set your view to all policies, change your filter setting to "all."
Populating Policy Data
Policy information can be populated several ways:
- Automatically, via the lead import API
- Automatically, by saving a quote from the quote path
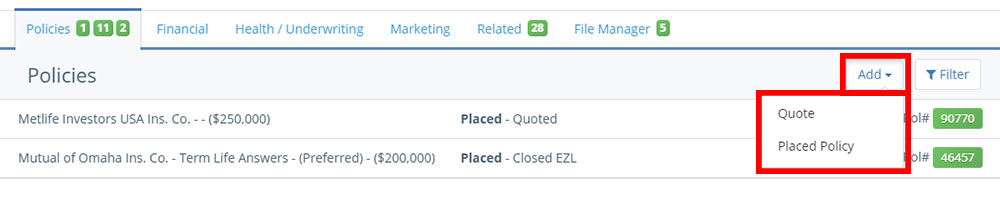
- Manually, by using the Add button provided in the policies tab, with the options to add a quote or placed policy.
- Add: Quote allows you to manually enter the details of a new quote (classified as an "opportunity").
- Add: Placed Policy allows you to manually enter the details of a placed policy (classified as "placed").
- Manually, by using the Actions button provided in the top-right of the consumer profile, with the options to run a quote or submit a new app ticket.
- Actions: Run Quote takes you to the quote path, where you'll choose between the referral and application options. Choose one, and you'll begin the quote path. It will be pre-populated with as much of the client's information as possible. You'll need to save the quote if you want the quote details to remain in the client record.
- Actions: New App Ticket takes you to step 1 of the quote path, customized for submission to our application fulfillment partners. If you select the application method, the final button in the quote path will let you send the app straight to our partner's application fulfillment team. If you select the referral method, the final button in the quote path will refer this client straight to our partner's sales team, where they complete the sale and process the application on your behalf. The quote path will be pre-populated with as much of the client's information as possible.

Viewing Policy Data
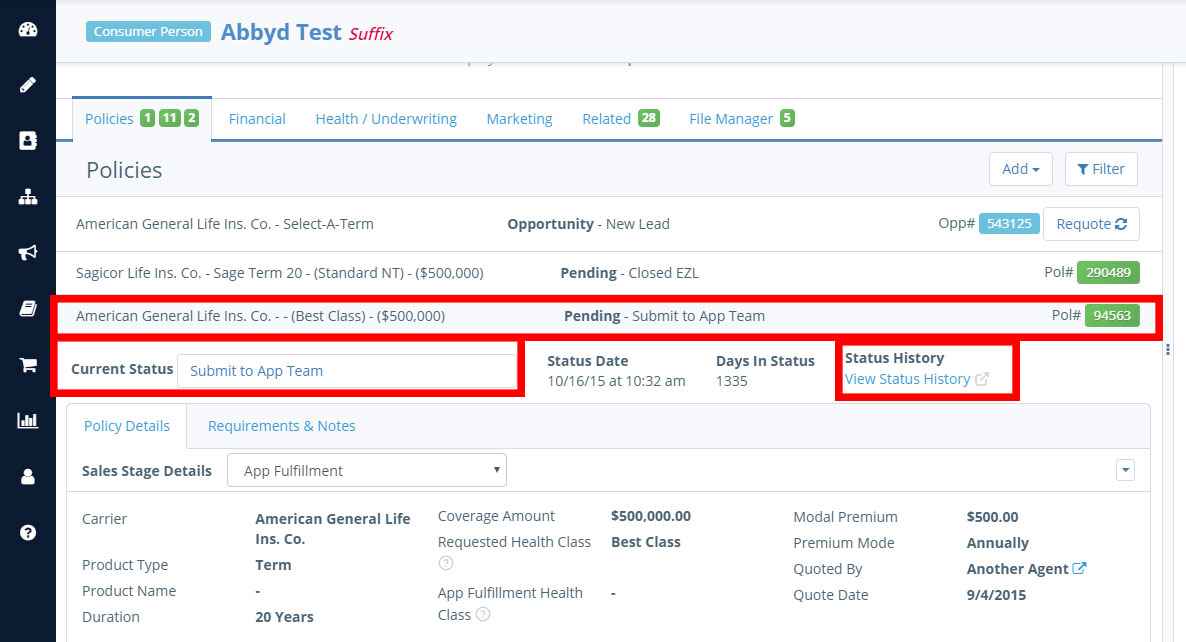
Click any policy to open it up (and click the policy name again to close it). You'll always be able to see the policy's status in the Current Status box. You can also see the day the policy entered that status, number of days in status, status history, quote details, submitted details, special handling, staff assignments, processing, exam details, and more.
There's a ton of information available to you here, so take a few minutes to click around and get comfortable with it. We'll take a quick tour below.
Opportunity Details / Policy Details
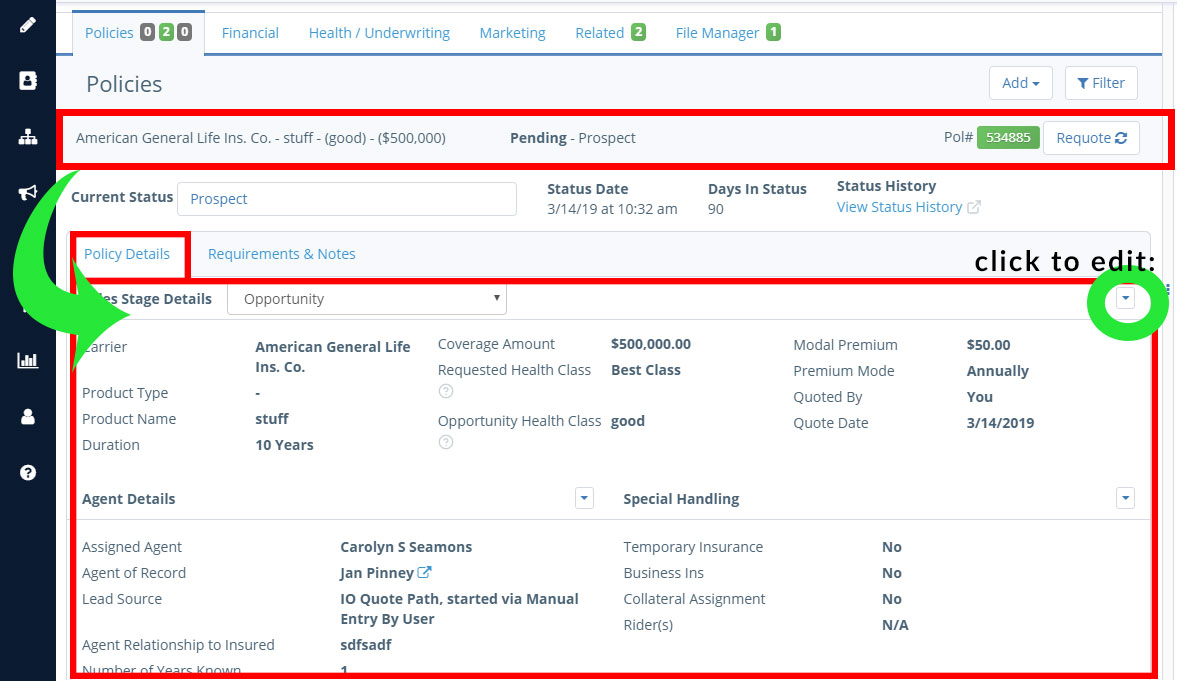
This tab shows you policy details based on its current and past statuses. That means the tabs you see will depend on the policy's current status. For example, a policy in Contact Attempted status won't have contacted details or app fulfillment details yet, so you'll only see an Opportunity Details tab. If you've made contact and changed the policy's status accordingly, you'll see other tabs revealed as you work that lead.
- Opportunity Details shows you details about the quote provided to the client. Click the blue dropdown arrow to edit, if needed.
- Policy Details shows you details about the policy, including sales stage, carrier, coverage amount, agent details, and more. Click the blue dropdown arrow to edit, if needed.
Requirements & Notes
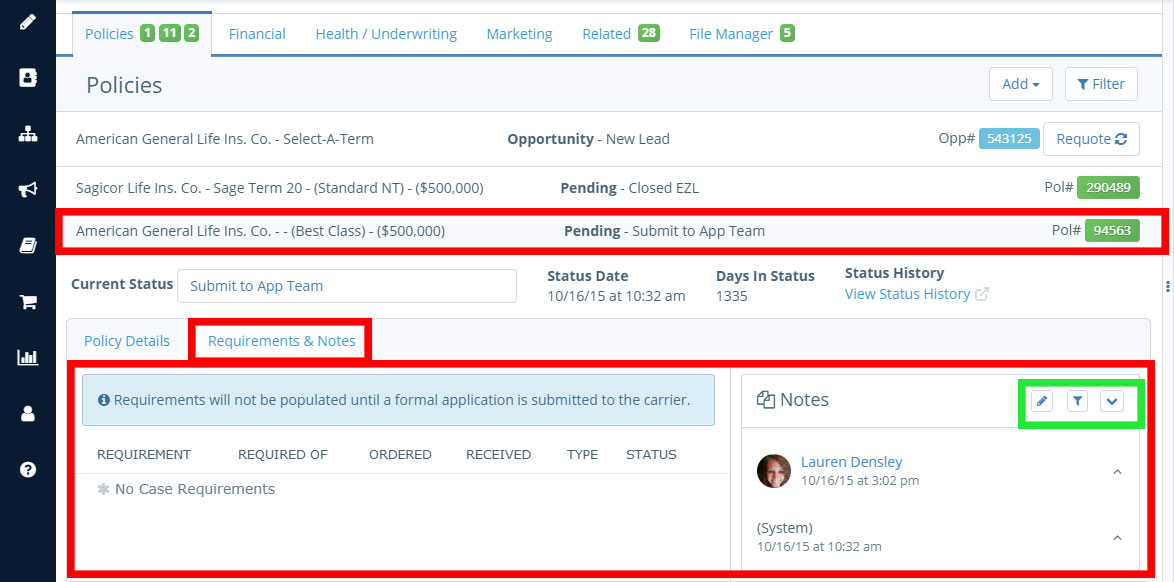
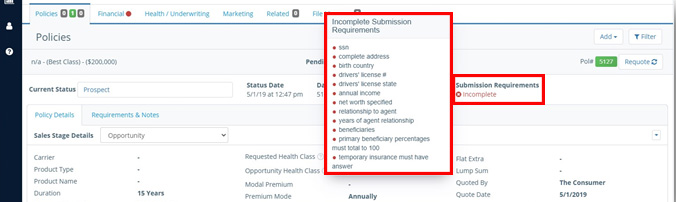
This tab populates once a formal application is submitted to the carrier. Once that happens, you can view any outstanding requirements. If there are no outstanding requirements, it will say "Fulfilled." If requirements exist, you'll see the red "Incomplete" notation. Just click or hover your mouse over that notation to open a modal with that list.
NOTE: If you're submitting this case to our application fulfillment partners, red text indicates those missing requirements will prevent submission.
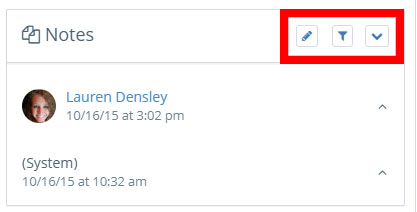
This tab is also where you can view and save notes about the policy (these are different than notes about the consumer in general). The Notes box has three action buttons in the top right: create a note, filter (view all notes, or only confidential notes), and expand (view text of the note in addition to the note creator/date). Status changes generate automated notes from the system, so even if you never create a note yourself, you'll see notes from (System) for almost all policies.
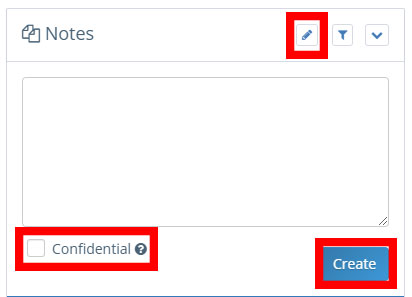
Click the create a note button to begin a new note. Check the Confidential box if no one but you should be able to see this note. Click Create to save your note.
Financial
This tab stores the client's financial information as entered and saved in the quote path, or via a manually entered quote or policy. You can view the client’s total income, family needs, assets, liabilities, and more. You have the ability to make changes to the client’s saved financial information here. Click the field you need to update, make the necessary change, and scroll to the bottom of the window to click Save Changes.

Health/Underwriting
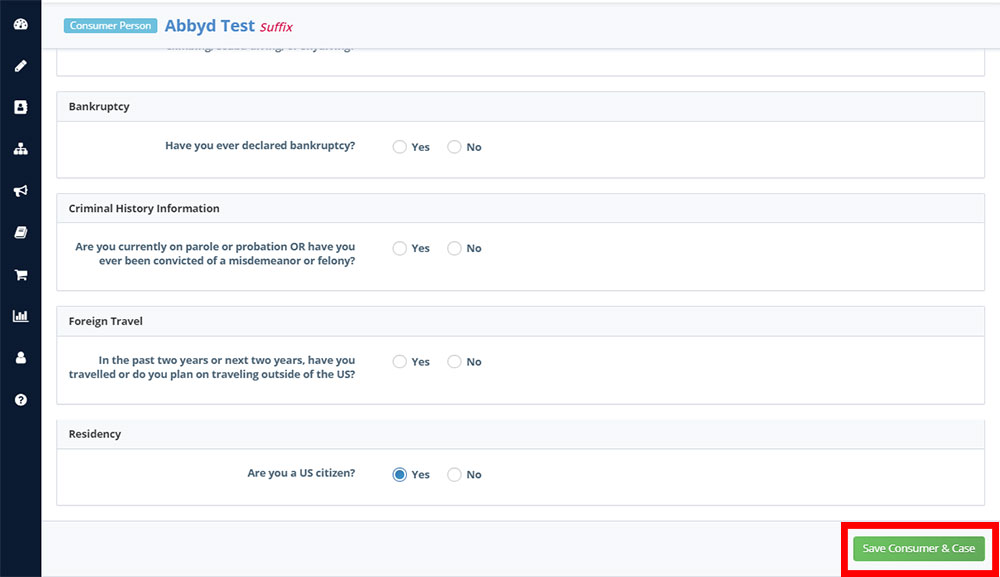
This tab stores the client's health and underwriting information as entered and saved in the quote path, or via a manually entered quote or policy. You can view the client’s health history, lifestyle responses, and more. You also have the ability to make changes to the client’s saved health information here. Click the field you need to update, make the necessary change, and scroll to the bottom of the window to click Save Consumer & Case.
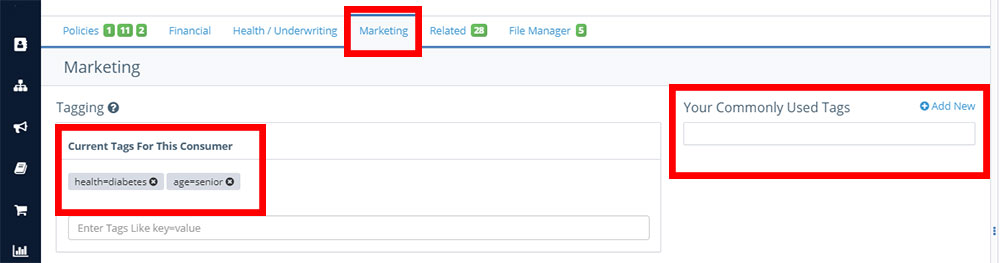
Marketing
This tab stores the marketing data that pertains to this consumer. This data comes in two forms: tags and campaigns.
Tags
Tags are useful for storing tidbits of information like the following: where you acquired a client, what their health conditions are, or other classifications you need to market to them effectively. For example, health-related tags are particularly useful. Tags such as “diabetes,” “high risk,” “heart disease,” etc. can make it easy to send targeted communication to this client based on his or her coverage needs. You can add new tags here, too. The system will display a list of your commonly used tags - to apply one of these to the client, just click the tag. To add a brand-new tag, click +Add New.
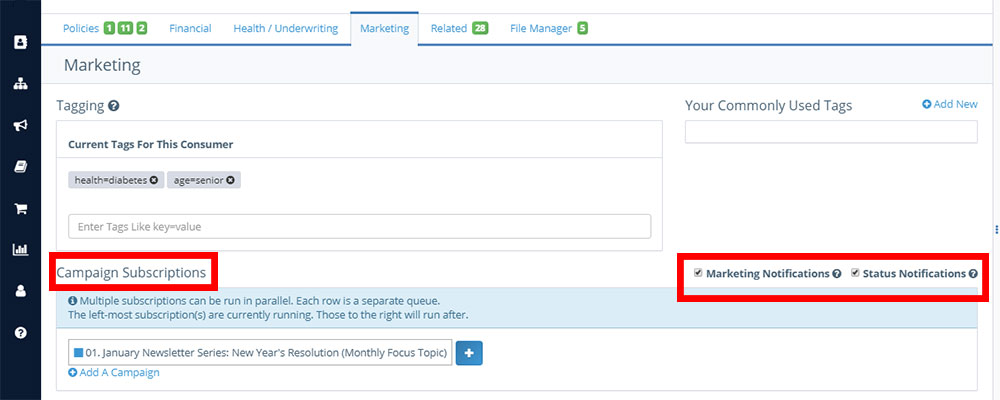
Campaign Subscriptions
The campaign subscription section is where you manage the consumer's subscription preferences, as well as enroll them in marketing campaigns.
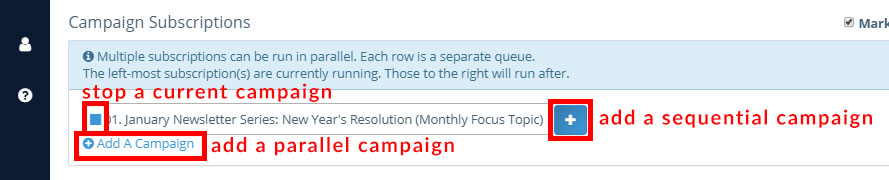
- Campaign Subscriptions: Here, you can see any marketing campaign subscriptions this consumer is currently enrolled in, or enroll them in a new campaign you've created. Want to stop an active campaign? Click the blue square to the left of any campaign name. By default, all consumers will receive status update emails during the application process, and any marketing emails you choose to send once their policy is in force. The two opt-out checkboxes allow you to remove this consumer from status update notifications and all marketing emails, should that be necessary. All emails sent through Insureio also have unsubscribe links, but should a client be unable to use them and communicate a preference to you in person, this is where you'd unsubscribe them.
- Adding Campaigns: There are two ways to add a consumer to a campaign, depending on how you want that campaign to run. If there are no active campaigns, click Add a Campaign, then click Select A Campaign and choose the appropriate campaign from the list provided. If the consumer is already enrolled in a campaign, you can choose whether you want the next campaign to run at the same time (in parallel) or in sequence (campaign 2 won't start until campaign 1 has finished). The default is to start campaign 2 after campaign 1 finishes. To add a sequential campaign: click the blue + button to the right of any existing campaign. To add a parallel campaign: Click +Add a Parallel Campaign.
- Completed Marketing Communications: This will show you a complete list of marketing communications sent to this client.
Related
Insureio gives you the ability to indicate relationships among consumers in your database. This is ideal for indicating relationships among blended or extended families, or clients who referred one another to you. Any related consumers will be displayed in this tab. (Note: If you've added a related consumer and indicated he/she is a spouse using the dropdown menu to assign a relationship, the spouse's name will display in the "Spouse" field in the client's profile.) You can add a new related consumer using the dropdown menu - choose whether to connect an existing consumer or add a new one.

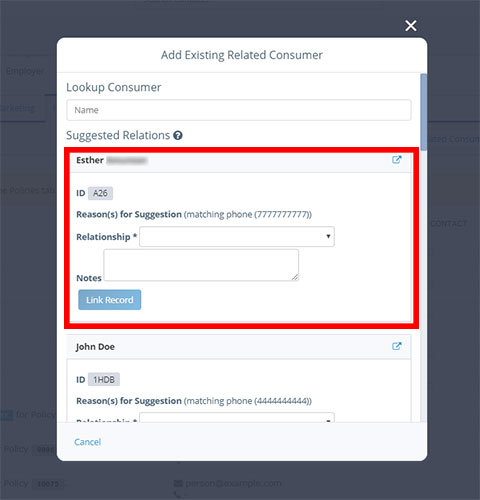
- Adding an Existing Consumer as a Related Consumer: Choose Add Existing Related Consumer from the Add Related Consumer dropdown menu. In the Lookup Consumer text box, start typing the existing consumer's name. Insureio will offer suggested relations under the text box. Select the correct name, then use the dropdown menu to indicate the relationship between these two consumers (mother, spouse, business partner, etc. - the menu gives you 23 different relationship options). Add any notes (optional), then click the blue Link Record button.
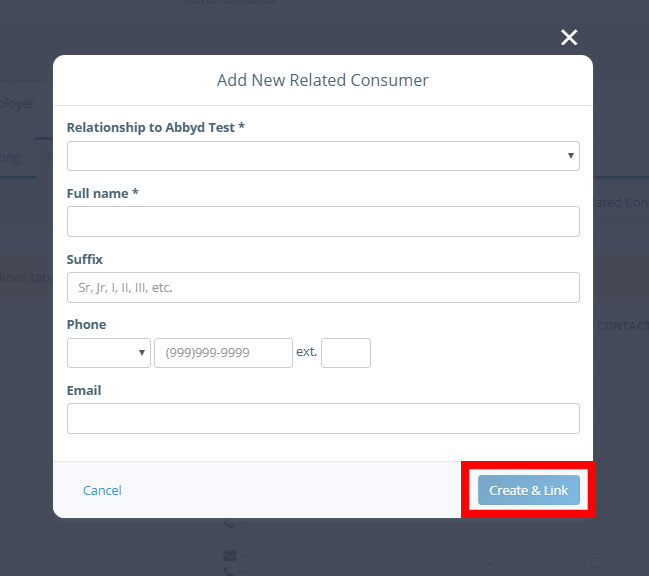
- Adding a New Consumer as a Related Consumer: Choose Add New Related Consumer from the Add Related Consumer dropdown menu. Use the relationship dropdown menu to indicate the existing consumer's relationship to the client (mother, spouse, business partner, etc. - the menu gives you 23 different relationship options). Type the new consumer's full name (required), and if you have the info, fill in the phone number and email address (optional). Click Create & Link to create the new consumer record and link it to your existing client.
- Critical: Use this to designate notes that must be seen every time you or someone on your team views a contact's profile. Critical notes will appear in a pop-up window every time you access this record, as well as display with a red triangle notification in the Notes field. You can use this field to remind yourself how a client likes to be addressed or contacted - including things not to say or do when contacting this client. Have a note that's no longer critical? Click the red triangle notification to remove the "Critical" designation. This will create a date and time stamp at the bottom of the note that looks like this: *Was marked as no longer critical by User Name (id:#) at date. You can't make a note critical again, so only do this if you're sure. If you do this by accident, you'll have to create a new note and mark it as critical.
- Confidential: Use this to make sure a note is visible only to you. For example, if you have team members or admins who also access consumer profiles, you can use the Confidential feature to keep a note from displaying for them.
- Personal: Use this to designate notes that are personal in nature. Keep in mind that they will display to all system users who access this contact's profile - they aren't confidential. You can use this field to record where you met the client, the client's kids’ names, or other information that may help personalize communications. In the notes field, personal notes are marked with a green person icon.
- Mark a task as complete: Click the Done box.
- Suspend a task: Click the Suspend box.
- Reassign a task: Click the name of the user currently assigned to the task. Start typing the user's name or Insureio user ID number. Choose the appropriate name from the list Insureio presents to assign them this task. NOTE: Tasks assigned to the system (like sending emails associated with a particular status) cannot be reassigned.
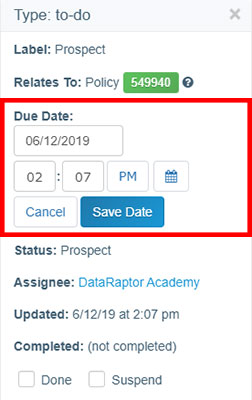
- Change a task due date: Click the blue date. Change the due date manually, or click the calendar icon at right. Click the Save Date button to save your change, or click Cancel to discard your change.
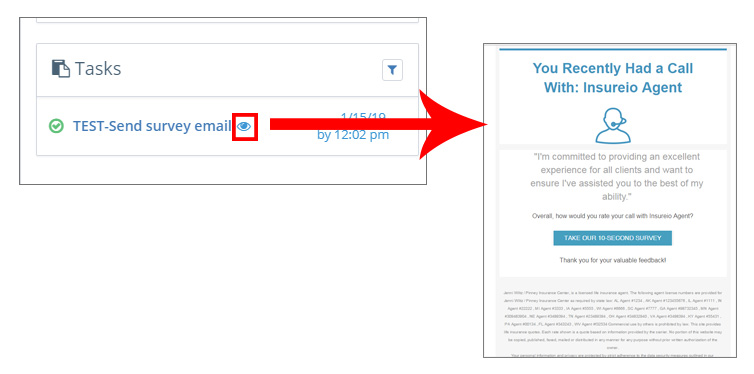
- Email tasks: If a task was to send an email, you'll see an eye icon next to the task title. Click the eye to see the email that went out to the client. NOTE: If Insureio was unable to send the email, you'll see a red exclamation point. Hover over the exclamation point to see what happened. Insureio will show you a message like this: "This message failed X times. For details, check your warning emails for task 1234 and task 5678." Those system emails will give you more information about why an email didn't send and how to fix it.
File Manager
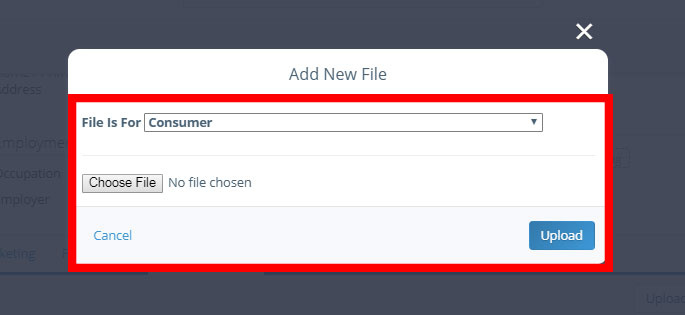
The File Manager is located in the row of tabs beneath the consumer's personal information. Here, you can upload documents to a contact's profile for future reference. Files are stored in relation to the the consumer in general, or to a specific policy. The system automatically creates a container for pending and in force policies. To upload a document, click Upload File.
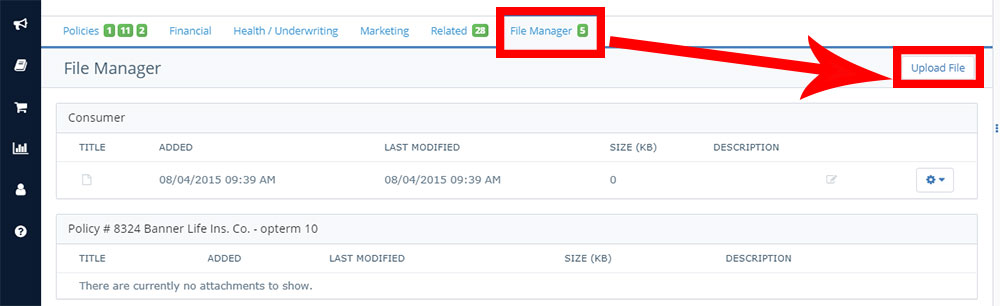
Select what the file is for (the consumer, or a particular policy). Next, select the file you want to upload and click Upload.
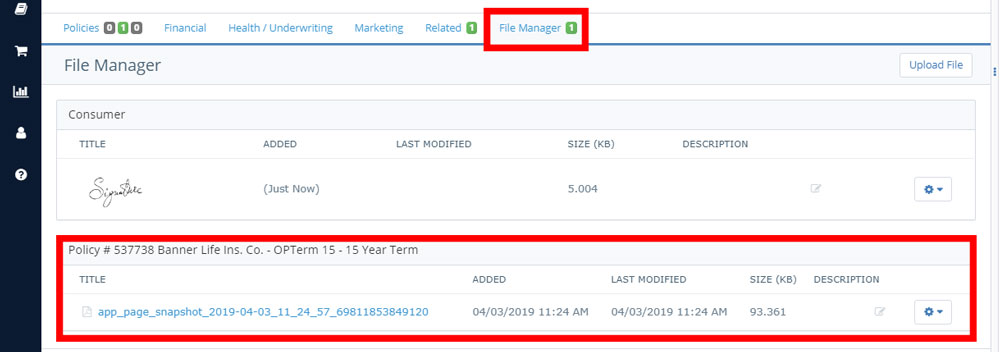
NOTE: See a document you didn't upload? The system auto-generates a screenshot of each policy application. It's stored beneath the appropriate policy in the File Manager.
Notes
All notes are stored in the vertical column on the right side of the consumer profile. When you click into a profile, all notes will be displayed. If nothing displays, that means there are no notes for this consumer. Notes include manual notes that you or a team member have created or uploaded about this consumer, as well as system-generated notes that indicate changes made (status changes, for example). Notes display with an icon indicating their type (more on this below) and the profile picture of the user who created the note.
There are three icons on the upper-right side of the notes panel: create, filter, and expand.
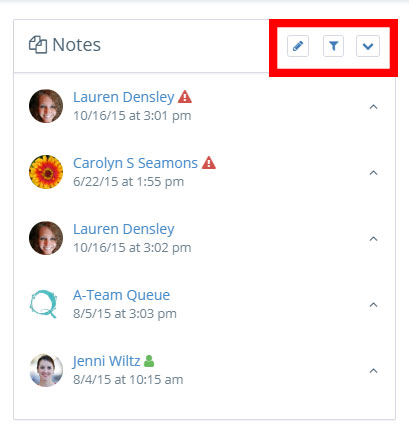
Create New Note
Click the pencil icon to create a new note. You can also label the note as "Critical," "Confidential," or "Personal" using the checkboxes below the note entry field. Click Create to save your note.
Filter Notes
The blue filter icon lets you toggle between note types: view all, view only critical, view only personal, or view only confidential. Click the type you want to see. To undo or change the filter, click the filter icon again and make a new selection.
Expand Notes
Click the dropdown arrow on the right to expand all visible notes and view their full contents.
Back to topTasks
All tasks connected to a contact are stored in the tasks pane, beneath the notes. When you click into a profile, all open tasks will be displayed. If no tasks display, there are no open tasks for this contact; there may be closed tasks, which do not display automatically. Tasks are displayed from oldest to newest. Tasks include tasks you create manually, as well as system-generated tasks associated with a particular status, such as an email to the client or a reminder to follow-up.
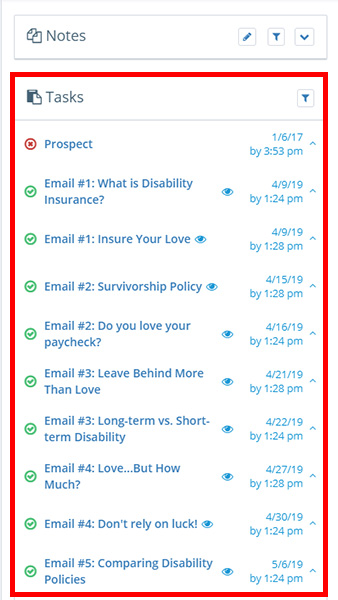
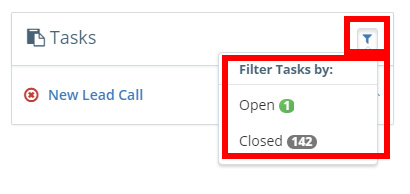
Filter Tasks
The blue filter icon lets you toggle between task types: view open or view closed. Click it, and you'll see the number of each type of task available to view.
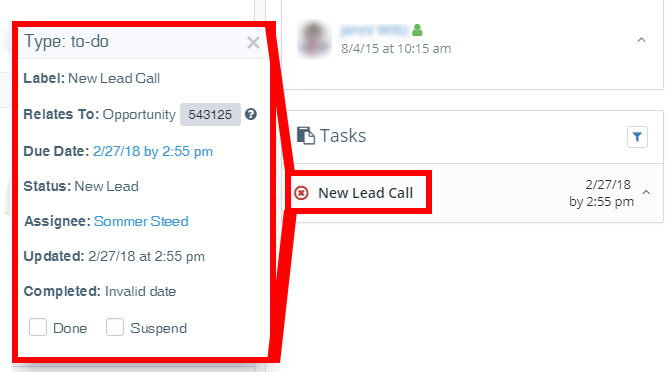
View Task Details
Click the task name to view its details. Any blue fields are clickable and editable.