LAST UPDATED: 5/6/22
Policy Status Rules: An Overview
Every policy (or case) in Insureio is driven by a status. When a policy's status is changed, that change can trigger a set of automatic reactions, such as to-do items for yourself, your employees, or automated messages via text or email that will be sent to you and/or your client(s) at the appropriate time(s). These reactions are called tasks. You can also add a task to the end of a status to auto-advance that policy into another status. A status can have any number of associated tasks, spread out over any period of time you wish. We've pre-built most of the status rules you'll ever need - in fact, most users won't need to add their own rules at all.
Jump to a section:
Overview
Viewing a Status Rule's Tasks
Setting Your Initial Status
Using Global Status Rules
How to Change a Client's Status
Policy Status Rules: An Overview
We've already created most, if not all, of the status rules you're likely to need. These are called global status rules, and they're visible to every Insureio subscriber. All status rules are displayed, created, and stored in the Agency Management section. Together, these rules dictate what happens as you (and our application fulfillment partners) work to put a policy in force.
NOTE: A status's visibility setting (global, user, or user and descendants) is what allows that status to be seen and applied to a consumer or policy. Statuses are applied regardless of brand. In other words, you do not need to own a status in order for a task within that status to apply your branding information in emails or text messages that go out to a consumer. If a status is visible to you, no matter who created it, you may use it and any tasks within that status will fire with the brand information associated with the consumer.
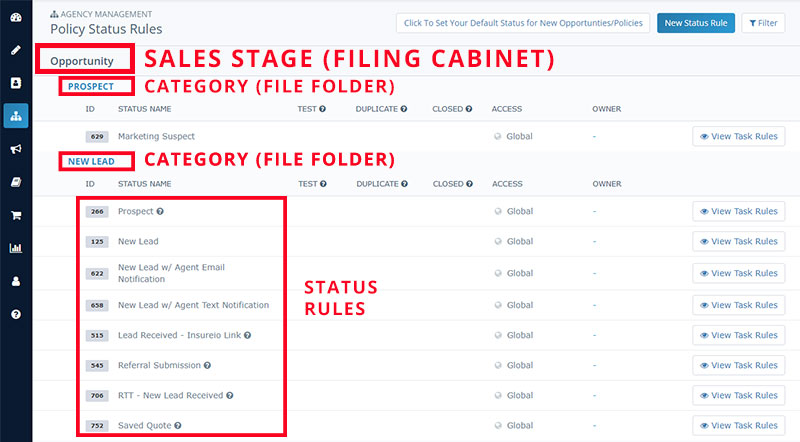
To view your policy status rules, click Agency Management in your left-hand main menu. Click Policy Status Rules.
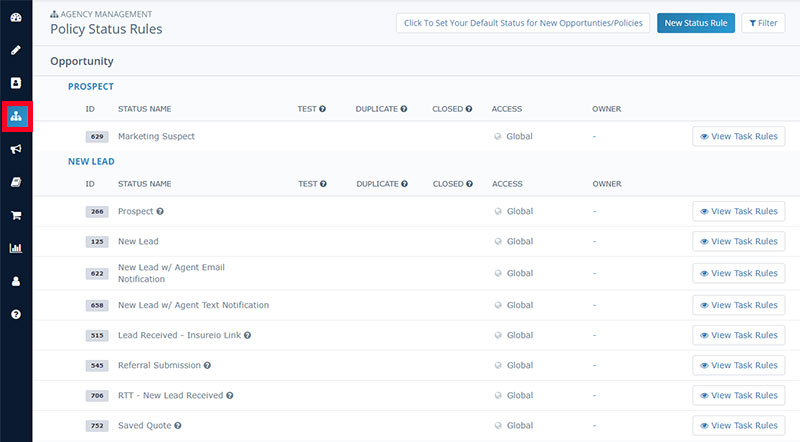
Status rules have two layers of organization: Sales Stage and Category. Think of these as a filing system. Every status rule is placed in a folder - that's the Category. Category folders are then placed in the appropriate filing cabinet - that's the Sales Stage. Together, this filing system represents the process of taking a prospect through the buying process.
Here's how this filing system looks on your Policy Status Rules screen:
- Sales Stages represent parts of the buying process:
- Opportunity - a prospect has expressed interest in a policy, usually by getting a quote
- Contacted - you have made contact with the client, but they have not yet submitted an app
- App Fulfillment - our app fulfillment partners handle this part of the process for you; that's why you won't see any categories or status rules here. You'll always be able to see cases that are in this sales stage - that's visible to you in the client record and policy details.
- Submitted to Carrier - our app fulfillment partners handle this part of the process for you; that's why you won't see any categories or status rules here. You'll always be able to see cases that are in this sales stage - that's visible to you in the client record and policy details.
- Completed - the policy is in force, the client has withdrawn, or the case has been closed.
- No Stage Indicated - a catch-all category for statuses that don't fit any of the above stages
- Categories represent actions and communications that you (and our application fulfillment partners) will take as you move a consumer through the Sales Stages listed above. For example, as shown in the image above, the global policy status rules for the Opportunity sales stage are:
- Prospect - default initial status for all cases whose agent and branding profile do not have an initial status set. The only task associated with this status rule is a to-do that will appear on your dashboard, letting you know you have a new opportunity.
- New Lead - We recommend you set one of the available statuses in this category as your branding profile's initial status. There are several tasks associated with the statuses in this category, including a to-do task that will appear on your dashboard, and an automated email introducing you to your new lead. For example, if you select New Lead w/Agent Email Notification, every new lead you receive will get an automated introductory email, you'll get an email, and you'll be prompted to call them through a to-do task on your dashboard.
- Attempting Contact - status associated with a lead you're in the process of contacting. The tasks associated with this status indicate how hot that lead is (hot, warm, cool). There are also tasks here that indicate what to do when a lead turns out to be bogus, has an invalid phone number, or does not respond.
Most of your work in Insureio will happen in the Opportunity and Contacted sales stages. Our application fulfillment partners handle the rest.
Viewing a Status Rule's Tasks
To see which tasks are triggered by a particular status, click View Task Rules to the right of the status name:

As an example, here are the tasks for the New Lead status:

At a glance, you can see that changing a policy's status to New Lead triggers two tasks:
- The system sends an email to your prospect using the template New Lead, Agent Intro.
- The system adds a to-do to your dashboard reminding you to call that lead.
NOTE: You may see some statuses that end with a "change status" task. This means the customer will automatically be moved into the next designated status when that task fires. If there are any remaining non-evergreen tasks in the status sequence, they will be skipped. If you want to build your own statuses and use this feature, you can learn more about it here.
You can learn more about a task by looking at the following elements:

- Name - our global tasks have descriptive names, telling you what happens during that task
- Type - is this task an email, to-do, SMS text message, etc.? If the task type requires a template, it will be indicated below the task type. Click the template name to preview that template in a new tab.
- Assignment Role/User - if the task must be completed by a particular user other than yourself or the system, it's indicated here. Automated emails are assigned to the system; to-do items are assigned to the agent.
- Delay - how long after a case is put into this status should this task fire? If the task is set to skip weekends and holidays, it will be indicated here.
- Evergreen - should the task remain on your dashboard until it's manually removed?
Setting Your Initial Status
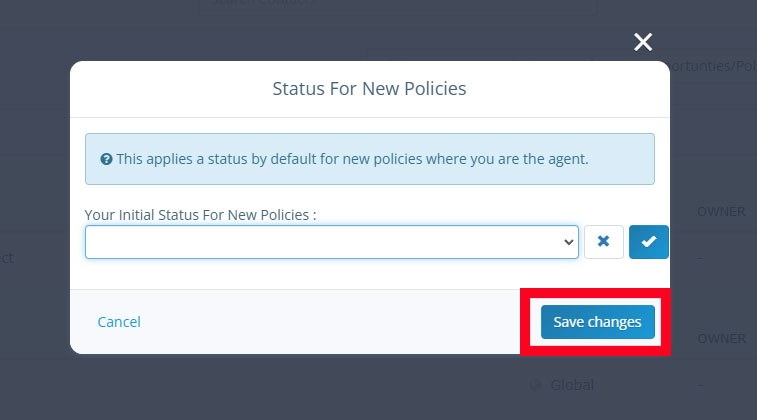
As we mentioned above, the default status for all new policies is Prospect, which will generate a to-do item on your dashboard. However, for a better consumer experience, we recommend you change this to New Lead, which ensures every lead will get an email introducing you as their agent. There are multiple ways to set your initial status, such as using the Branding tab in the My Account section. For this tutorial, we'll show you how to do it in the Policy Status Rules section.
At the top of the Policy Status Rules screen, click the button that says Click To Set Your Default Status for New Opportunities/Policies.

Choose the initial status you want to set from the dropdown menu. We recommend New Lead w/Agent Email Notification or New Lead w/Agent Text Notification.

Click the blue Save changes button.
Using Global Status Rules
As we mentioned earlier, most users use our global status rules. These rules create a workflow that's been refined over 15 years and tens of thousands of cases.
If you're a new Insureio user, what should you do in order to use our global status rules?
- Set your brand profile's initial status, if you haven't already (see above).
- Browse the available statuses in the Attempting Contact sales stage, shown below. While you're attempting to reach a new lead, these are the statuses you'll use.

- Browse the available statuses in the Contacted sales stage, shown below. You can use these statuses to indicate the progress you've made after making initial contact. If the client isn't interested or is uninsurable, select the appropriate status available in Not Quoted to close their file (Withdrawn - Not Interested - No Quote or Withdrawn - Uninsurable). If you're able to quote the client, select the appropriate status available in Quoted to either close their file (Withdrawn - Quoted - No Response or Withdrawn - Not Interested - Quoted) or indicate that you quoted the client and are working towards getting them to take further action (Contact Made - Quoted).

- Made contact and ready to move forward? Here are your options:
- Ready to submit an app? Change the policy's status to Submit to App Team and our application fulfillment partners will take it from there. This option is also available at the end of the quote path. NOTE: By popular demand, we're working on alternate submission methods that don't include our application fulfillment partners. For now, this is the best and easiest way to submit an app in Insureio, but look for this option to be updated soon!
- Want to refer the lead to our app fulfillment partners to complete the sale and process the app on your behalf? Change the policy's status to Submit to App Team and our application fulfillment partners will take it from there. This option is already available at the end of the quote path.
- Lead not interested, or provided bogus contact info? We've covered the available statuses that close a case above. You can also change a status in the client record as described below.
How to Change a Client's Status
- You can change a status in the client record. This is also where you can check the status of a policy you've already submitted to our application fulfillment partners. To access any client record, either type the client's name into the search bar at the top of your screen or select Contacts Management from your left-hand main menu and use Advanced Consumer Search.
- In the client record, scroll down to the Policies tab and click to open the appropriate policy.
- Use the policy status dropdown menu to select the appropriate status.

Keep in mind that you'll see our app fulfillment partner's custom statuses appear within your case as they process the application. However, you won't see those statuses on your Policy Status Rules screen since they're the only ones who can apply those statuses. You don't need to build or modify any statuses for the processes that happen after you send a case to our partners for application completion and exam ordering. You'll be notified at every step of the way with tasks that automatically appear on your dashboard. They'll even put the case in-force for you. If you want to do any post-in-force marketing, that's up to you - and it will be handled through the Marketing section.
Want to learn more about status rules?
Our global status rules can't be edited. If you want to make a change, you may create a new status rule and associated tasks: Creating a New Policy Status Rule
Learn how to use the "change status" task type to auto-advance from one status to another: How to Auto-Advance a Status