LAST UPDATED: 10/6/21
Email Configuration
Located in the My Account section, the Email Configuration tab is where you'll connect your Insureio account to your email account in order to send status and marketing emails to your clients and prospects. Keep in mind that Insureio is not an email provider - all client emails sent via Insureio will be sent using your business or personal email account.
Email configuration is one of the three steps required to set up your account: fill out your personal information, set up your brand, and configure your email. In this article, we'll cover email configuration for a variety of email providers (Office 365, Yahoo, Gmail, etc.). Still need to do the other steps? Here are the links for your reference:
- Step 1: Fill out your personal information.
- Step 2: Set up your brand.
- Step 3: Configuring your email.
Configure Your Email
All emails sent by Insureio on your behalf are sent through your email server, not Insureio's email server. Insureio uses a process called SMTP (simple mail transfer protocol) to send these messages through your email account.
NOTE: Like consumer records, email configurations are associated with a particular brand. Insureio chooses the SMTP configuration appropriate for the chosen brand based on the domain of the brand's primary email. For example, if you create an email task that relates to a consumer record, the system will send that email using the configuration associated with that consumer's brand. If you send an email to yourself for testing purposes, the system will choose your default brand's email configuration.
If you're using one of the most popular email providers (Office 365, Outlook, Hotmail/Windows Live, Gmail, or Yahoo), we've done a lot of the configuration work for you. If you're using a different email provider, you'll need to fill in some of those details yourself. We'll walk you through the whole process below.
Click one of these links to get started:
- I use Office 365, Outlook, or Hotmail/Windows Live
- I use Yahoo
- I use Gmail
- I use a different email provider
Setting Up a New Email Account: Office 365, Outlook, or Hotmail/Windows Live
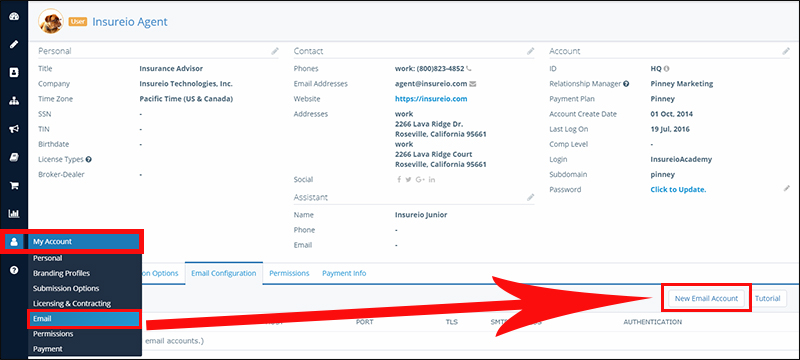
- Click My Account and then Email in your left-hand main menu.
- Click the New Email Account button on the top right of the Email Configuration tab.
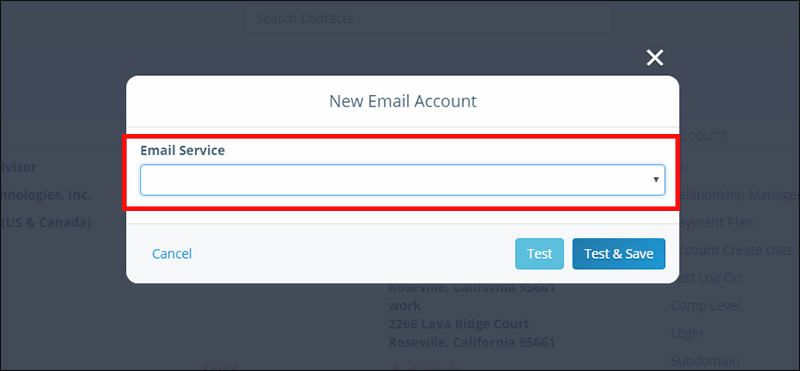
- Select your current email provider from the choices in the dropdown menu.
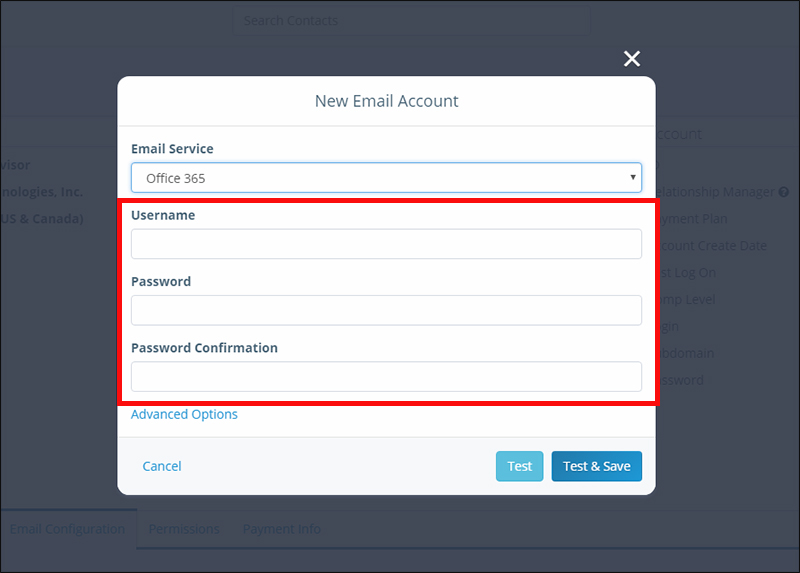
- Enter your username (usually your email address), password, and password confirmation.
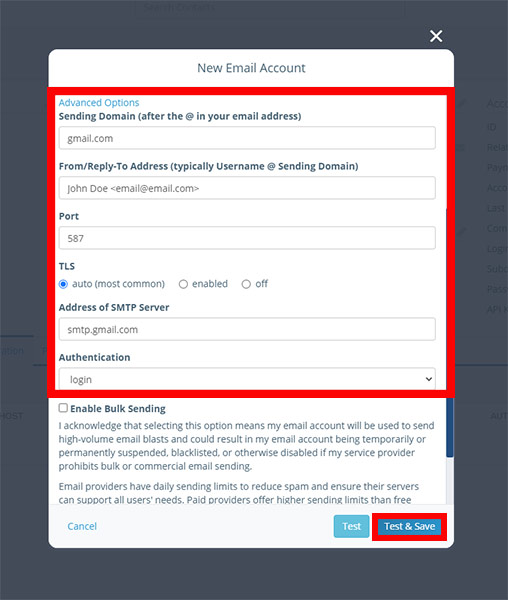
- Click the Advanced Options link - it's beneath the text boxes where you filled in your username and password. Use the scroll bar on the right side of the window to see all the available options.
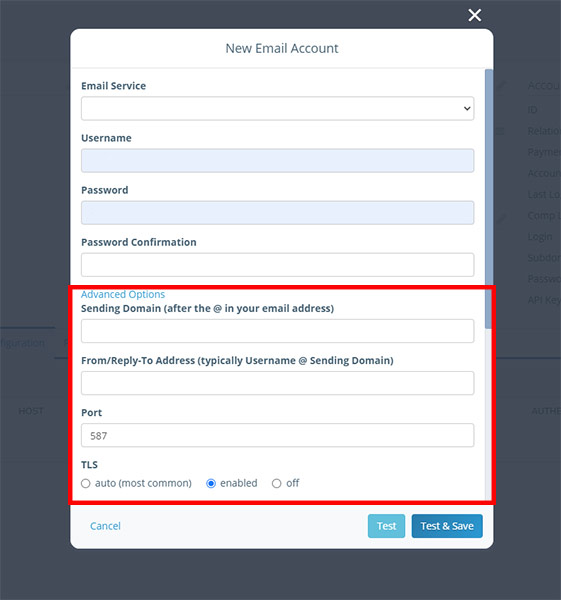
- Enter your From/Reply-To Address. If you want a custom display name to appear in your recipient's inbox, include that display name here, followed by your return email address in angle brackets, as shown below:

- Find the TLS setting. We've discovered that Outlook tends to work best when we change one of these settings now. Change your TLS setting from the default to auto (most common).
- Are you planning on using your email account for bulk email sending? If so, you'll need to enable this feature by checking the box shown below:

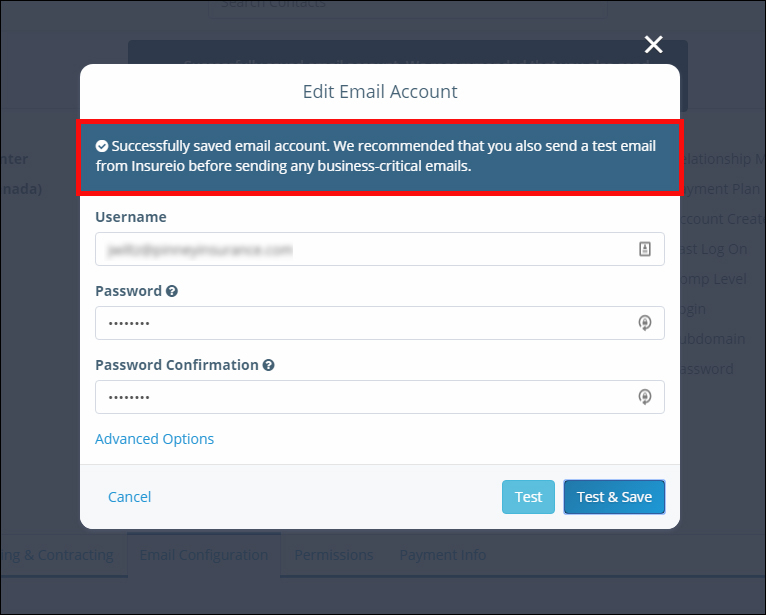
- Click the blue Test & Save button.

- Check the system notifications at the top of your screen as the test progresses. If you see a success message, you're done! Your settings are correct and no further action is required.
NOTE: The above message won't stay on the screen forever. If you miss it and need to double-check the status of your email configuration, click the bell icon to read the saved alerts: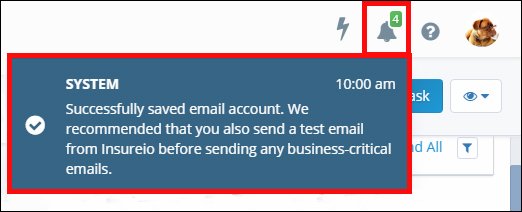
TIP: Want to send a test email to yourself to double-check your settings? Head to the Marketing / Marketing Templates section, choose any of the available email templates, and click Email Self.
Got an error message instead of a success message?
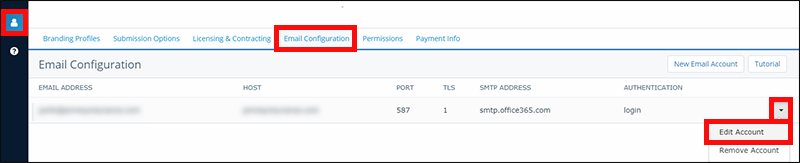
- Return to the Email Configuration tab (My Account / Email Configuration).
- Select Edit Account from the dropdown menu to the right of your email address.
- Click the Advanced Options link - it's beneath the text boxes where you filled in your username and password.
- Check the list of email account settings provided. Insureio filled in some of these for you automatically, but email providers update their details from time to time. It's possible one of our auto-filled settings isn't working anymore. Let's double-check these one by one.
- The first blank is easy - just fill in your sending domain (this comes after the @ in your email address).
- Do a Google search to find the rest of your email provider's settings. You'll probably find all of these settings with your first search, as the information is often presented together. Just in case, here's what to look for to find each of the missing pieces of information. Be sure you replace [your email provider] with the actual name of your email provider.
- Port: Google the following phrase: smtp port setting for [your email provider]
- This will be a 2- or 3-digit number. Enter it into the text box.
- MSN users: if you tried port 465 and it didn't work, try port 587.
- Hotmail users: the port number for a Hotmail account is 25, not 587.
- TLS: Google the following phrase: smtp tls setting for [your email provider]
- If TLS IS required, select "enabled" in Insureio.
- If TLS IS NOT required, select "off" in Insureio.
- MSN users: use "auto."
- Address of SMTP Server: Google the following phrase: smtp server address for [your email provider]
- Examples: smtp.emailprovider.com or smtp-mail.emailprovider.com
- MSN users: try smtp.live.com
- Authentication: Google the following phrase: smtp authentication method for [your email provider]
- Most providers use "login," but other choices are "plain," "gssapi," "digest-md5," "md5," or "cram-md5" - confirm the method your provider uses, then select it from the dropdown menu in Insureio.
- MSN users: use "login."
- Most providers use "login," but other choices are "plain," "gssapi," "digest-md5," "md5," or "cram-md5" - confirm the method your provider uses, then select it from the dropdown menu in Insureio.
- Port: Google the following phrase: smtp port setting for [your email provider]
- Repeat the process above starting with Step #5 (click the blue Test & Save button).
Still didn't get a success notification?
One or more of the settings above still needs to be changed. First, double-check your sending domain and server address for typos. If they're both correct, try changing the TLS setting and re-running the test.
If this still doesn't work, revisit steps 1-6 in the "error message" instructions above. Sometimes online sources become outdated, or email providers change things like port numbers. Consulting a different article in your Google search results may give you a better answer.
You may also be able to contact your email provider's support staff to get the correct information from them.
Setting Up a New Email Account: Yahoo
NOTE: We're aware that the Yahoo security settings have changed recently - we'll be updating these instructions shortly!
- In the My Account / Email Configuration tab, click the New Email Account button.
- Select Yahoo as your current email provider in the dropdown menu.
- Enter your username (usually your email address), password, and password confirmation.
- Click the Advanced Options link - it's beneath the text boxes where you filled in your username and password. Use the scroll bar on the right side of the window to see all the available options.
- Enter your From/Reply-To Address. If you want a custom display name to appear in your recipient's inbox, include that display name here, followed by your return email address in angle brackets, as shown below:
- Click the blue Test and Save button. This will generate a system error - but don't worry! Insureio is ready to talk to Yahoo, but Yahoo isn't ready to talk to Insureio yet. We'll fix that in the next step.
- Log in to your Yahoo account.
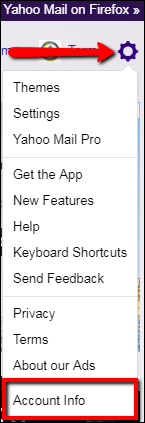
- Find the settings icon and click Account Info.
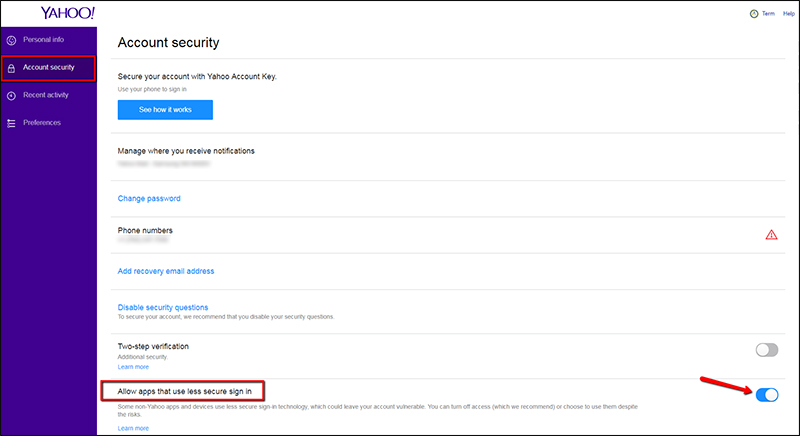
- Click the Account security tab.
- Find the Allow apps that use less secure sign in setting. Click the toggle to turn this setting on.
- NOTE: If you have two-step verification turned on for your Yahoo account, you'll need to generate and use an "app password" so Insureio can access Yahoo Mail. Here's how to do that:
- Access your Account Security page (you're probably already here, if you're following the above step).
- Click Generate app password or Manage app passwords.
- Choose Other App from the dropdown menu and click Generate.
- Follow the instructions below the password.
- Click Done.
- Use this app password and your email address for Insureio's email configuration.
- NOTE: If you have two-step verification turned on for your Yahoo account, you'll need to generate and use an "app password" so Insureio can access Yahoo Mail. Here's how to do that:
- Return to the Insureio email configuration set-up screen. Repeat steps 1-4 listed above.
- Are you planning on using your email account for bulk email sending? If so, you'll need to enable this feature by checking the box shown below:
- Click the blue Test & Save button.
- Check your system notifications at the top of your screen to see how the test turned out - if you see a success message, you're done! Your settings are correct and no further action is required.
NOTE: The above message won't stay on the screen forever. If you miss it and need to double-check the status of your email configuration, click the bell icon to read the saved alert:
Got an error message instead of a success message?
- Return to the Email Configuration tab (My Account / Email Configuration).
- Select Edit Account from the dropdown menu to the right of your email address.
- Click the Advanced Options link - it's beneath the text boxes where you filled in your username and password.
- Check the list of email account settings provided. Insureio filled in some of these for you automatically, but email providers update their details from time to time. It's possible one of our auto-filled settings isn't working anymore. Let's double-check these one by one.
- The first blank is easy - just fill in your sending domain (this comes after the @ in your email address).
- Do a Google search to find the rest of your email provider's settings. You'll probably find all of these settings with your first search, as the information is often presented together. Just in case, here's what to look for to find each of the missing pieces of information.
- Port: If you tried port 465 and it didn't work, try port 587. Otherwise, Google the following phrase: smtp port setting for Yahoo
- This will be a 2- or 3-digit number. Enter it into the text box.
- TLS: Google the following phrase: smtp tls setting for Yahoo
- If TLS IS required, select "enabled" in Insureio.
- If TLS IS NOT required, select "off" in Insureio.
- Address of SMTP Server: Google the following phrase: smtp server address for Yahoo
- Examples: smtp.emailprovider.com or smtp-mail.emailprovider.com
- Authentication: Google the following phrase: smtp authentication method for Yahoo
- Most providers use "login," but other choices are "plain," "gssapi," "digest-md5," "md5," or "cram-md5" - confirm the method your provider uses, then select it from the dropdown menu in Insureio.
- Port: If you tried port 465 and it didn't work, try port 587. Otherwise, Google the following phrase: smtp port setting for Yahoo
- Repeat the process above starting with Step #10 (click the blue Test & Save button).
Still didn't get a success notification?
One or more of the settings above still needs to be changed. First, double-check your sending domain and server address for typos. If they're both correct, try changing the TLS setting and re-running the test.
If this still doesn't work, revisit steps 1-6 in the "error message" instructions above. Sometimes online sources become outdated, or email providers change things like port numbers. Consulting a different article in your Google search results may give you a better answer.
You may also be able to contact your email provider's support staff to get the correct information from them.
TIP: Want to send a test email to yourself to double-check your settings? Head to the Marketing / Marketing Materials section, choose any of the available email templates, and click Email Self.
Setting Up a New Email Account: Gmail
Gmail is a bit more complicated than other email providers, but don't worry! We've got step-by-step instructions to help you through it.
NOTE: If you use Google Workspace (formerly G Suite), you will need to turn on comprehensive mail storage and enable SMTP relay before completing this step. Click here for instructions and complete both of these steps before proceeding. If the steps we provide below don't work, please contact Google support at https://workspace.google.com/support.
- In the My Account / Email Configuration section, click the New Email Account button.
- Select Gmail as your current email provider in the dropdown menu.
- Enter your username (the part of your email address that comes before @gmail.com), your password, and your password confirmation.
- Click Advanced Options.
- Change the Sending Domain to gmail.com.
- Change the From/Reply-To Address to your "from" email address. To display a name along with the address in a recipient's inbox, add the name and place the email address in angle brackets, as shown in the image below:
- Change the Port to 587.
- Under the TLS setting, select "auto."
- Change the Address of SMTP Server to smtp.gmail.com.
- Are you planning on using your email account for bulk email sending? If so, you'll need to enable this feature by checking the box shown below:
- Click the blue Test and Save button. This will generate a system error - but don't worry! Insureio is ready to talk to Gmail, but Gmail isn't ready to talk to Insureio yet. We'll fix that in the next step.
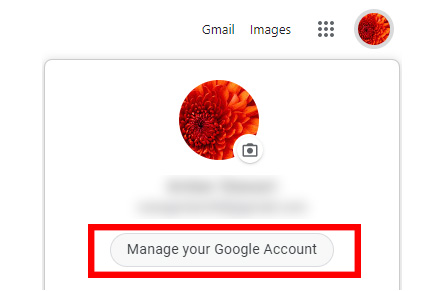
- Log in to your Gmail account.
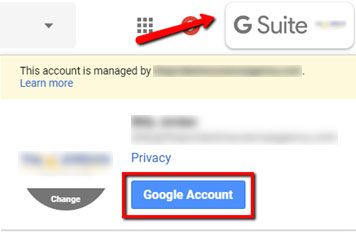
- Click Manage your Google Account.
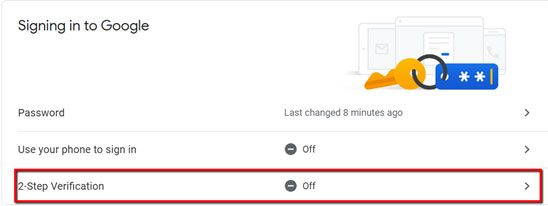
- Click Security on the left-hand side.

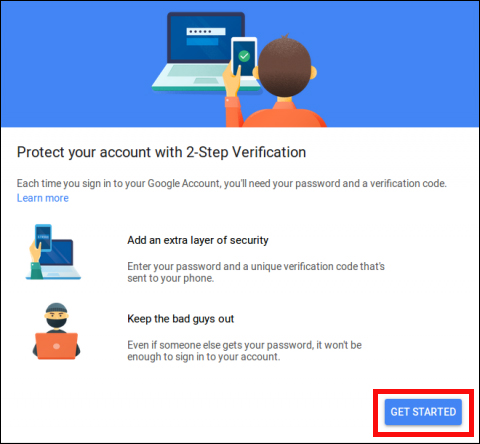
- Scroll down and click to set up a new sign-in method: 2-Step Verification.
- Click the Get Started button.
- Gmail will ask for your password again. Enter it to continue. To set up 2-step verification, Google will need to send you a verification code. Type in the phone number where you want to receive this code, and click Next.
- Check your device. Once you receive Google's verification code, go back to your computer and enter the code. Click Next.
- Now that Google has verified your Gmail password and your identity (using the verification code), you can enable 2-step verification. Click Turn on 2-step verification.
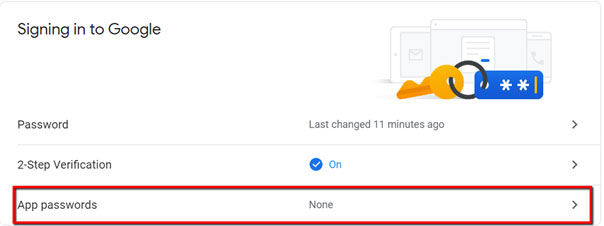
- From your left-hand menu options, click Sign-in & security under My Account. You'll see a new option called App Passwords - click this. This is where you can store and generate passwords for specific apps so you don't have to have your phone with you and receive a verification code every time you sign in.
- Google will ask you to enter your password again. Then they'll send another verification code to your device. Once you have the code, type it in and select Other from the dropdown menu of available apps.
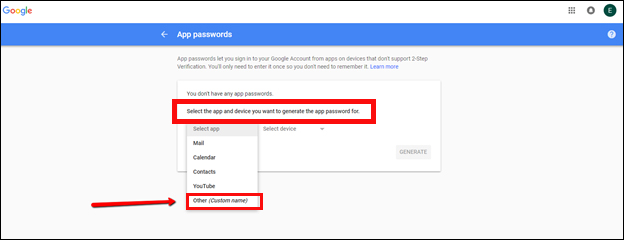
- Google will ask you to name the app you're adding to your permissions. Type in "Insureio" and click Generate. Google will give you a 16-character code that functions as a password just for Insureio. IMPORTANT! Be sure you keep a copy of this code. If you can't find it, you'll have to redo this process to generate another one.
- Return to the Insureio email configuration tab. Select Edit Account from the dropdown menu to the right of your email address.
- Enter the 16-character code from Google into the Password and Password Confirmation fields.
- Click Advanced Options. We changed these already, but it never hurts to double-check. Here's what they should be:
- Sending domain: gmail.com
- Port: 587
- TLS: auto
- Address of SMTP server: smtp.gmail.com
- Click the blue Test & Save button.
- Check the system notifications at the top of the window as the test progresses. If you see a success message, you're done! Your settings are correct and no further action is required.
NOTE: The above message won't stay on the screen forever. If you miss it and need to double-check the status of your email configuration, click the bell icon to read the saved alerts:
TIP: If you complete the above steps and your Gmail still doesn't receive the test message, Google may be blocking access from an unknown location. Go to http://www.google.com/accounts/DisplayUnlockCaptcha and click Continue. This will grant access for 10 minutes for registering new apps.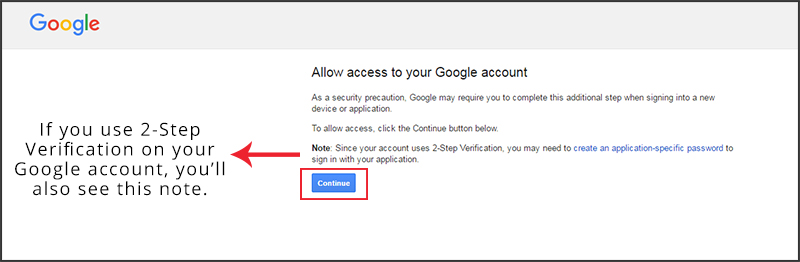
TIP: Want to send a test email to yourself to double-check your settings? Head to the Marketing / Marketing Materials section, choose any of the available email templates, and click Email Self.
Google Workspace (formerly G Suite): Turn on Comprehensive Mail Storage and Enable SMTP Relay Service
Step 1: Comprehensive Mail Storage
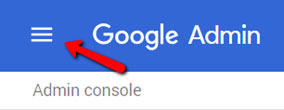
- Access your Google Admin console, located at https://admin.google.com. Not sure what this is or how to use it? Click here for Google's help.
- Sign in using an administrator account (does not end in @gmail.com).
- From the Admin console dashboard, go to Apps > G Suite > Gmail > Advanced settings (at the bottom of the Gmail page).
- On the left, select an organization. NOTE: If you only have one organization, there won't be a choice - you can skip this step.
- Scroll to the Comprehensive mail storage setting.
- Check the Ensure that a copy of all sent or received mail is stored in associated users' mailboxes box.
- At the bottom, click Save.
Step 2: Enable SMTP Relay
Still signed into your Google Admin console after completing the above step? Skip to step 4.
- Access your Google admin console. Sign in using your administrator account (does not end in @gmail.com).
- From the Admin console dashboard, go to Apps > Workspace > Gmail > Advanced settings (at the bottom of the Gmail page)
- On the left, select the top-level organization. You can only configure the SMTP relay service for the top-level organization.
- Scroll to SMTP relay service (you can also enter SMTP relay service in the search field):- If the setting is Not configured yet, hover over the setting and click Configure. If the setting is Locally applied, or Inherited, hover over the setting and click Edit or Add another to edit it or add a new setting.
- For each new setting, enter a unique description.
- In the Allowed senders section, select the users who are allowed to send messages through the SMTP relay service. Choose "only registered Apps users in my domain" - this means the sender must be a registered user in one of your domains.
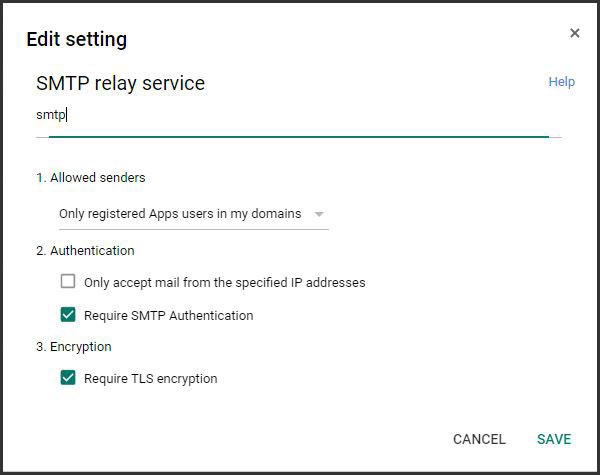
- In the Authentication section, check Require SMTP Authentication. This enforces the use of SMTP Authentication to identify the sending domain.
- In the Encryption section, check the Require TLS encryption box to require that the communication between your server and Google’s server be TLS encrypted, including the message contents.
- Click Add setting or Save to close the dialog box. Any settings you add are highlighted on the Advanced settings page.
- At the bottom, click Save. It can take up to an hour for changes to propagate to user accounts. You can track prior changes using the Admin console audit log. Here's what your settings summary should look like:

- Return to our Gmail configuration instructions and complete the process as described. Click here to go back to the top of the Gmail instructions.
Emails Sent Using Your Google Address Going to Spam?
If this happens, it's likely because Google continually changes and tightens their email security requirements without notice. Although this makes it harder for bad actors to use Gmail to send harmful messages, it also makes it harder for legitimate senders and services to get their emails to the desired recipients.
Google's suggestion is to do the following:
- Set up DKIM (Domain Keys Identified Mail). DKIM is a security setting to prevent third-party systems from “spoofing” an email address (pretending to be that address/sender) by adding a key pair (a private and public key) to your email settings. This essentially tells the internet world that it is really you sending an email with your domain name even though it's coming from a separate service with its own email address/domain (Insureio.com). Here is Google's Help Center article on how to do this.
- Add an SPF (Sender Policy Framework) record. An SPF record specifies which mail servers are allowed to send email for your domain. Without it, emails sent from your domain are more likely to be marked as spam.Here is Google's Help Center article on how to do this.
- Set up DMARC (Domain-based Message Authentication, Reporting & Conformance). DMARC is a universally accepted method for authenticating emails. It helps prevent others from sending emails that appear to be sent from your domain when they're not. DMARC also lets you receive reports on emails sent worldwide that either are - or appear to be - from your domain. This helps you spot problems early, in case someone is sending spoofed emails using your domain name. Here is Google's Help Center article on how to do this.
All of these are done through Google, your domain host, and DMARC - not Insureio. Adding all three as a best practice should improve the sending reliability and limit the times your emails are sent to spam.
Setting Up a New Email Account: Other Providers
- Click My Account and then Email in your left-hand main menu.
- Click the New Email Account button on the top right of the Email Configuration tab.
- Click Other from the choices in the dropdown menu.
- Enter your username (usually your email address), password, and password confirmation.

- Click Advanced Options.
- Enter your Sending Domain - this is what comes after the @ in your email address.
- Enter your From/Reply-To Address. If you want a custom display name to appear along with your return email address in a recipient's inbox, enter it here before the email address, and place the email address in angle brackets, as shown in the image below:
- Enter the port number. We've auto-filled a common port number, but it's still a good idea to double check.
- This will be a 2- or 3-digit number. If you don't know what it is, do a Google search for the following phrase: smtp port setting for [your email provider].
- Don't forget to replace [your email provider] with the actual name of your email provider.
- This will be a 2- or 3-digit number. If you don't know what it is, do a Google search for the following phrase: smtp port setting for [your email provider].
- Select the correct TLS setting.
- If your email provider DOES require TLS, select "enabled" in Insureio. If your email provider DOES NOT require TLS, select "off" in Insureio. If you don't know which is correct, do a Google search for the following phrase: smtp tls setting for [your email provider].
- Don't forget to replace [your email provider] with the actual name of your email provider.
- If your email provider DOES require TLS, select "enabled" in Insureio. If your email provider DOES NOT require TLS, select "off" in Insureio. If you don't know which is correct, do a Google search for the following phrase: smtp tls setting for [your email provider].
- Enter the address of the SMTP server.
- This will be something like smtp.emailprovider.com or smtp-mail.emailprovider.com. If you don't know what it is, do a Google search for the following phrase: smtp server address for [your email provider].
- Don't forget to replace [your email provider] with the actual name of your email provider.
- This will be something like smtp.emailprovider.com or smtp-mail.emailprovider.com. If you don't know what it is, do a Google search for the following phrase: smtp server address for [your email provider].
- Select the correct authentication method.
- This will almost always be "login," but there are a few other options in the dropdown menu. If you're not sure which to choose, do a Google search for the following phrase: smtp authentication method for [your email provider].
- Don't forget to replace [your email provider] with the actual name of your email provider.
- This will almost always be "login," but there are a few other options in the dropdown menu. If you're not sure which to choose, do a Google search for the following phrase: smtp authentication method for [your email provider].
- Are you planning on using your email account for bulk email sending? If so, you'll need to enable this feature by checking the box shown below:
- Click the blue Test & Save button.
- Check the system notifications at the top of the window as the test progresses. If you see a success message, you're done! Your settings are correct and no further action is required.
NOTE: The above message won't stay on the screen forever. If you miss it and need to double-check the status of your email configuration, click the bell icon to read the saved alerts:
TIP: Want to send a test email to yourself to double-check your settings? Head to the Marketing / Marketing Templates section, choose any of the available email templates, and click Email Self.
Didn't receive the test email in your inbox or your spam folder?
One or more of the settings above need to be changed. First, double-check your sending domain and server address for typos. If they're both correct, try changing the TLS setting and re-running the test.
If this still doesn't work, revisit steps 5-10. Sometimes online sources become outdated, or email providers change things like port numbers. Consulting a different article in your Google search results may give you a better answer.
You may also be able to contact your email provider's support staff to get the correct information from them.
Congratulations!
If you followed all three of the steps below, you're now ready to start using Insureio.
Need a recap?
- Step 1: Filling out your personal information.
- Step 2: Setting up your brand.
- Step 3: Configuring your email.
Don't forget - if you need help while using the system, you can call 866-795-4244 for support.