LAST UPDATED: 6/4/21
Lead Distribution
If you have a multi-agent office or call center, Insureio's lead distribution rules allow you to automate distribution among the agents on your team. If you import or purchase leads, you can distribute those leads to your agents once your Lead Import is set up.
Lead distribution requires you to have the correct permissions set for your agency, your brand, and the agents you want to receive leads. Once those are set up, you can create basic parameters that tell Insureio how to handle the types of leads you receive. You can then fine-tune each type's distribution among particular agents. You can also turn an agent's lead distribution on or off.
IMPORTANT: Do not skip the permissions set-up below. Many problems with lead distribution are caused by missing permissions, especially when you need to change the Agent of Record or reassign a case to a different agent.
Jump to a section:
Permissions: How to Find & Change Them
Permissions Set-Up
Brand Set-Up
Lead Distribution Set-Up: Basic
Lead Distribution Set-Up: Adjusting Parameters
Inactive Accounts and Lead Distribution
Permissions: How to Find & Change Them
1. Viewing, Changing, and Saving Your Permissions
Before you set up your lead distribution, let's get your agency's permissions set up. Any time you need to view, add, or save permissions, go to My Account/Permissions.
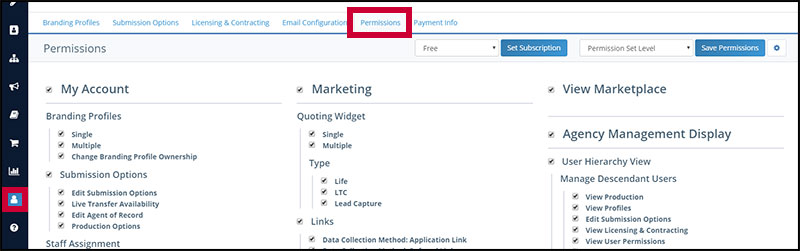
If you need to add a permission, check the desired box and click Save Permissions in the top-right of the Permissions tab.

2. Viewing, Changing, and Saving a Sub-User's Permissions
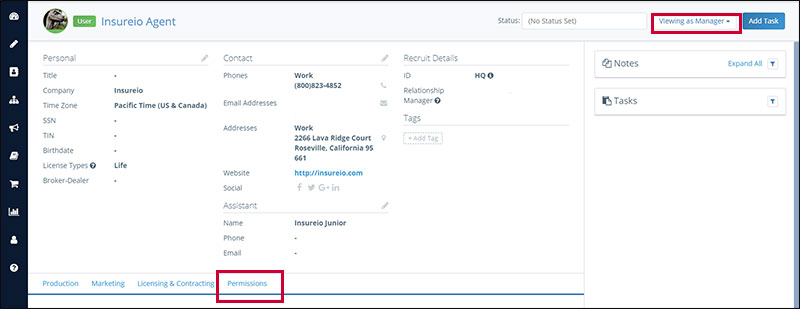
Need to manage a sub-user's permissions? You can access their profile as a manger. From your left-hand main menu, go to Agency Management/User Hierarchy. In your hierarchy, find the agent who should receive leads from your distribution. Use the search box at top-left if you need help finding them. Click the link icon, which allows you to view their profile as a manager.

In their profile, you'll see the Viewing as Manager option selected in the dropdown at the top-right. From here, click their Permissions tab and view, change, or remove their permissions as needed. Don't forget to click Save Permissions after you make any changes.
Permissions Set-Up
1. Permission to Edit the Agent of Record
This is required to reassign a policy's Agent of Record within your hierarchy once your lead distribution is set up.
- Go to the My Account/Permissions tab.
- Look in the left-hand column for Submission Options/Edit Agent of Record. Be sure you (the agency manager) have this permission checked. If not, check it and click Save Permissions.

2. Permission to View/Edit Descendants
This is also required to reassign consumers/policies to a different agent within your hierarchy once your lead distribution is set up.
- In your Permissions tab, look in the Agency Management Display permission set on the right-hand side.
- Find the Hierarchy Related Permissions section. Make sure View Descendants and Edit Descendants are checked. If not, check it and Save Permissions.

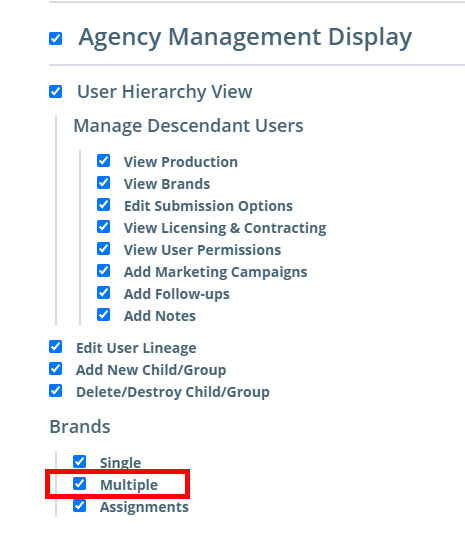
- To give yourself (the agency manager) this permission, go to your Permissions tab and look in the Agency Management Display permission set on the right-hand side. Find the Brands section. Make sure Multiple is checked. If not, check it and Save Permissions.
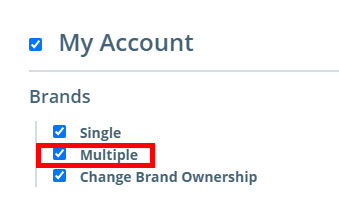
- To give your sub-users this permission, look in each sub-users' My Account/Permissions tab, on the left-hand side. Find the Brands section. Make sure Multiple is checked. If not, check it and Save Permissions.
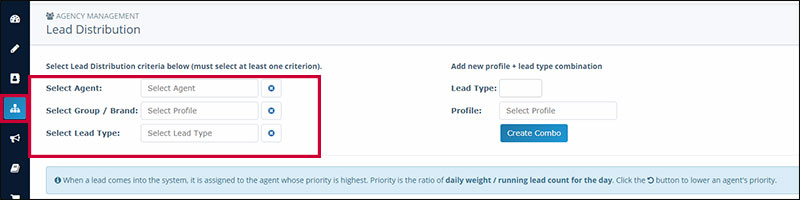
- Agent. Click Select Agent and choose a user's name from the dropdown menu.
- USE IF: You want to distribute leads from a particular source to one agent and only one agent. For example, you may only have one agent in your hierarchy. Or you may have leads coming in from an annuity-specific website, for example, and you want to send them only to your annuity specialist. Note: You cannot distribute leads to yourself using this method. As soon as you select an available agent, they'll appear in your lead distribution list below, with their toggle switch turned on.
- Brand. Click Select Brand and choose the brand associated with the leads you want to distribute.
- USE IF: You want to distribute leads associated with a particular brand within your agency. If you've already assigned agents to this brand, those agents will automatically appear in your lead distribution list. You can then move down the list and toggle individual agents on or off, and adjust the volume of their leads.
- Lead Type. Click Select Lead Type and choose the lead type you want to distribute. You need to have at least one lead type created in order to use this criteria. If you've already imported leads using lead type tags, they will be pre-loaded in the search box.
- USE IF: You want to distribute leads based on lead type (i.e., from a particular website or landing page).
- What is a lead type? The system uses "lead type" tags to identify the source of a lead. In addition to driving your distribution patterns, these tags are especially useful for reporting if you have multiple brands and/or streams of leads, such as in-house marketing, pay-per-click, and purchased leads. Lead types can be entered into Insureio in three ways: (1) via a Lead Import, when the tags you choose are affixed to the API endpoint used to pull those leads into Insureio, (2) via manual entry when you create a new contact in the Contacts Management section, or (3) by adding your desired lead type tag to your widget (click here to see how).
- TIP: Use one brand and one lead type together frequently? You can create a combo for easier lead distribution in the future. Select a Lead Type and Profile, then click Create Combo.
3. Permission to Access Multiple Brands
If you manage multiple brands, this is required to reassign consumers/policies to a different agent or change the Agent of Record on a case once your lead distribution is set up. If you only have one brand, you can skip this step.
4. Permission to Configure Distributed Leads
To distribute leads, you need the permission to configure lead distribution.
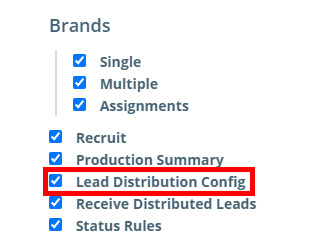
Go to your Permissions tab and look in the Agency Management Display permission set on the right-hand side. Find the Brands section. Make sure Lead Distribution Config is checked. If not, check it and Save Permissions.
5. Permission to Receive Distributed Leads
An agent must have permission to receive distributed leads. If you add them to lead distribution but do not give them permission to receive the leads, they will not see any leads on their dashboard.
Go to the sub-user's My Account/Permissions tab. On the right-hand side, under Agency Management Display, find the Brands permission set. Click Receive Distributed Leads to toggle permission on. Later, should you wish to keep this user from receiving leads, toggle this permission off. Even if they are included in your lead distribution, they will NOT receive leads if this permission is toggled off.

Brand Set-Up
1. Set up a Brand
All leads must be associated with a brand, set up in the My Account / Brands section. Click here for a complete walk-through on how to set up your brand. Don't skip this step - the information you enter for your brand will appear in client communications.
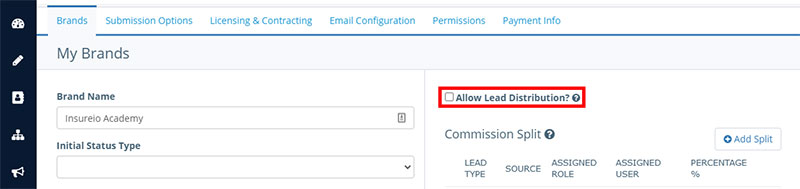
2. Enable Lead Distribution
Check the "Allow Lead Distribution" box in your brand's settings.
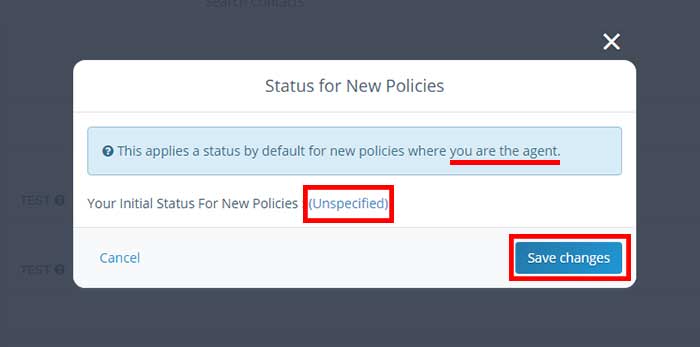
NOTE: The brand allows you to set a default for a new lead's initial status. However, you can also set an initial status on the user level - i.e., all of an Insureio user's leads enter the system with the user's selection for initial status type, regardless of the brand's initial status type. This is not recommended in most cases. If the user sets a default initial status, it will override a brand's initial status. However, this functionality may be helpful if you have multiple lead distribution recipients with individual branding profiles, but the user wants to standardize the handling of initial lead status using a status such as New Lead with Agent Email or Text. To set your user-based initial status, go to Agency Management / Policy Status Rules, and click the Status for New Policies button. Click (unspecified), select a status from the dropdown, and click the Save Changes button.
3. Assign One or More Sub-Users to the Brand
An agent cannot receive leads associated with a brand unless you manually give them access to that brand. Also, an agent cannot be reassigned as the agent/Agent of Record on a policy unless they have been added to the brand associated with that policy. Checking the Allow Lead Distribution box will open up a list of your brand's members. Your name will be included by default. In the text box below your name, start typing in the name of the Insureio user you want to add to this brand. Insureio will pull up a list of matching results. Select the appropriate user and click the blue checkbox.

Scroll to the bottom of the screen and click Save Brand.
Lead Distribution Set-Up: Basic
Step 1: Click Agency Management/Lead Distributions from your left-hand main menu.

Step 2: Select at least one of three available lead distribution criteria to get started. As soon as you make your selection, the agents who fit that criteria will appear below, in your lead distribution array. If no results are available based on the criteria you select, try removing one of the criteria until you see results.
Step 3: Click Save Settings at the bottom of your screen. You can fine-tune your selections using the steps in the next section.

Lead Distribution Set-Up: Adjusting Parameters
Step 1: Use the given parameters to change the default lead distribution settings.
For this example, we've already selected a brand called In-House Generation. The agents associated with this brand are shown below in the lead distribution array. By default, every agent appears with a distribution parameter for every lead type associated with the brand. Each line in the array is called a "rule." That rule controls whether that agents gets leads associated with that lead type, and if so, how many. Keep in mind that you'll see agents who may no longer receive distributed leads or work for your agency. Agents who do not have permission to receive distributed leads will appear with the red icon near their name, as in the image below. In short, for an agent to receive leads according to the rule shown, the rule must be checked and the agent must be enabled to receive lead distribution.

Here are your options for controlling lead distribution:
On/off checkbox. Click this box to turn a rule on/off. If turned off, the agent will not receive that lead type. Each lead type must be toggled on/off individually. If you have multiple lead types posting to your agency, be sure to check each lead type distributed to that agent. A black check for the rule and no "off" symbol for the agent means the agent will receive leads. NOTE: If the red "off" symbol appears for the agent as in the image below, they will not receive leads even if the rule is turned on.
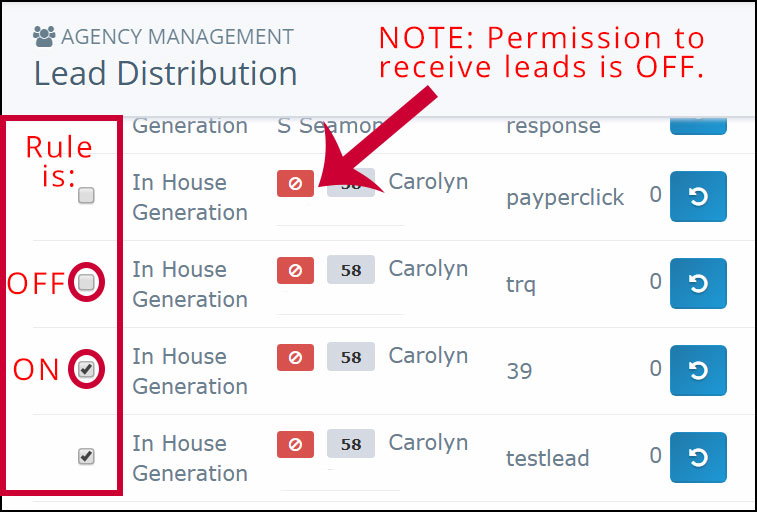
No lead distribution indicator. The red "off" indicator beside an agent's name means their account permission settings will not allow them to receive distributed leads, even though they appear in your lead distribution array. See Permissions Set-Up above.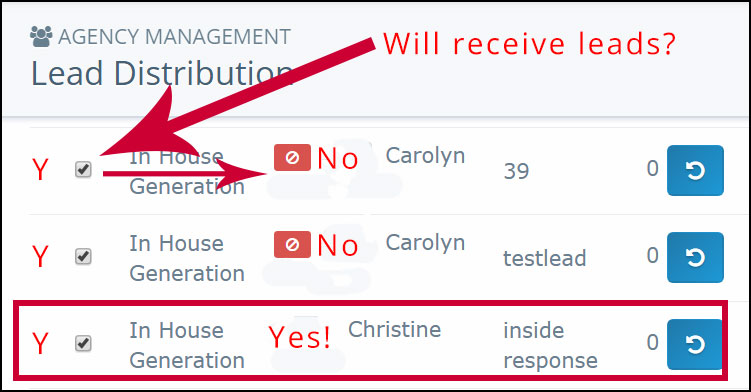
Running Count. The system distributes leads in a round-robin style. All agents toggled on, with their master lead distribution permission enabled, will receive the number of leads indicated until all eligible agents on your list have received the number of leads allocated in your array. The system will then start over at the beginning of the list, distributing each agent their allotted leads from the pool of available leads posted to their brand. The Running Count shows you how many leads each agent has received (i.e., +4 if an agent has received 4 leads that day). NOTE: The system resets this count every night at 11:30 pm Pacific time. The system will keep lead distribution equitable among enabled agents unless you specify otherwise.
There may be times when you need to override this distribution pattern. For example, if you enable a new agent, they hit your lead distribution array with 0 leads received. The system will see that the rest of your agents have received, say, 3 leads that day. To keep distribution equitable, it will distribute the next 3 available leads to your new agent, bypassing your current agents. To ensure your current agents continue to receive leads, use the blue reset button for their running counts. This will return their count to 0, and the system will distribute leads to them as well as your new agent.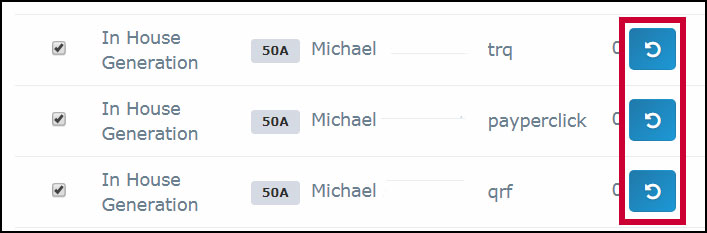
Quick Set. Use this to fill each day's lead distribution slot with the same number.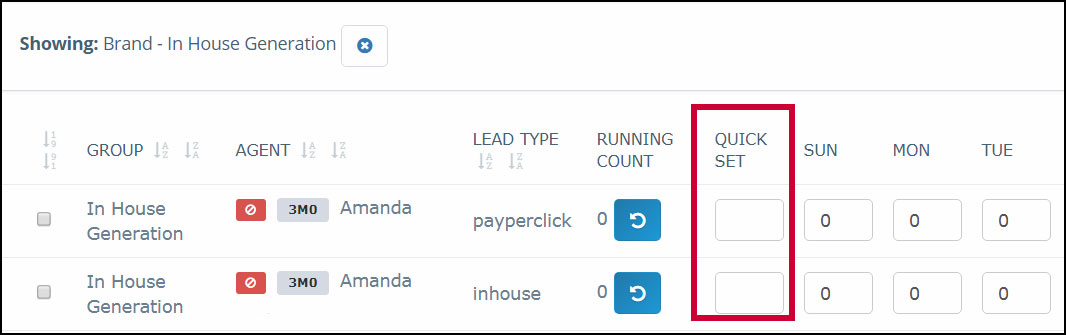
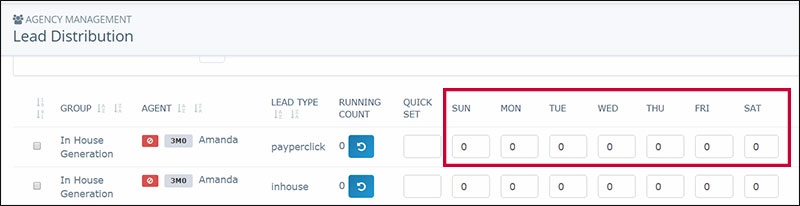
Lead Distribution Manual Settings. Adjust the number of leads you want an agent to receive here.
Step 2: Click Save Settings at the bottom of your screen.
Inactive Accounts and Lead Distribution
Lead distribution automatically excludes non-active users from its pool of potential agents. However, if you directly specified an agent (one of the methods described above), that method technically bypasses the system's built-in lead distribution logic. In that case, the lead posting will fail and return an error message stating that the agent specified does not exist. Your developer or lead posting technician can check for those error messages and the corresponding details.
If, on the other hand, you have leads assigned to a brand but that brand has no active agents to receive leads, there's a fallback solution in place. Brands always have the owner as a fallback for lead assignment and distribution. If the brand owner's account is deactivated, however, the lead post will return an error message stating that the agent specified does not exist.
If your lead posting doesn't specify a brand, it doesn't meet the minimum requirements to post to the system. The system requires at least a brand in order to successfully post a lead. If no brand has been specified (regardless of whether an agent has been specified), the lead post will fail and return an error message stating that a brand is always required.