LAST UPDATED: 5/6/22
Creating a New Policy Status Rule
Every case and every action in Insureio is driven by a status. While most users can do everything they need to do with the global statuses we've already built, agency-level users may want to create their own statuses and customize the tasks associated with those statues. Your custom statuses can trigger to-do tasks for you and your staff, automated messages via text or email for clients and/or agents, or they can advance a case into another status.
NOTE: A status's visibility setting (global, user, or user and descendants) is what allows that status to be seen and applied to a consumer or policy. Statuses are applied regardless of brand. In other words, you do not need to own a status in order for a task within that status to apply your branding information in emails or text messages that go out to a consumer.
Jump to a section:
Creating a New Status
Adding Tasks to a New Status
Creating a New Status
All policy status rules are displayed, created, and stored in the Agency Management section. Together, these rules dictate what happens as you (and our application fulfillment partners) work to put a policy in force. You can create as many new statuses as you want. Here's how to create a new policy status rule.
1. Click Agency Management and then Policy Status Rules in your left-hand main menu. Click New Status Rule on the top-right of your screen.

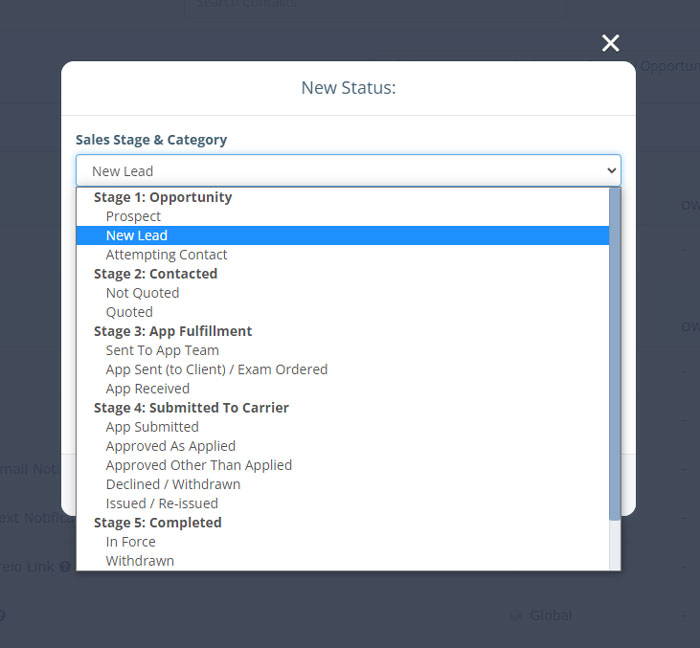
2. Select the appropriate Sales Stage & Category from the dropdown menu. All new statuses must be placed within one of these pre-defined categories.

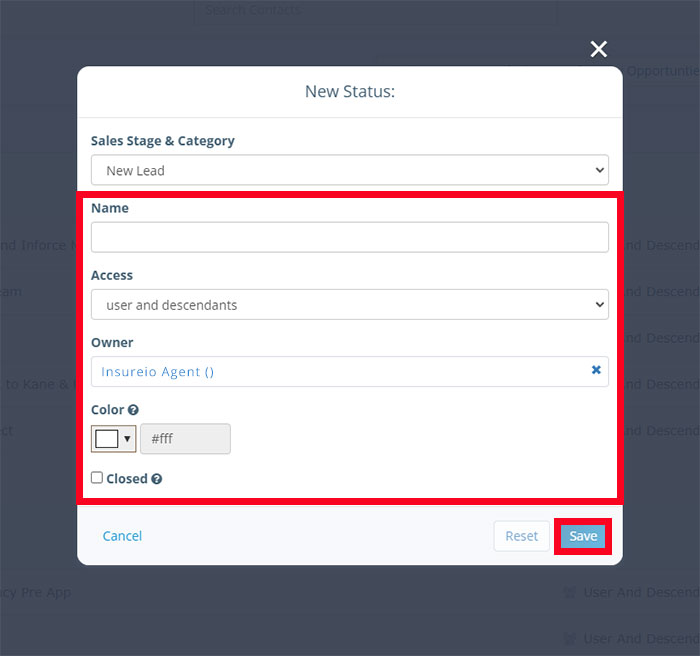
3. Fill in the rest of the details for your new status, discussed below, and click Save. To cancel without saving, click Cancel. To clear the form and start again, click Reset.

Name: Give your new status a name. Try to describe the function of the status so you'll remember what it does.
Access: Who should have access to this status? If you're an agency manager and want your downline to have access to this status, select "user and descendants." If you're the only one who needs or should have access to the status, select "user."
Owner: By default, you will be selected.
Color: Choose a color if you want this status to appear listed in a different color within the system. Enter a hex code or click the white box to use a color picker.
Closed: Check this box if this status will apply to a policy that is closed. If selected, this status will appear with a green checkmark in your list of policy status rules. Once you check "Closed," you also have the option to select "Test" or "Duplicate" if you're creating a status especially for any of these situations.
4. After you save, make sure your new status appears in the designated Sales Status & Category you selected. If you didn't select a category, your new status will be at the end of the list in the "No Category Indicated" section.

Adding Tasks to a New Status
1. Click the gear icon to the right of your new status. Click Edit Task Rules.

2. Click New Task Rule.

3. Fill in the New Task options as described below.

Name. The task name you enter here is what will show up on your dashboard. Use a descriptive name like “Pre-Application Call,” “Email #1 to Consumer.”
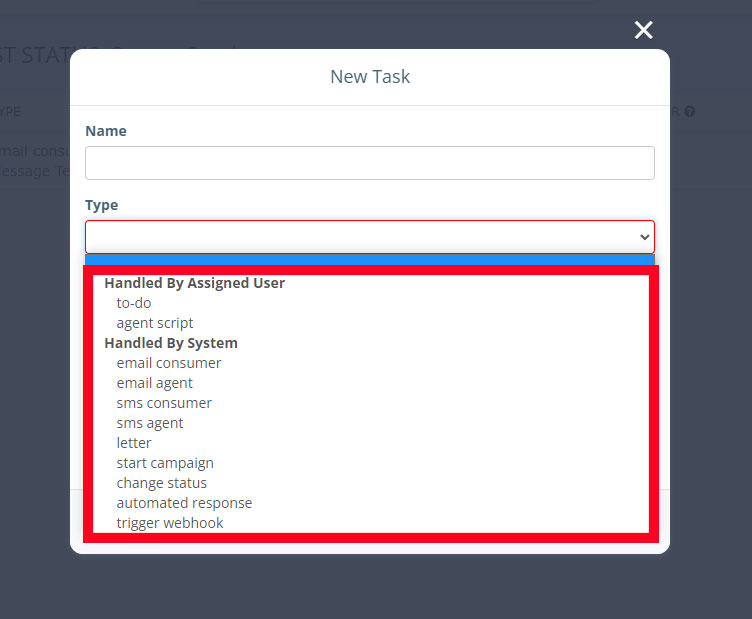
Type. Specify the type of task from the dropdown menu. Depending on the task type you select, additional options may become visible. There are two umbrella types of tasks: those assigned to a system user and those assigned to the system.
User Tasks:
To do
Agent script
System Tasks:
email consumer (requires a template)
email agent (requires a template)
sms consumer (requires a template)
sms agent (requires a template)
letter (requires a template)
start campaign (requires name of campaign you wish to start)
change status (requires name of status you wish to change to)
automated response
trigger webhook (requires a message template and a payload template)
Assignment User. Select yourself or one of your sub-users to whom the task will be assigned.
- If this is an email or SMS task: The assigned user is the one the email or SMS will be sent from, even if that email or SMS is going to a consumer for whom you are the agent. This makes it possible to automate emails that come from members of your team who are not you (i.e., a case manager, underwriter, assistant, etc.).
- If your task will be fulfilled by the system (i.e., an automatically generated email or text message using a template): Leave this field blank.
Assignment Role. Select the appropriate role for this task from the dropdown menu. If this task will be fulfilled by the system (i.e., an automatically generated email or text message using a template), select "system." If your task is a to-do, in most cases, the role will be “agent.” Other roles you may use include “administrative assistant” or “case manager,” depending on how large your agency is.
Only Build Task for Brand. If this task should only apply to contacts within a certain brand, select that brand here. If this task should apply to all contacts regardless of brand, leave this blank.
Delay. Once a lead is assigned to the status associated with this task, you have the option of setting a delay before this task hits the system. Use the three boxes to input a number for days, hours, and minutes (i.e., to add a delay of 1 day, enter 1:00:00).
- Evergreen. Because Insureio is status-driven, everything associated with a status (including its tasks) is removed when the next status takes over. If you have a task that you want to stay on your dashboard no matter what status the case goes to, check this box to make the task evergreen. It will remain on your dashboard until you mark it complete.
- Skip Weekends & Holidays. Use this to indicate whether the task should skip holidays and weekends. This is best used with automated email sends to clients, leads, and prospects. To be sure an email or text message is only sent during the work week, and not on a holiday, check this box.
Template / Action (not applicable to all task types). If your task type requires a template, campaign name, or status name, begin typing it in this box. Insureio will bring up a list of potential matches. Select the one you want.
Payload Template (not applicable to all task types). If your task type requires a payload template, begin typing it in this box. Insureio will bring up a list of potential matches. Select the one you want.
4. Click Save to create your task.