LAST UPDATED: 5/13/22
Webhooks and Payloads
Webhooks and payloads allow you to automatically send data from Insureio to third-party services such as Zapier and automate.io. When a particular action happens in Insureio (i.e., a task fires as part of a status), you can send a payload to a third-party service’s endpoint (called a webhook). You can then configure that service to perform a variety of additional tasks, such as sending emails, sending SMS messages, and adding appointments or to-do items to your calendar, all using the same trigger from Insureio.
While you can do some of these tasks natively within Insureio, such as sending emails and SMS messages, these third-party services expand on that capability. For example, you can send emails and SMS messages to a wide range of recipients instead of the agent or consumer, or have a text sent to yourself anytime the status of a case changes.
For the purposes of the tutorial below, we will be using Zapier to send SMS messages via MessageMedia SMS.
Our webhooks are also "resthook" compatible. This means you can:
- set up a webhook and payload by entering an external endpoint into the webhook record in Insureio (as described below), or
- start from your third-party service and provide a version of the following URL filled in with your agent ID, API key, and brand ID for it to create the webhook record in Insureio: https://pinney.insureio.com/webhooks.json?agent_id=&key=&brand_id=
SAMPLE - replace each instance of "123" with your own agent ID, API key, or brand ID: https://pinney.insureio.com/webhooks.json?agent_id=123&key=123&brand_id=123
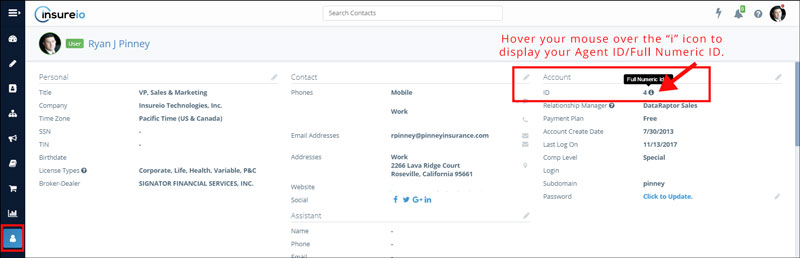
To find your agent ID, look in your My Account / Personal section. In the Account column on the right, you'll see an ID. Hover your mouse over the "i" icon. Your agent ID (full numeric ID) will appear, as shown below. Note that your full numeric ID may not be the same as the ID listed in your personal profile.
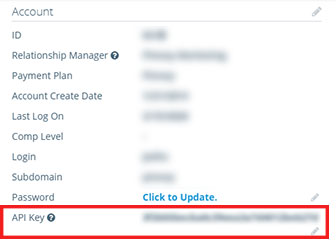
To find your API key, look in your My Account section (at the bottom of the right-hand column, as shown in the image below). Your API key is unique to your account. It is required to verify your identity when you use the Insureio API. Treat this like a password. Do not share it with others. Only store it in locations that no one but you can access. If your computer or Insureio account become compromised, immediately reset your key and your password in your My Account section. If you do not have an API key, please contact your Insureio representative to request one.
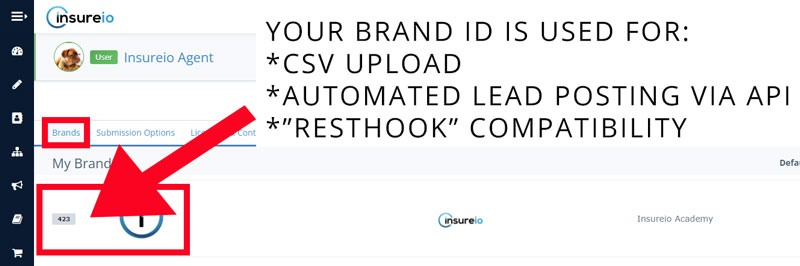
To find your brand ID, look in your My Account / Brands tab. Each brand has an ID number listed as shown here:
Jump to a section:
What Is a Webhook?
What You Need to Get Started
Part 1: Get an Endpoint from Zapier
Part 2: Create Your Webhook in Insureio
Part 3: Create Your Payload in Insureio
Part 4: Create Your Task in Insureio
Part 5: Complete your Zap
What Is a Webhook?
Webhooks send information between apps in the form of a URL. When a given event happens in App A, a webhook URL can provide that information to App B in real-time using a payload (in XML or JSON format) appended to App B’s webhook URL.
Think of a webhook as a mailing address and the payload as the letter you’re mailing to that address.
What You Need to Get Started
The ability to use webhooks is a premium feature on Zapier and requires a paid account. Click or tap here to view their paid account options.
The fields you’ll see in our example below will vary depending on the third-party apps you connect and the automated actions you wish them to take. Insureio cannot provide customer service or troubleshooting for Zapier or the apps you connect to it.
To set up and test webhooks and payloads, you will need a test client and a test status in Insureio. Please create these before beginning the process below, and ensure your test client has an email address and phone number you have access to. You don’t need to create any tasks in your test status – we’ll go through that part below. If you plan to send policy details as part of your payload, be sure your test client has a quote or placed policy saved.
Part 1: Get an Endpoint from Zapier
In order to set up a webhook in Insureio, you need an endpoint. This is a post URL provided by a third-party service such as Zapier.
1. Log into Zapier. From your dashboard, click Zaps.
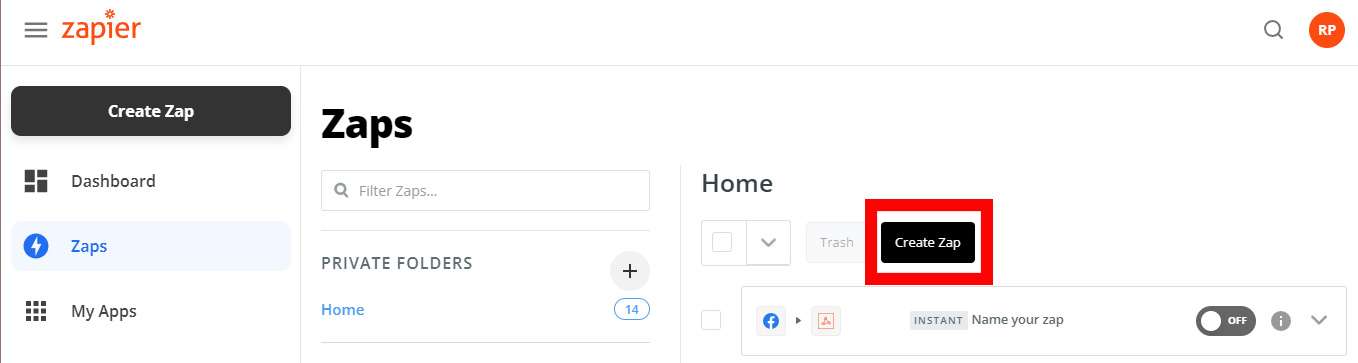
2. Click Create Zap.
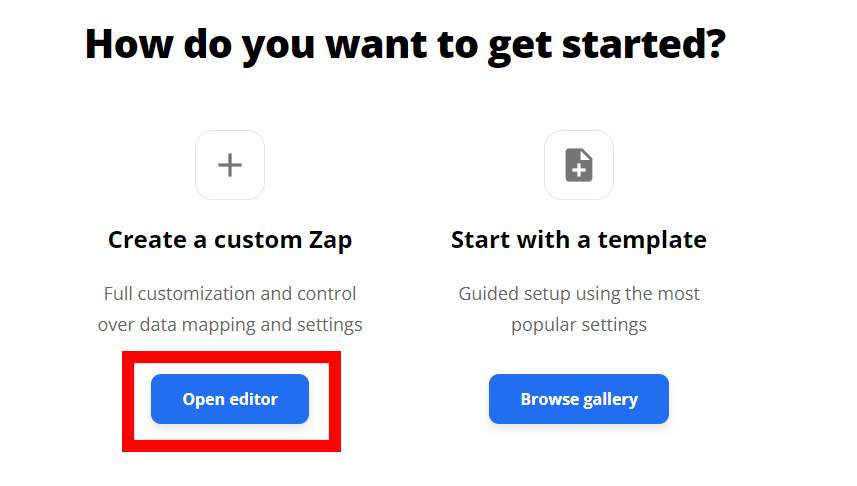
3. Select Open editor.
4. Name your zap and select Webhook as your trigger.
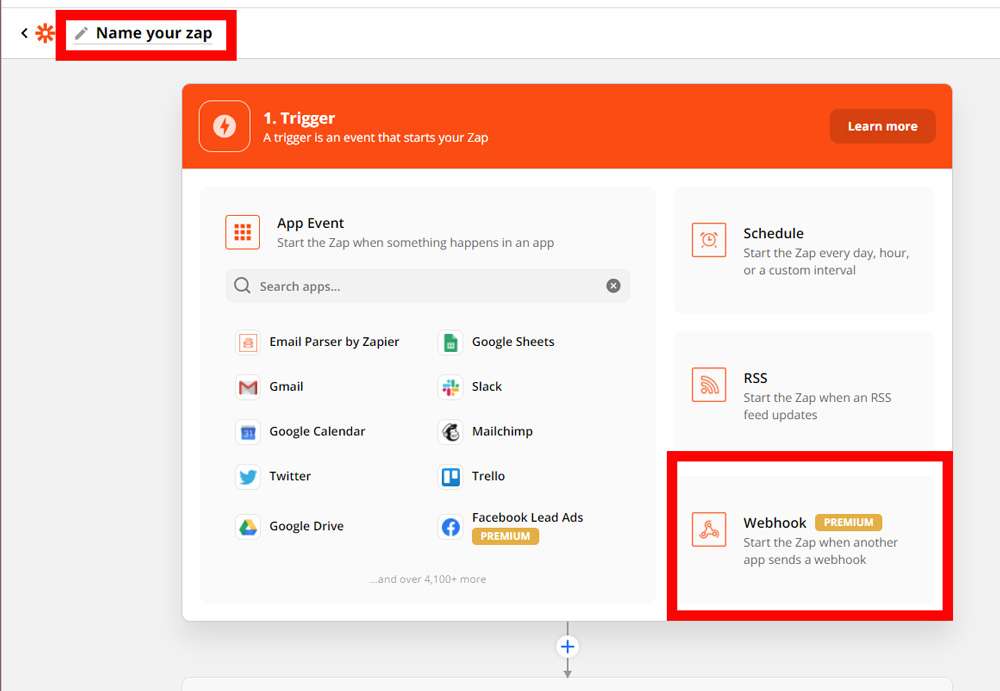
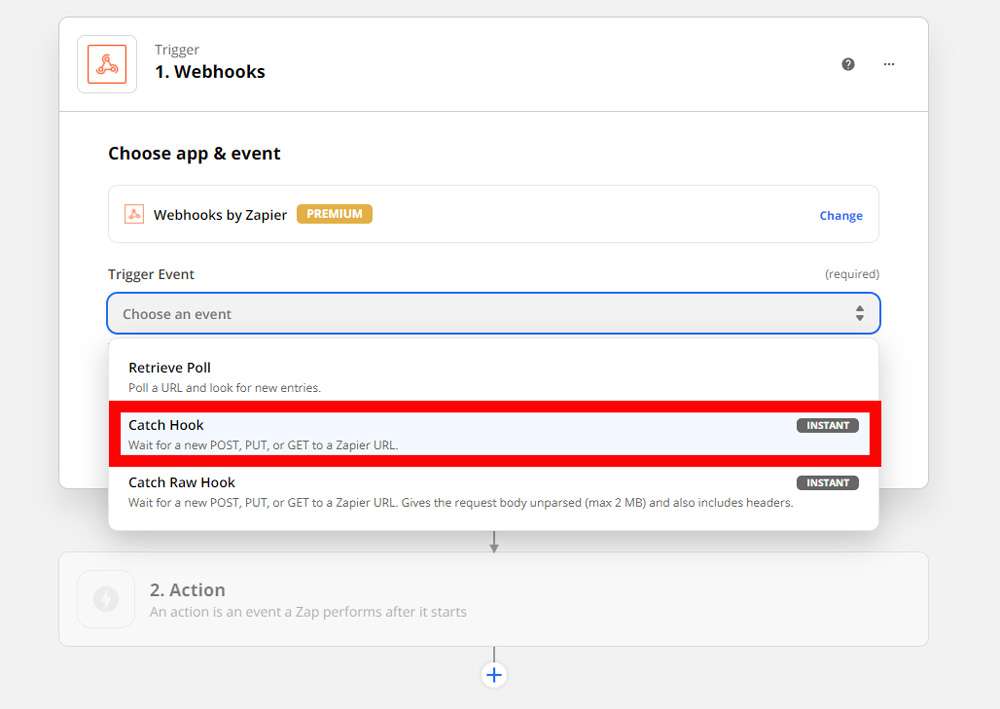
5. Select Catch Hook as your Trigger Event. Click Continue.
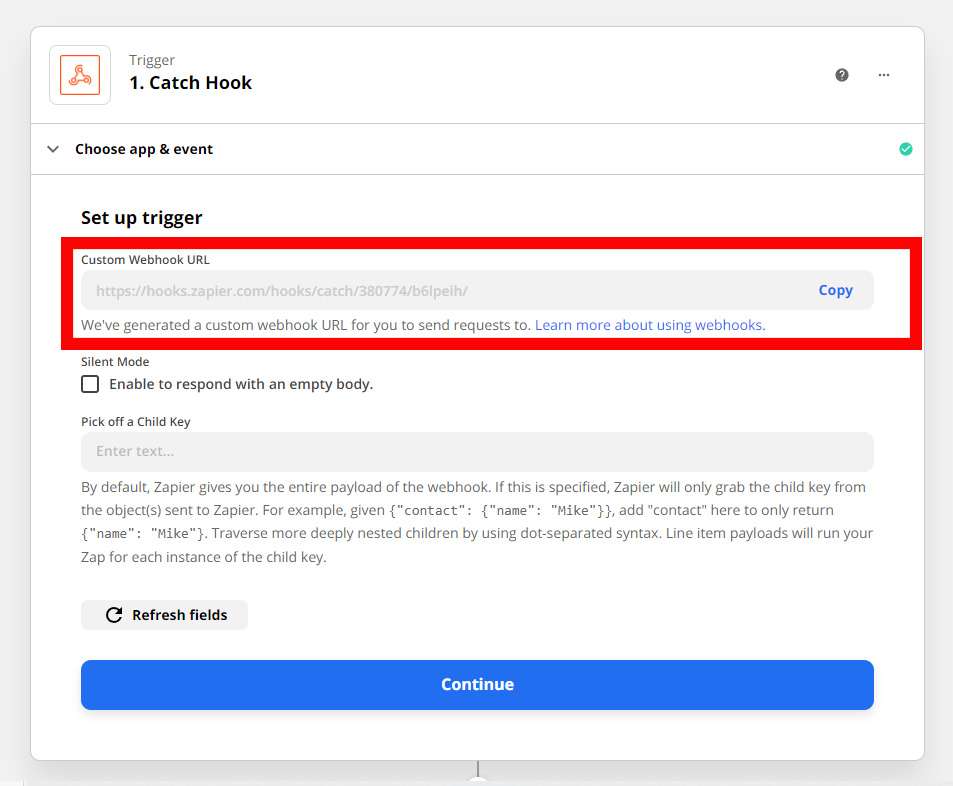
6. Locate your custom webhook URL (underneath the heading “Set up trigger”). You don't need to copy it yet - we'll come back and copy this into Insureio as described below in part 2, step 5.
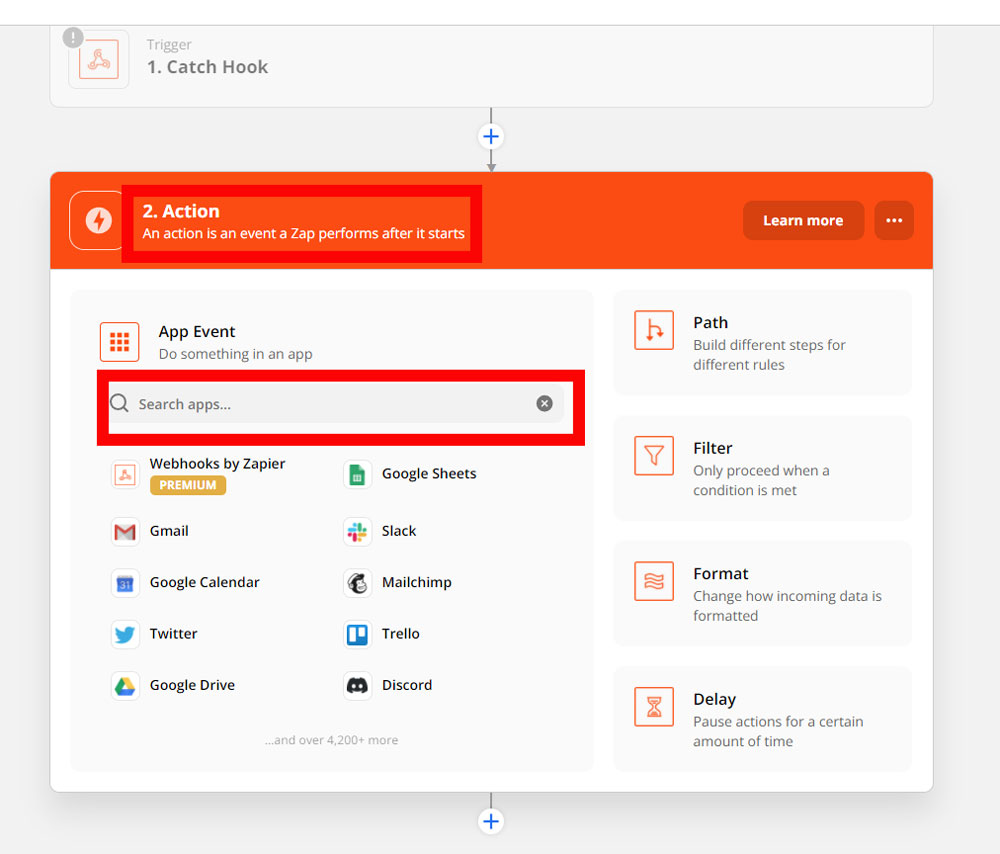
7. Jump down to the Action section (part 2) of your zap. Under App Event, search for and select the app you want to perform an action when your trigger occurs. For the purposes of this tutorial, we’re using MessageMedia SMS.
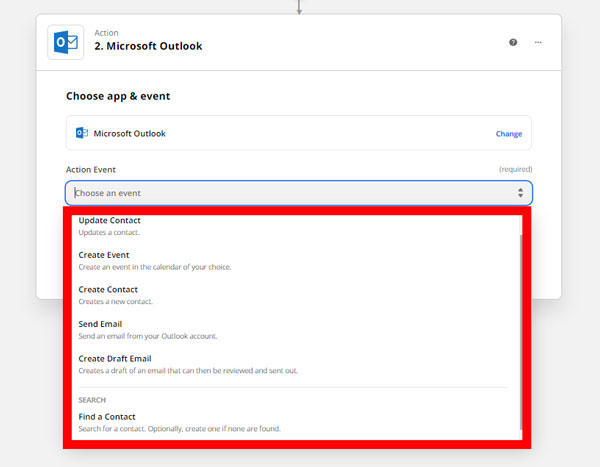
8. Choose your Action Event.
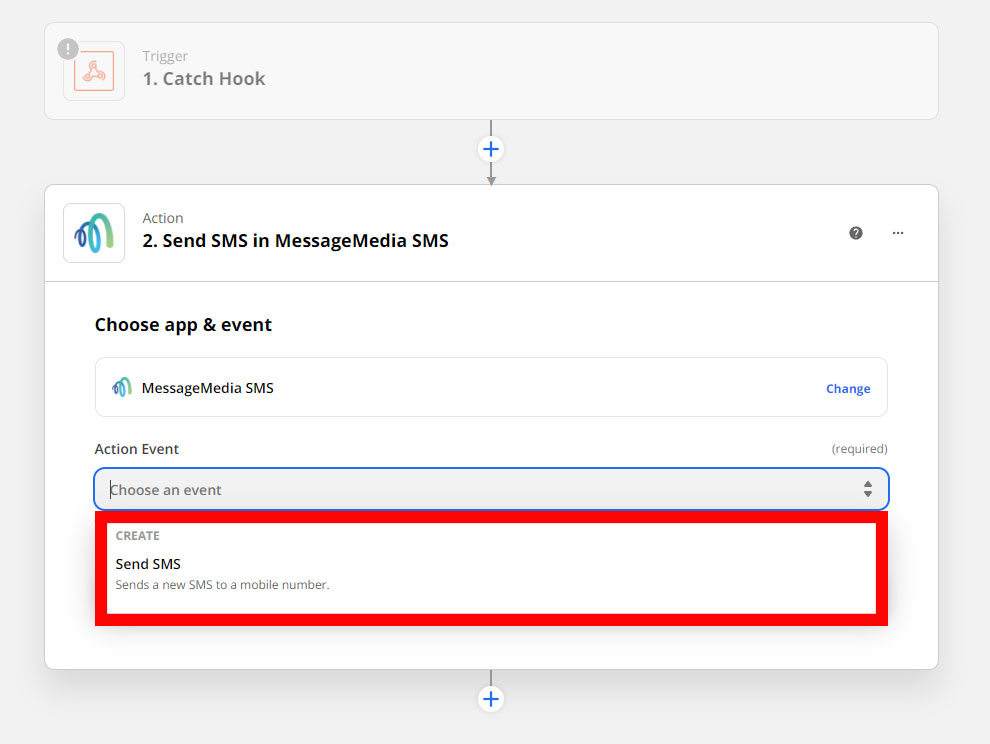
Click Continue.
NOTE: The available action events in Zapier are pre-loaded based on the app you select. In our example, MessageMedia SMS only has one action event available (Send SMS). As an example, here’s what you’ll see if you’re working with Microsoft Outlook:
9. Leave this tab open in your browser. We’ll come back to it in a few minutes.
Part 2: Create Your Webhook in Insureio
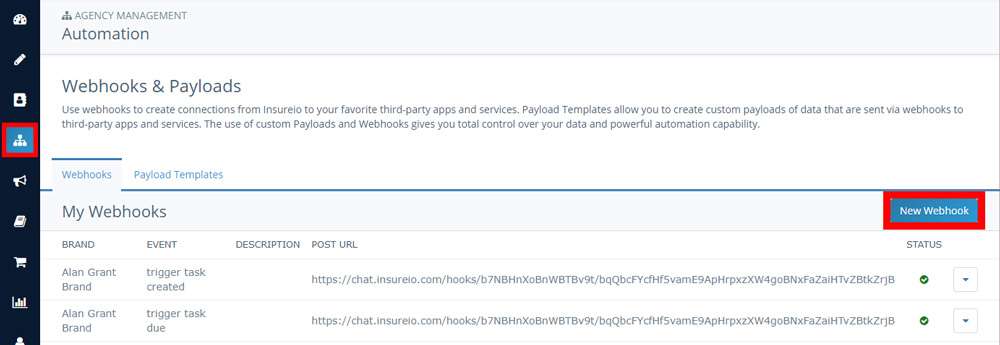
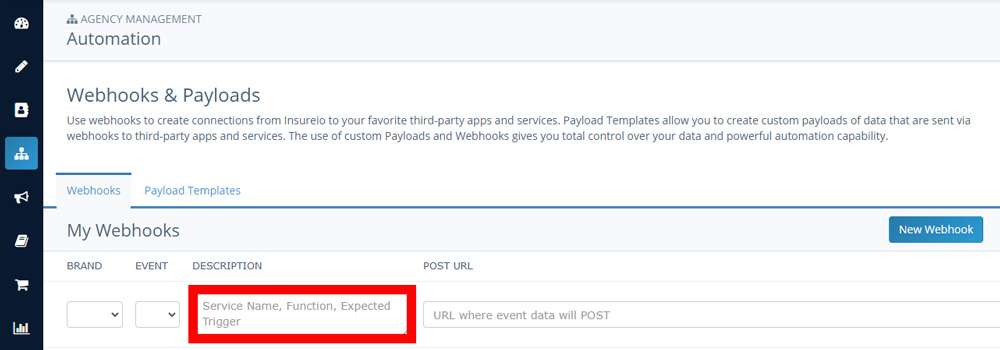
1. From your left-hand main menu, select Agency Management / Automation. On the Webhooks & Payloads screen, click New Webhook.
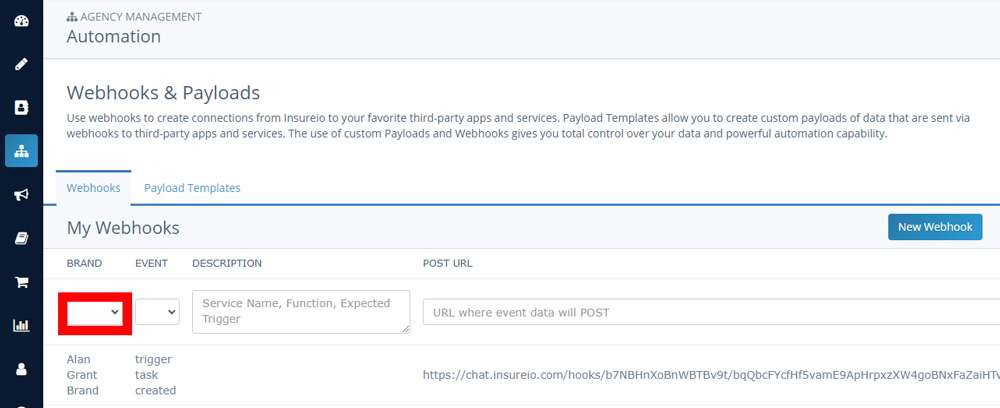
2. Select the brand you want for this webhook.
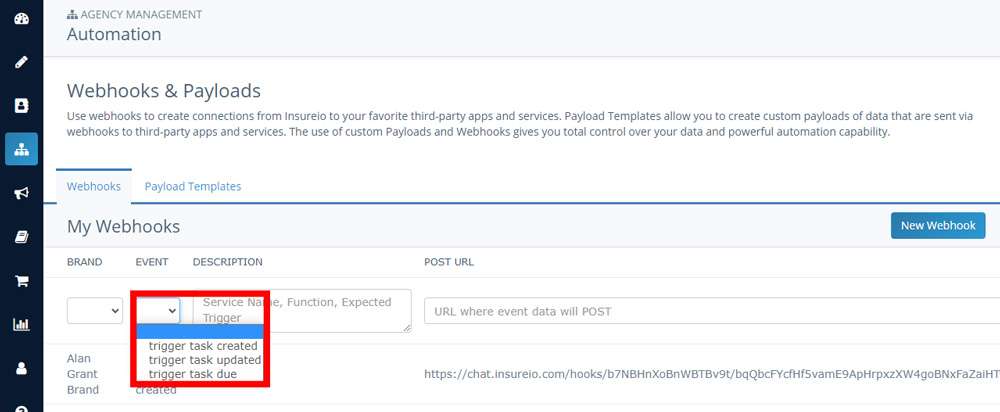
3. Select the event you want to trigger this webhook: task created, task updated, or task due.
4. Enter a description (optional).
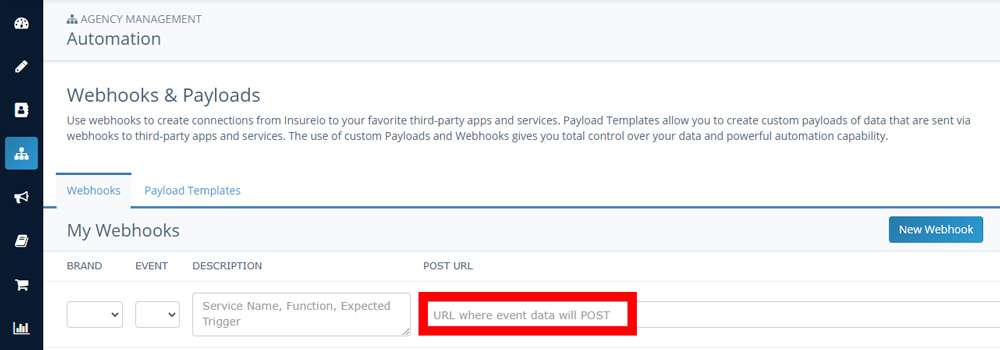
5. Paste the endpoint URL provided by Zapier (described in part 1, step 6 above) or another third-party service.
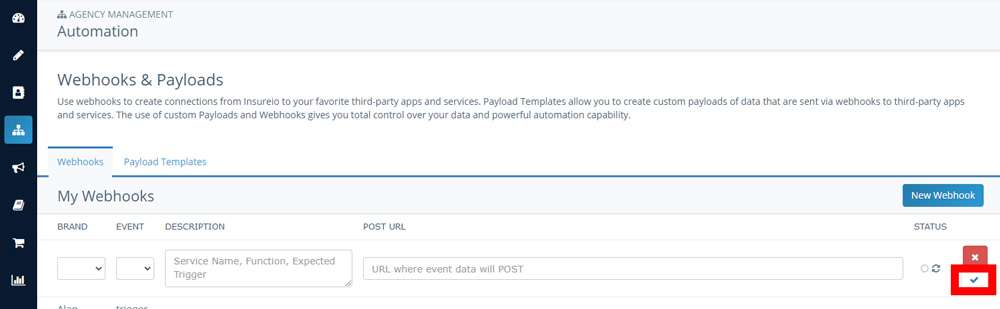
6. Click the blue checkmark button to save your webhook.
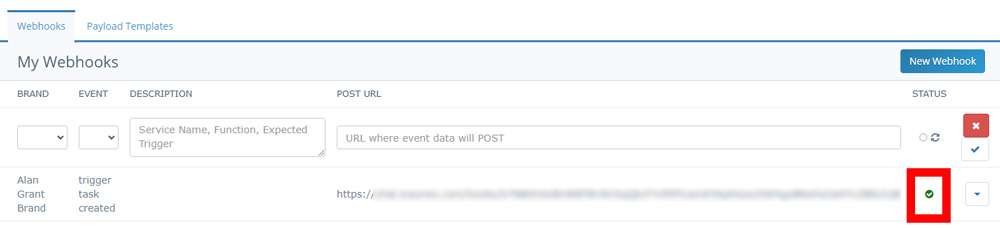
NOTE: The green checkmark button you now see in the STATUS column indicates your endpoint is online.
Part 3: Create Your Payload in Insureio
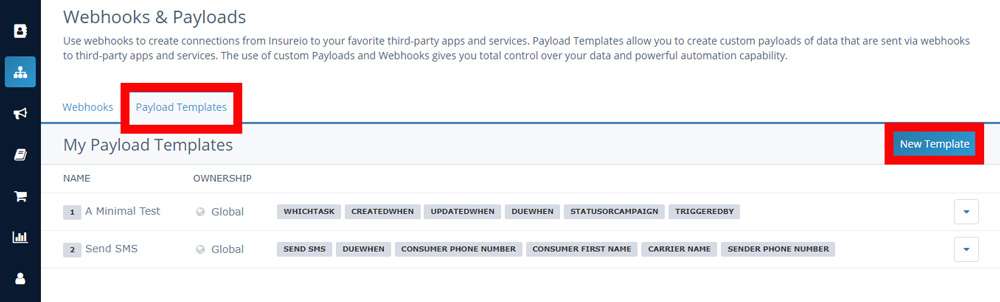
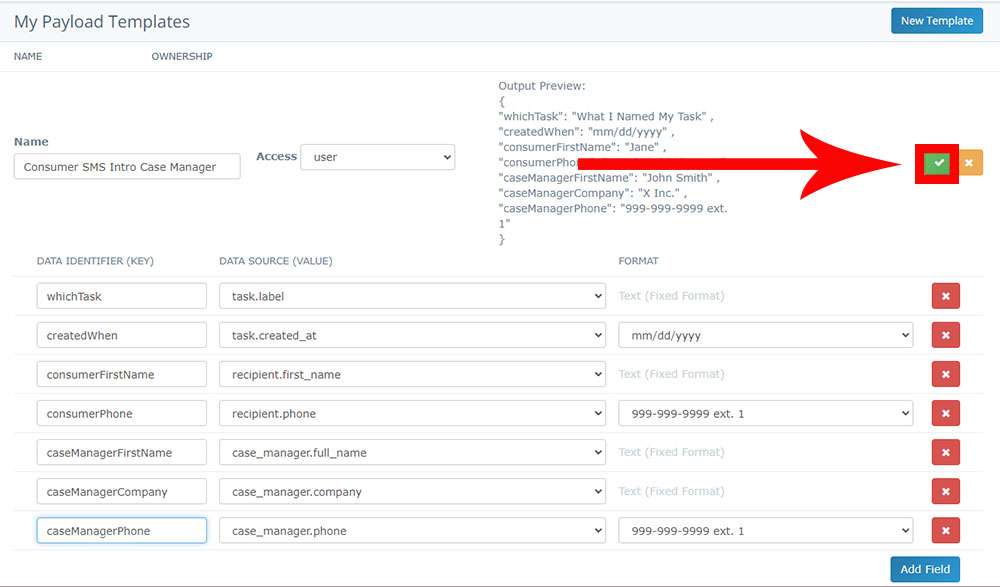
1. Click over to the Payload Templates tab. Click the blue New Template button.
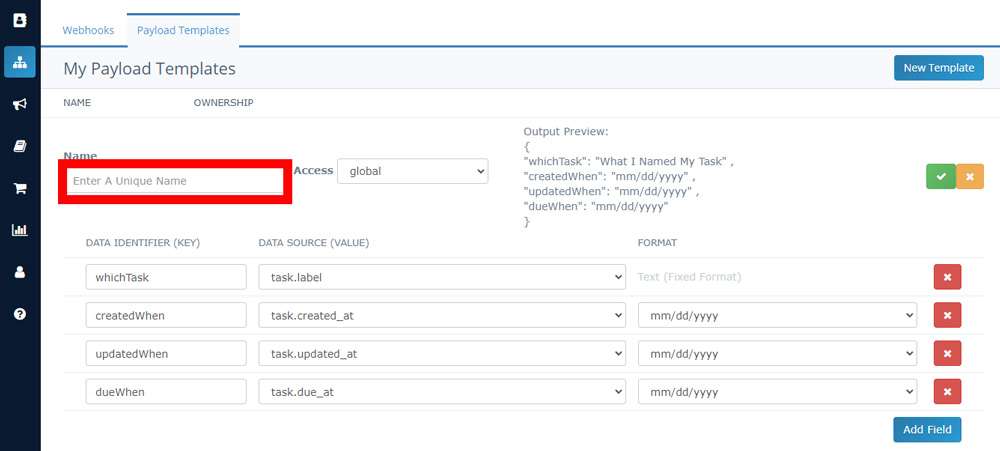
2. Enter the name of your payload template. The name should be unique and descriptive. As an example, “send email” is generic and not very descriptive. Something like “Send Outlook Email When Status Changes” would be more descriptive. Remember this name because you’ll also need it to create the accompanying task in the next part of our setup.
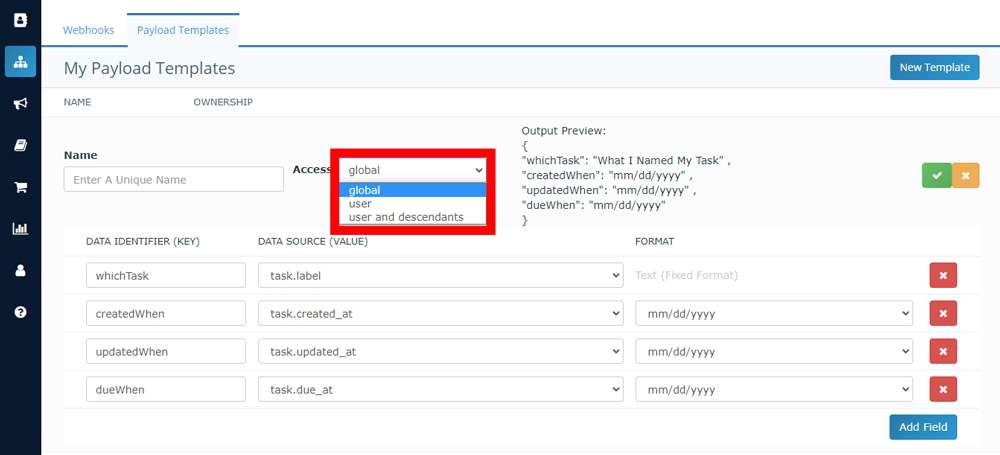
3. Set the access for your payload template.
- “Global” means everyone who uses Insureio has access (please do not use this setting unless you work for Insureio).
- “User” means you and you alone have access.
- “User and descendants” means you and anyone in your downline will have access.
4. Enter the key/value/format of as many fields as you require to create the desired content of your payload. Zapier uses that content to decide what to do with your payload, so the field keys and values should be matched carefully.
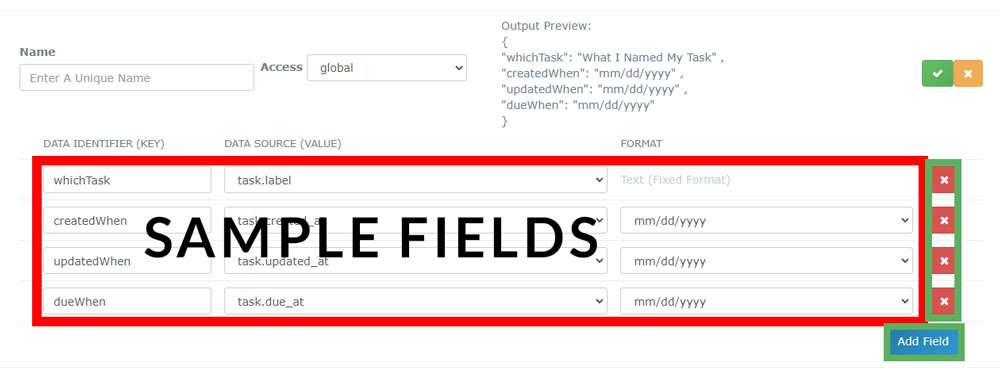
Every field (row) represents a single piece of information transmitted in the payload. That field is defined by the three components displayed in that row: a key (data identifier), a value (data source), and the format. We’ll go over each field in more below.
Because webhooks and payloads are status-driven, we recommend every payload template include a task name (although this is not required). The task name is the first sample field provided for you, with the data source (value) of task.label. As a suggestion, you could replace the default text of “whichTask” with the name of your Zapier action event.
There are three additional sample fields (rows) that you may use or delete as needed. To delete a field, use the red X button on the right. To add a field, click the blue Add Field button.
What is a data identifier (key)? This is a brief descriptor for the data source (value). These keys will be visible in Zapier – you can use them the same way we use marketing variables in Insureio (as insert/merge tags). Choose keys that will make sense to you when you see them in Zapier, as described below in part 5, step 4. The sample data identifier fields contain no spaces; however, as shown in the examples below, you may also use multiple words with spaces between them.
Examples of key/value pairs:
| KEY | VALUE |
|---|---|
| Send SMS | task.label |
| dueWhen | task.due_at |
| Consumer Phone Number | recipient.phone |
| Carrier Name | case.current_details.carrier_name |
| Sender Phone Number | brand.phone |
What is a data source (value)? This is the piece of data Insureio will insert into your payload. You may recognize some of the options in this dropdown menu from the variable fields you’ve seen in Insureio’s marketing email templates. These include consumer and policy information. There are additional fields available relating to tasks: when a task is created, due, updated, etc.
You will need to add every piece of information Zapier (or other 3rd party service) needs to generate your desired end result. For example, if you want to send a text message to an agent on your team with a client’s contact information, make sure you include the consumer’s name and phone number, along with any other information you plan to include in that automated text.
As another example, if you’re sending an automated text to a consumer as a reminder when their delivery requirements are due, you will need to include: the consumer’s first name (recipient.first_name), the consumer’s phone number (recipient.phone), the sender’s phone number (brand.phone), and any policy details that may be helpful, such as the carrier name (case.current_details.carrier_name).
Here are the task-related data sources you may choose from:
| task.label | Descriptive name for the task |
| task.due_at | Task due date |
| task.created_at | Task created date |
| task.updated_at | Date of the task's most recent update |
| task.sales_stage_id | ID number of the sales stage (https://academy.insureio.com/enum/#SalesStage) ID Name 1: Opportunity 2: Contacted 3: App Fulfillment 4: Submitted to Carrier 5: Completed |
| task.status_type_category_id | The ID of the subcategory of a sales stage. These are visible in the status dropdown in policy management. ID Name 1: Prospect, New Lead, Attempting Contact 2: Not Quoted, Quoted 3: Sent to App Team, App Sent (to client)/Exam Ordered, App Received 4: App Submitted, Approved As Applied, Approved Other Than Applied, Declined/Withdrawn, Issued/Reissued 5: In Force, Withdrawn, Closed |
| task.status_type_id | The ID of a particular status rule, visible in the Agency Management / Policy Status Rules section: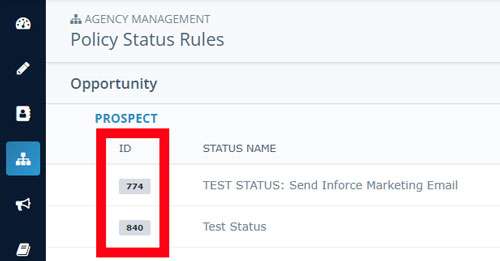 |
| task.origin_type | One of two options: Crm::Status Marketing::Subscription |
| task.origin_id | The ID of the actual status record (created from a status type) or marketing subscription (created from a marketing campaign). |
| task.sequenceable_type | Indicates the type of record that the status or subscription is attached to. One of three options. If Policy: Crm::Case If Consumer: Consumer If Recruit: User |
| task.sequenceable_id | The ID of the policy, consumer, or recruit in Insureio. |
| task.brand_id | The ID of the brand associated with that task. |
| task.assigned_to_id | The ID of the system user to whom a task has been assigned. |
| task.assigned_to_name | The name of the system user to whom a task has been assigned. |
| task.id | The ID of a task. |
What is the format? This is the format in which the value will display. You may or may not be able to make a selection here. For labels and consumer or carrier names, for example, the value can only be displayed in plain text format; as a result, that format will be automatically selected for you with no ability to change it. If the value is numeric and can be displayed multiple ways, as with a date or phone number, you may select the format you prefer.
5. Save your payload template. Click the green checkmark button to the right of your output preview.
Part 4: Create Your Task in Insureio
1. Go to Agency Management / Policy Status Rules. Find the status for which you want to create a new task that will create and send your payload. Click the gear icon to the right and click Edit Tasks.
NOTE: If this is the first time you’re doing this, we highly recommend using a test status, not one that will impact your clients or downline.
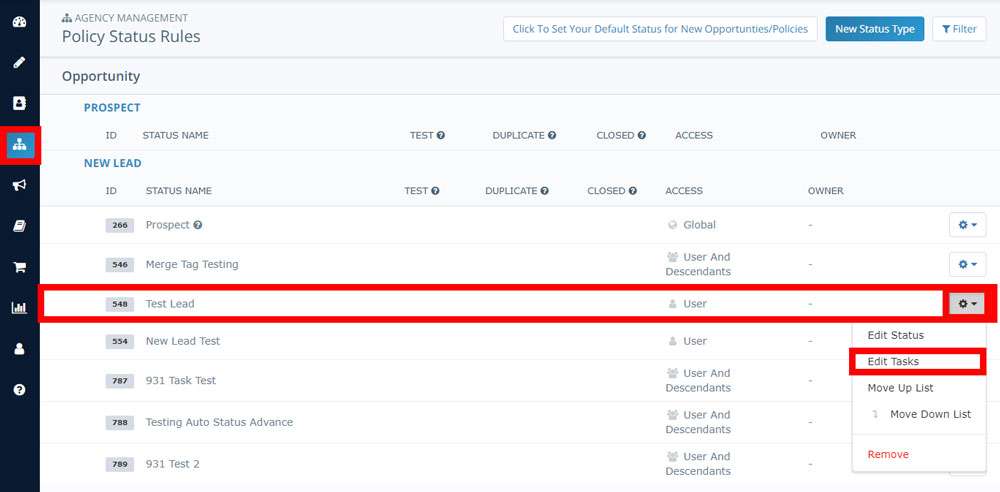
2. Click New Task.

3. Fill in the three necessary components in the task builder (in bold below).

Name: Brief description of what this task will do. If the Zapier event is meant to correspond one-to-one with a specific task, using names that indicate this would probably be wise.
Assigned User: leave blank
Assignment Role: leave blank
Delay: leave at default (0)
Evergreen: leave unchecked
Type: Select “trigger webhook”
Template/action: Select the name of your payload template. Start typing in the name and Insureio will pull up a list of possible matches; select the one you want. Note that this field won’t become available until you select “trigger webhook” to set the task type.
Skip Weekends & Holidays: leave unchecked
4. Click the blue checkmark icon to save your task.

Any time this task fires in Insureio, it will send the data indicated by your payload template to the post URL provided by Zapier. In order to test this in our next step, we need to fire the task.
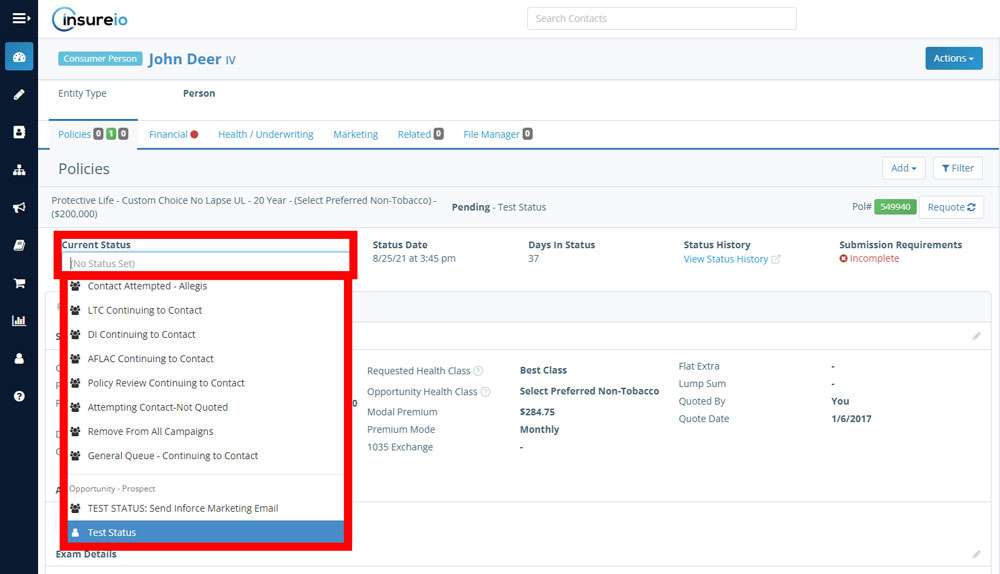
5. Locate your test client and manually change their status to your test status. In the client record, scroll down to the Policies section, find Current Status, and select your test status from the dropdown menu.
Part 5: Complete Your Zap
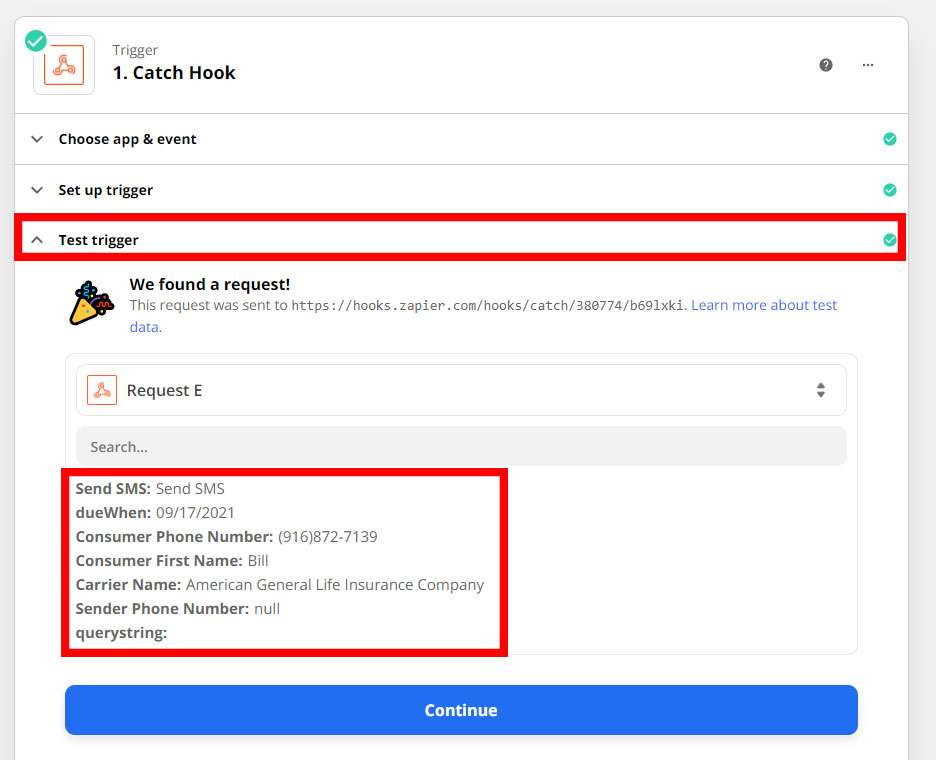
1. Go back to Zapier. We’re going to pick up where we left off in Part 1, step 6. Now that our payload is completed, we can test it. If you left this tab open, you should still see the Set up trigger section where you copied your custom webhook URL:
2. Scroll down to the next section and click Test trigger. It will show you that data that was in the payload so you can confirm your payload is working. Click Continue.
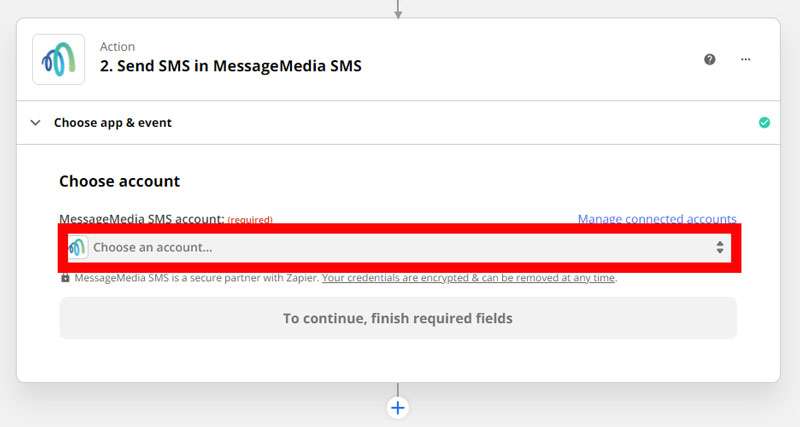
3. Scroll down to part 2 (the action, as opposed to the trigger) and select Choose Account. Give Zapier permission to access your third-party app account. If you’ve already used this app in Zapier, you can select your account from the dropdown menu.
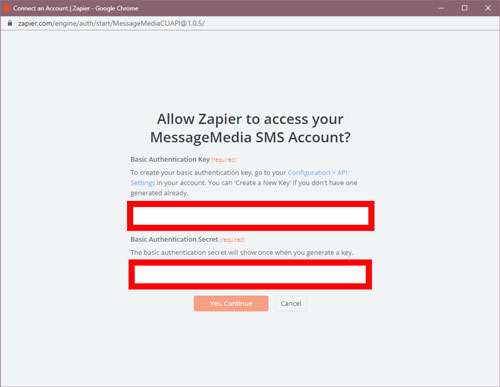
If you have never used this app in Zapier, you will need the appropriate login credentials. In this example, we had to provide our MessageMedia SMS Basic Authentication Key and Basic Authentication Secret.
Click Continue.
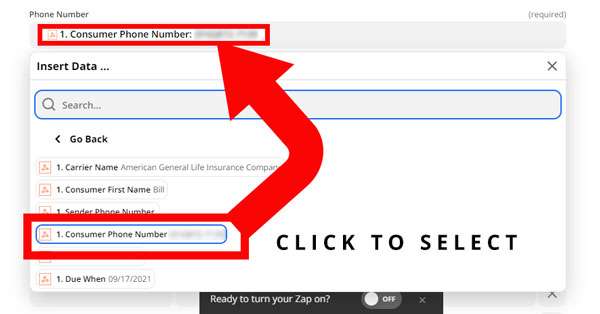
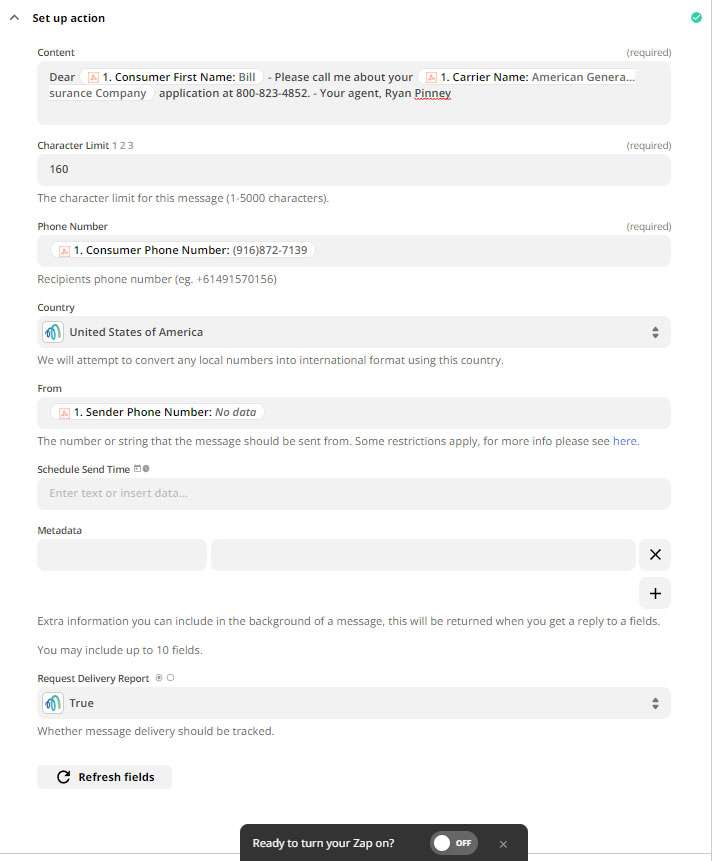
4. Fill in the information required to Set up action. All required fields will have a notation. The fields you see will vary depending on the third-party app you connected and your intent. In this tutorial, we’re using a text messaging app, so our required fields include the text message’s content, character limit (pre-populated), recipient’s phone number, sender’s phone number, country, and more.
To enter the required information, click any text box – you will then have access to any of the elements you included in your payload, labeled with the keys you entered in Insureio. For example, in the image below, you can see we are required to enter a phone number. We selected “Consumer Phone Number” from our list of keys imported from Insureio.
If you’re building a message for a text message or email, click the field to begin entering text. Click any of the available payload data below to insert into your template where necessary. Remember, the payload data functions like a mail merge / marketing variable.
Here is how we set up a brief SMS message template with a mixture of standard text and payload data insertions:

And here is what our completed action set up looks like:
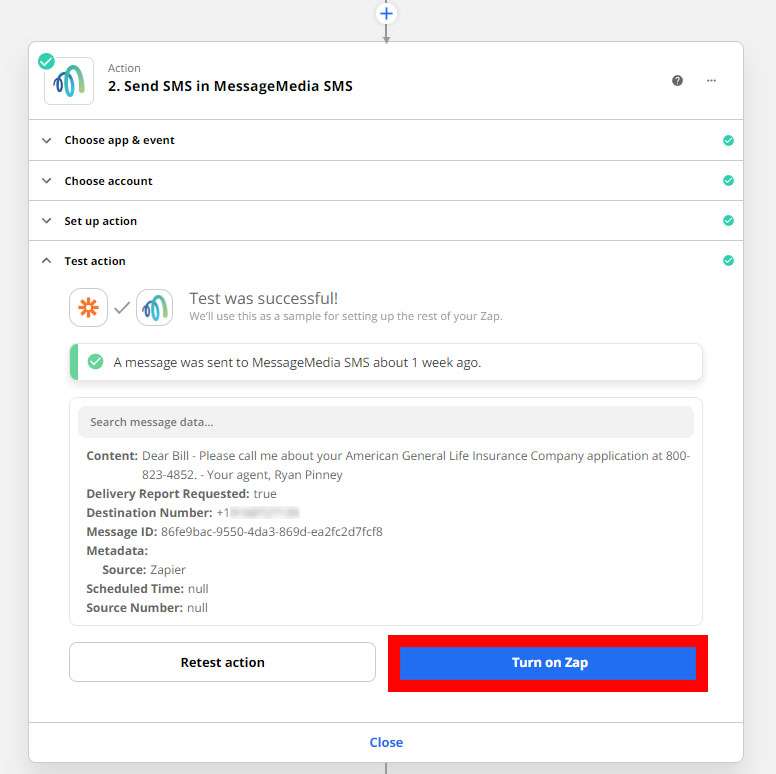
5. Scroll down and click the Test action section. Zapier will run a test using the data you have entered. If all goes well, you’ll see a success message.
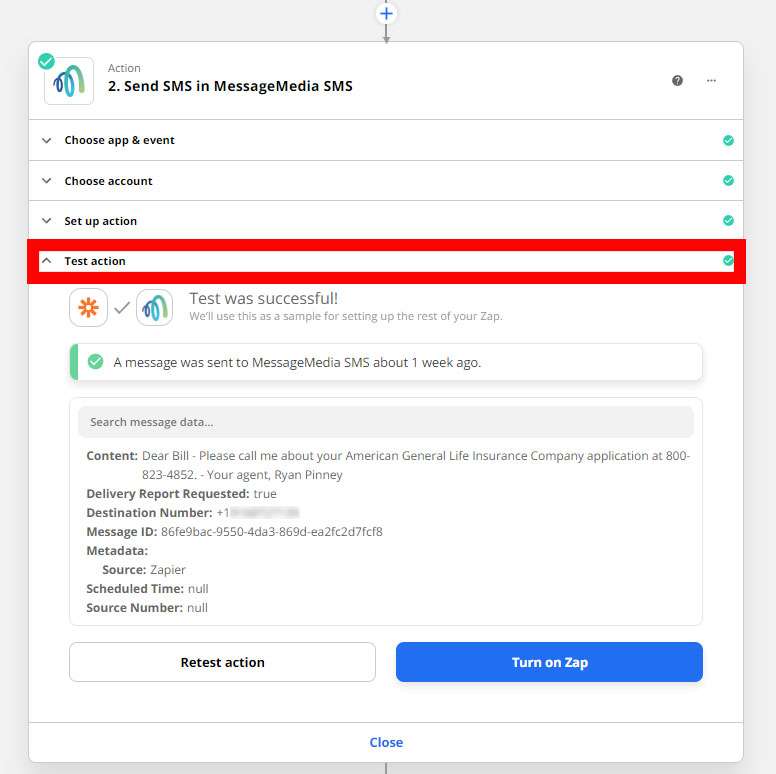
6. Click Turn on Zap. Your action(s) will now take place every time the task in Insureio triggers your webhook and payload.