LAST UPDATED: 6/9/21
Agent of Record
Located in My Account / Submission Options, your Agent of Record selection is necessary to complete and process your clients' life insurance application paperwork. The Agent of Record selection determines who the "writing agent" is on a particular case or application. Insureio allows you to enter up to 6 Agents of Record and 1 Assigned Agent per policy to enable commission splits. Anytime there are multiple Agents of Record, Insureio's reporting section will indicate as such with comma-separated lists of agent IDs and names.
NOTE: If you manage an agency, a downline, or several brands, you may want to assign/reassign the Agent of Record on a case. You'll need to check several system permission settings first. We walk you through the whole process below.
Jump to a section:
Set Yourself as the Agent of Record
Set Another User as the Agent of Record
Enable Commission Splits & Multiple Agents of Record with Automated Rules by Brand
Change the Agent of Record at the Policy Level
Set Yourself as the Agent of Record
In most cases, you will be the agent of record. If so, the system will use the account information from your My Account / Personal tab along with state licensing and agent contract numbers from the Licensing & Contracting tab and apply them to any submissions processed via the Insureio system.
1. To set yourself as the Agent of Record, click the Agent Name name field next to Agent of Record.

2. Start typing your name and Insureio will bring up a list of matching selections. Click on your name. You'll see your name displayed as the Agent of Record.

Set Another User as the Agent of Record
You would not be the agent of record if another agent is acting as a "solicitor" for your firm or agency, or if you are an administrative/support employee submitting information on behalf of an agent you work with. In these cases, the actual agent of record may be your up-line, your manager, or the principal at your agency. They will need to be an Insureio user to set them as your agent of record in the system. Set them as your agent of record as follows:
- Click the search box next to the Agent of Record field. Start typing a name or an email address and the system will pull up any matches.
- Click to select the appropriate user.

NOTE: You don’t need to do anything with the signature fields. We handle these as part of the contracting process.
Enable a Multiple Agent Commission Split at the Brand Level
If you know that all policies placed under this brand will have a commission split, you can enable that split at the brand level. Each entry you add will create another Agent of Record to whom you can assign a percentage of the commission. You can also add criteria for lead type and source to ensure that the correct split is applied based on where that policy originated. If needed, you can override these brand-specific rules within a policy.
When a lead hits the system for this brand, the system will first look for rules that apply to that lead’s source and/or lead type. If the system finds a match in the rules you enter here, the percentage set in those rules will apply. If the system finds no commission split details with matching lead type and/or source, the split will be applied according to the remaining rules. Here’s the order in which the system looks for and applies your rules:
- First priority: Lead type and source match
- Second priority: Lead type, but no source
- Third priority: Source, but no lead type
- Fourth priority: No source or lead type
If you want to override your brand-level split, you can do so on a case-by-case basis at the policy level. We'll go over that below.
Add Commission Split Rules
1. Click Add Split.

2. (optional) Click to select a lead type and/or source. These values are pre-populated based on previous use within that brand. If you don't use lead distribution, you may see no available fields or a default such as "IO quote path submission."

3. Add assigned user. Start typing the name of a system user. Insureio will pull up possible matches. Click to select the desired user. NOTE: Only users who have been given access to the brand will be available to select. Don’t see the user you want? Make sure they are members of the brand (as shown in the image below - the entry box is directly above the commission split entry).

4. Add the percentage this user should receive.

5. Click the blue checkmark to save this rule.
Once you add an additional agent of record, the system will add a row for the agent assigned. It will assign the remaining percentage to this agent. You can add additional agents of record by repeating the steps above. You may have up to six agents of record and one agent assigned.

Change the Agent of Record
If you manage an agency or downline, you may want to change the Agent of Record for a consumer or policy. There are a couple system permissions to check first. Without the right permissions, you won't be able to change the Agents of Record on a case.
How to View & Save System Permissions
1. To view, add, and save your permissions, go to My Account/Permissions.
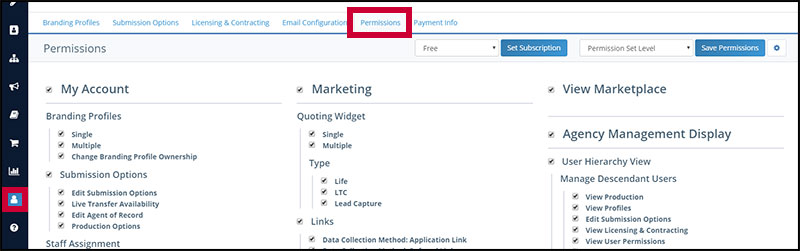
2. If, based on the instructions below, you need to add a permission, check the desired box and click Save Permissions in the top-right of the Permissions tab.

Make Sure You Have the Right Permissions
1. Edit Agents of Record. As the agency/brand manager, you need the appropriate system permission to edit the Agents of Record. This permission is located in the Permissions tab, under My Account/Submission Options. Be sure you have this permission checked. If not, check it and save the permissions.

2. View/Edit Descendants. If you and your desired Agent of Record are in the same hierarchy group (this is the case most of the time), you need the permission to view/edit a descendant. Look in the Agency Management Display permission set on the right-hand side of the Permissions tab. Find the Hierarchy Related Permissions section. Make sure View Descendants and Edit Descendants are checked. If not, check them and save the permissions.

Make Sure You and the New Agent of Record Share Access to the Consumer's Brand
1. Allow Multiple Brand Profiles. Changing the Agent of Record may require both users to have access to multiple brand profiles. If your agency only has one brand profile (i.e., there is only one possible brand all your consumers' policies could be under), you can skip this step.
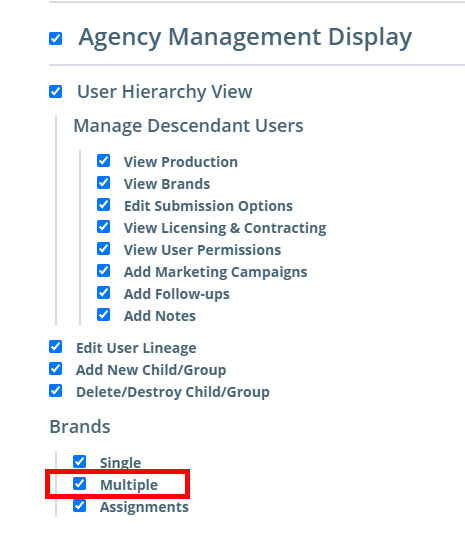
- To give yourself (the agency manager) this permission, look in the Agency Management Display permission set on the right-hand side of the Permissions tab. Find the Brands section. Make sure Multiple is checked. If not, check it and save the permissions.
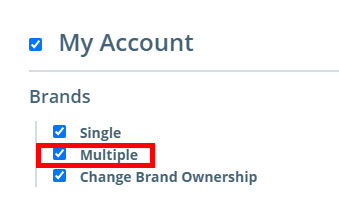
- To give the new Agent of Record this permission, look in their My Account/Permissions tab. Check the left-hand side of the Permissions tab and look for the Brands section. Make sure Multiple is checked. If not, check it and save the permissions. Not sure how to view a sub-user's profile? Click here.
2. Make sure your new Agent of Record is assigned to the brand of the relevant consumer/case.
- Go to My Account / Brands. Click the dropdown arrow to the right of the brand you want to edit. Choose Modify.

- Check the Allow Lead Distribution box. This will open up a list of your brand's members. Your name will be included by default. In the text box below your name, start typing in the name of the Insureio user you want to add to this brand. Insureio will pull up a list of matching results. Select the appropriate user and click the blue checkbox.

- Scroll to the bottom of the screen and click Save Brand.

3. Change the Agent of Record in the Policy Tab
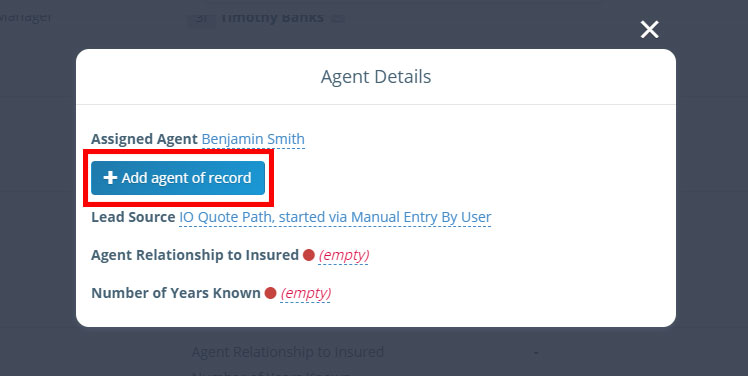
- In the client record, click the Policies tab. Click to open the relevant policy, then scroll down to the Agent Details section. Click the dropdown arrow at the top-right of the section (circled in the image below) and select Edit Agent Details.
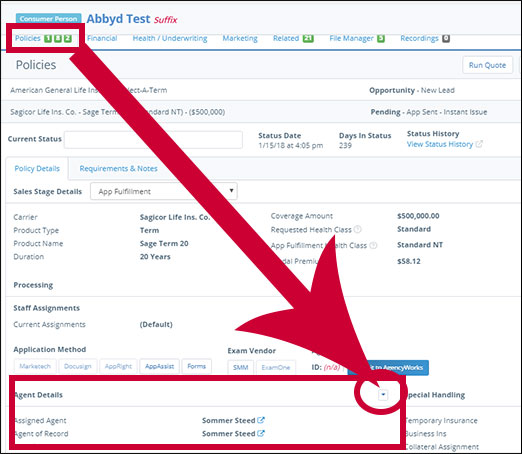
- In the pop-up modal, click Add Agent of Record. Start typing the new Agent of Record's name and select the match from the available options. Click the blue checkmark to save your selection.
- Keep in mind that if you're adding multiple Agents of Record, the commission split percentage must add up to 100%. For more information on commission splits, click here.