LAST UPDATED: 12/10/20
How to Auto-Enroll Consumers in a Marketing Campaign
You can automatically enroll consumers in a marketing campaign using a task as a trigger in your policy status rules. Keep in mind that this will enroll *everyone* who hits that status when this particular task fires. Scroll down to see best practices and considerations.
Jump to a section:
Auto-Enroll Consumers
Best Practices & Considerations
Auto-Enroll Consumers
1. Click Agency Management / Policy Status Rules in your left-hand main menu.

2. Find the status you want to add an auto-enrollment feature to. Click the gear icon on the right, then select Edit Tasks.

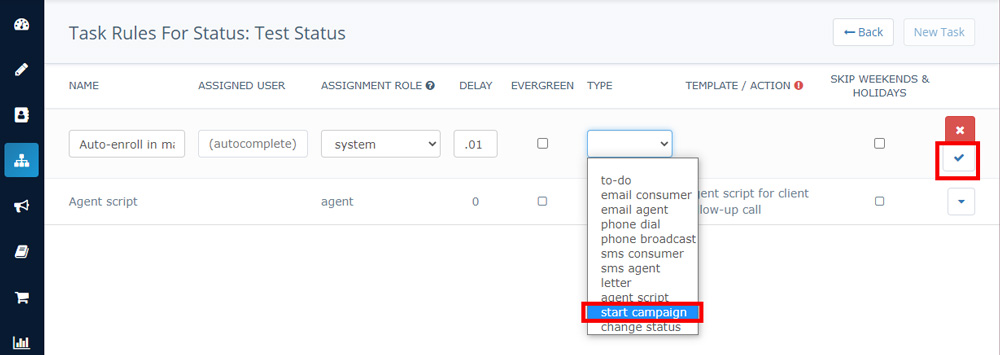
3. Click New Task in the upper-right hand corner.

4. Fill out the task builder options:
- Name: Create a descriptive name for this task (i.e., “Auto-enroll consumer in marketing campaign”).
- Assigned User: Leave this blank; the system will complete this task (as opposed to a user).
- Assignment Role: Select “system.”
- Delay: How long should the system wait between the previous task and this one? The delay is set by day, with “1” equaling 1 day.
- Evergreen: Leave this blank.
- Type: Select “start campaign” from the dropdown menu.
- Template/Action: Select the name of the campaign you want to enroll a consumer in this status in.
- Skip Weekends & Holidays: Should this task hold off on firing at the appointed time if it falls on a weekend or holiday? If you check this box, the task will fire as soon as the weekend and/or holiday is over.
- Click the checkmark button to save your task.
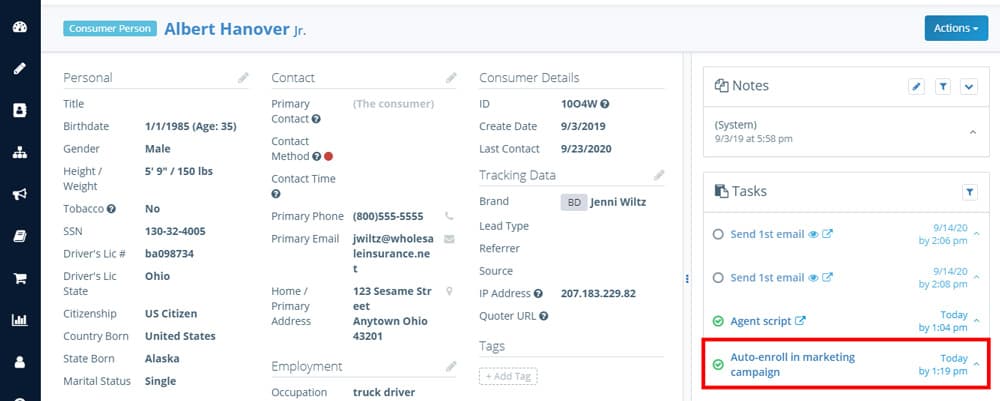
5. Want to confirm the auto-enroll is on schedule? Check the Tasks pane in a consumer profile. As long as they entered that status after you set up this task, you'll see the auto-enroll task at the bottom of the pane.
Best Practices & Considerations
Consideration: Keep in mind that if you add an auto-enroll task to a currently existing status, consumers already in that status will NOT be auto-enrolled. Insureio won't work backwards - it will only apply that auto-enroll task to consumers who land in the originating status going forward.
Use Case: Do you have a status for "no response" or "bogus" leads? If so, you can add an auto-enroll task to the end of these statuses. When that task fires, it will drop these leads into the campaign you select without having to manually change their status. This keeps your reporting accurate, as those leads will still show up in the "no response" or "bogus" category. But that long-term nurture campaign just might get you a response that lets you move forward with that consumer.
Use Case: Automate annual review campaigns. First, create a marketing campaign that includes a series of emails and/or tasks relating to your annual review process. For example, there might be an email or two to the consumer, alerting them that it's time for their review. You could also include a follow-up task reminding you to call them, and an agent script for the call itself. At the end of this campaign, include an auto-enroll task for the following year that would fire in 350 days, for example. Then, at the end of your "in force" status, you'd add an auto-enrollment task for your annual review campaign that fires in 350 days. Now you have an automated evergreen annual campaign for yearly policy reviews. You could also create a 5-year or 10-year policy review sequence in a single status using this technique.
Use Case: Automate end-of-term reminders. Create campaigns with agent to-do tasks, agent scripts, and consumer-facing emails that remind clients when their term policy is set to expire. You could use a different "in force" status for each variety of term policy - "in force 10 years," "in force 20 years," etc. At the end of each status, add an auto-enroll task for your end-of-term campaign. Since the delay function uses an entry of 1 for each day of delay, you'd set the delay on a 10-year policy to something like 3,285 (a 9-year delay) or 3,467 (9.5 years).
Use Case: Automate a sequential newsletter. Create a different campaign for each month of the year. Fill that campaign with any emails you like from our global selection, or create your own. Next, go into each month's campaign and add a final auto-enroll task and select the next month's campaign. That's a whole year of marketing in a few minutes' work! If you want to re-use that set-up year after year, all you have to do is go into your pre-built campaigns and revise or replace the text of the emails in that campaign. You can even add an agent to-do task to each month's campaign, reminding you to revise or replace next month's campaign emails before they go out.