LAST UPDATED: 1/6/23
Advanced Lead Tracking & Pre-Populating Fields Using the Quoting Widget
In the Marketing section, use the Quoting Widget tab to create a personalized quoter that you can embed on your website(s). This article explains how to use the widget's advanced tracking options by appending codes to a web page's URL. You can also use the techniques described below to pre-populate quoting fields in your widget.
Jump to a section:
How Advanced Lead Tracking Works
Creating an Advanced Tracking Parameter Using Marketing Tags
Creating an Advanced Tracking Parameter Using Quote Details
Creating an Advanced Tracking Parameter Using Marketing Tags & Quote Details
Pre-Populating Widget Fields (including coverage length)
How Advanced Lead Tracking Works
The Insureio quoting widget allows you to track lead sources using the URL of the page on which your quoter is housed. This is handy if you're using display ads, remarketing, or other sources for leads that constantly change, but need to be tracked when leads are generated. When a prospect uses that URL to get a quote, your unique tracking codes will transmit to the system along with your prospect's details.
To use advanced lead tracking, you'll append codes to the URL of your quoter page. You can use codes for marketing tags, codes for quote-related data such as the state, policy face amount, etc., or any combination of the two.
Here's an example of a specific URL with tracking details appended for a marketing tag:
http://www.mywebsite.com/quotes.html?io_tags[]=health-diabetes
Creating an Advanced Tracking Parameter Using Marketing Tags
- Begin with the URL of the page on which your Insureio quoting widget is housed. In our example above, that would be https://mywebsite.com/quotes.html.
- Add a ? immediately after the ending of the page address. This is the beginning of the parameters (aka the query string) you are passing to the page.
- Insert the prefix io_tags[]=. Those two characters to the left of the equals sign are the left and right bracket with no space or other characters between them; this tells the server that the parameter should be treated like an array. We insert this prefix before any URL parameters meant for our quoting widget so they don't conflict with the names of any parameters meant for the host page (i.e., if you're running a display ad on a website and the host page has its own parameters for Google Analytics or similar tracking service).
- Insert your marketing tag. In the example above, that is health-diabetes.
- OPTIONAL: Insert any additional query strings formatted like this:
- Use the & symbol to separate this new key/value pair from the previous pair.
- Insert the prefix io_tags[]=.
- Insert your query string as described above.
- If we were adding to the example above, it would look like this: &io_tags[]=career-businessowner.
A full example with two key/value pairs would look like this:
https://mywebsite.com/quotes.html?io_tags[]=health-diabetes&io_tags[]=career-businessowner
Creating an Advanced Tracking Parameter Using Quote Details
- Begin with the URL of the page on which your Insureio quoting widget is housed. In our example above, that would be http://www.mywebsite.com/quotes.html.
- Add a ? immediately after the address of the page ends. This is the beginning of the parameters (aka the query string) you are passing to the page.
- Insert your key/value pair. Your key should be prefaced by io_ then followed by = then followed by a value. Here's an example: io_state_id=5.
- You can use any of the following keys to create a query string:
- duration_id (signifies the policy duration) - the corresponding value must be one of these Term Life Insurance (TLI) duration option codes
- id
- state_id - the corresponding value must be one of these State ID codes
- birth_day
- birth_month
- birth_year
- height
- weight
- gender
- face_amount
- health_class - the corresponding value must be one of these Health Class codes
- address_id - the corresponding value must be one of these Address Type codes
- You can use any of the following keys to create a query string:
Creating an Advanced Tracking Parameter Using Marketing Tags & Quote Details
You can use parameters for both marketing tags and quote details in your URL. Add an unlimited number of marketing tags by using the prefix io_tags.
Here's an example of a URL that contains parameters for marketing tags and quote details:
https://mywebsite.com/quotes.html?io_state_id=5&io_height=6_0&io_tags[]=health-diabetes
Pre-Populating Widget Fields (including coverage length)
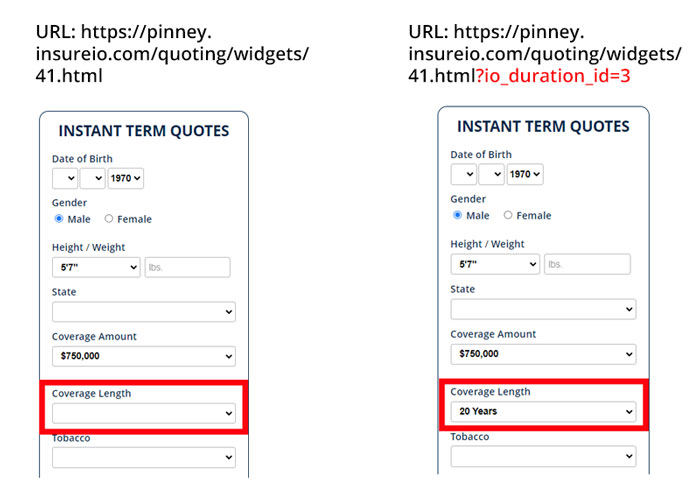
You can also use specific parameters to pre-populate quoting fields in your widget. For example, let's say you want to display "20 years" as the default coverage length in a term life quoting widget. You could make that happen in two different ways.
Method 1: In the URL
Using this method, you will add a query string to the widget URL to change the default selection for the relevant entry box. As an example, your final URL will look something like this: https://yoursubdomain.insureio.com/quoting/widgets/yourwidgetnumber.html?io_duration_id=3. Here's how to put it together.
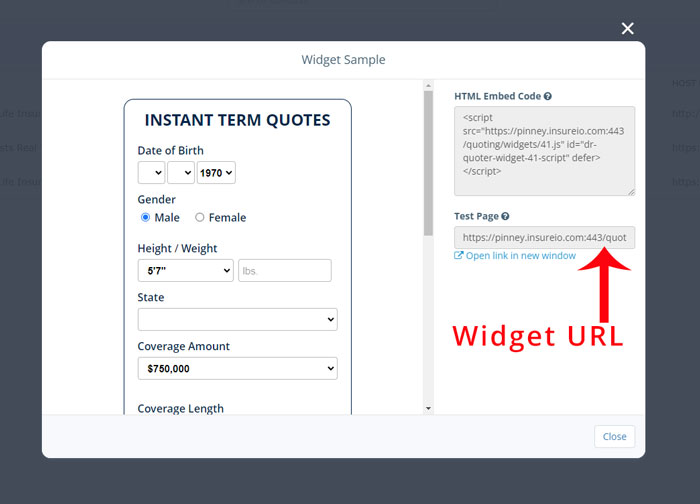
Step 1. Start with the URL of the widget you wish to pre-populate. Any widgets you've saved will be in the Marketing / Quoting Widgets section of Insureio. To find a widget's URL, click the dropdown arrow to the right of the widget and select Show. Click "open link in new window" to create and test your query string.

Step 2. Add a ? to the end of the your widget's URL. It should look like this:
https://yoursubdomain.insureio.com/quoting/widgets/yourwidgetnumber.html?
Step 3. Add the key for the parameter you want to pre-populate. Every key must be prefaced with io_. You can use the list of keys provided in the section above (Creating an Advanced Tracking Parameter Using Quote Details). The most frequently used keys are state_id and duration_id. Formatted for your URL string, they would appear as io_state_id and io_duration_id. For the purposes of this example, we're using duration_id. It should look like this:
https://yoursubdomain.insureio.com/quoting/widgets/yourwidgetnumber.html?io_duration_id
Step 4. Add an equals sign and the desired value for your key. Note that, as referenced above, both duration_id and state_id require a corresponding value from the Insureio Data Codes page. For this example, 3 is the code for a 20-year term length we want.
https://yoursubdomain.insureio.com/quoting/widgets/yourwidgetnumber.html?io_duration_id=3
Step 5. Check to be sure your complete URL displays the parameter you added. You may need to refresh your browser.

Method 2: Add code to the webpage.
Add a piece of code to your page that contains the parameter(s) you want to pre-populate. This code snippet uses "window variables" and requires you to add your desired query parameters, then insert the code onto the page where you plan to use your widget. You'll add query parameters to the second line of code as shown below. Once you build your snippet, paste the resulting code somewhere in your page before the normal widget snippet.
In our sample below, you'll see the query parameter following "window.io_". In this example, as in the method above, we're using the parameter to set the default coverage length to 30 years. In that case, we follow "window.io_" with "duration_id=3;".