LAST UPDATED: 1/6/23
Personal Information
Your personal information is stored in the My Account section. The information you include here will help populate emails sent to clients, as well as let us know how to contact you if we need to. This is also where you can view your subscription level and change your password.
Fields that must be updated for your dashboard or client status emails to function properly are described in red text below.
Overview
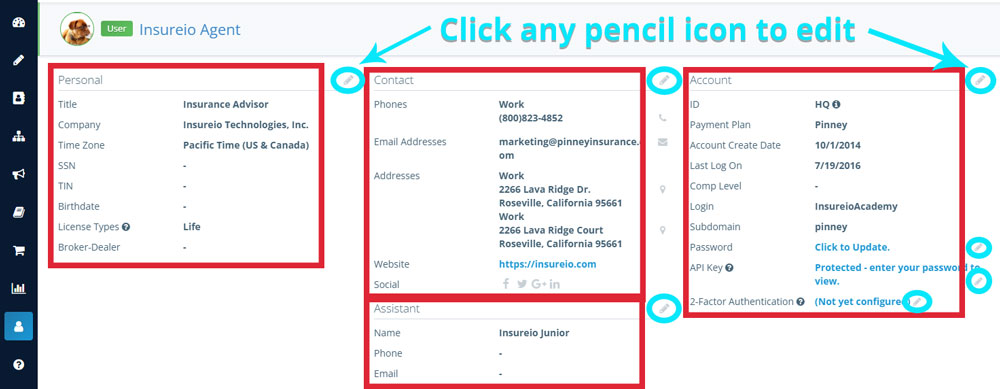
Let's take a look at the four personal information sections housed in the top of your profile. The first time you log in, please be sure you fill in as much of this information as possible. Click the pencil icon to the right of any section to enter or edit your information. Here's what it looks like:
Personal
This section includes your title, company, time zone, SSN, TIN, birth date, license types, and broker-dealer status. To add or edit information, click the pencil icon at the top right of the column. A data entry window will appear. Click any blue or red text to edit. Some information - such as your company name - will auto-fill based on the information you provided at sign-up. To skip or cancel without saving, click outside the data entry window.
Note: It's important to fill in as much of this information as you can. Most client communication templates will populate with information specific to your brand, but if that information is unavailable or left blank, the system may try and fill the gaps with information from your personal profile. We'll go over each field in detail below. To learn more about our marketing templates and how they work, click here.
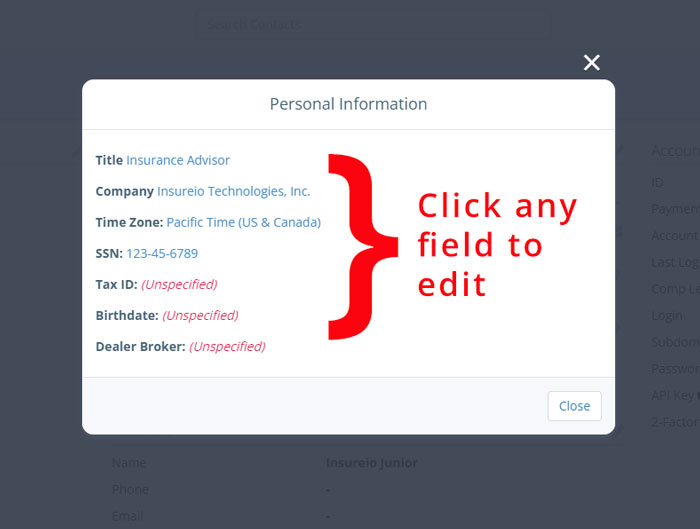
Title: Fill in your job title as you would want a client to see it. Some marketing and status templates use this as part of an email signature block.
Company: Fill in your job title as you would want a client to see it.
Time Zone: Click this field to reveal a dropdown menu and select your time zone. Do not skip this step. On your dashboard, you will see each client’s time zone in relation to yours. For example, if you are on Pacific time, the time zone of a client on Eastern time will appear as “+3.” The dashboard can’t populate correctly unless it knows which time zone you’re in. There is no default time zone set, so this will appear blank until you fill it in. Your time zone must be set in order for your dashboard to function properly.
SSN: Fill in the SSN field with your social security number. Filling in a non-existent number (i.e., 555-55-5555) will generate an error message. Why do we need this? We ask for this information here because some carriers require your SSN or Tax ID for electronic forms, like an eApplication. Insureio is set up to populate those forms with the info entered here, not the info you provided to Licensing & Contracting.
TIN: Fill in the TIN (Taxpayer Identification Number) field with your taxpayer identification number. Filling in a non-existent number (i.e., 555-55-5555) will generate an error message. Why do we need this? We ask for this information here because some carriers require your SSN or Tax ID for electronic forms, like an eApplication. Insureio is set up to populate those forms with the info entered here, not the info you provided to Licensing & Contracting.
Birthdate: Fill in the day, month, and year of your birth. Why do we need this? We ask for this information here because some carriers require your date of birth for electronic forms, like an eApplication. Insureio is set up to populate those forms with the info entered here, not the info you provided to Licensing & Contracting.
License Types: This information is populated via the Licensing & Contracting tab.
Broker-Dealer: This information is populated by your Insureio brokerage director.
Contact
This section includes your phone numbers, email addresses, mailing addresses, websites, and social media profiles. To add or edit information, click the pencil icon at the top right of the column. A data entry window will appear. Click any blue or red text to edit. Some information - such as your phone and email address - will auto-fill based on the information you provided at sign-up. To skip or cancel without saving, click outside the data entry window.
Note: It's important to fill in as much of this information as you can. Most client communication templates will populate with information specific to your brand, but if that information is unavailable or left blank, the system may try and fill the gaps with information from your personal profile. We'll go over each field in detail below. To learn more about our marketing templates and how they work, click here.
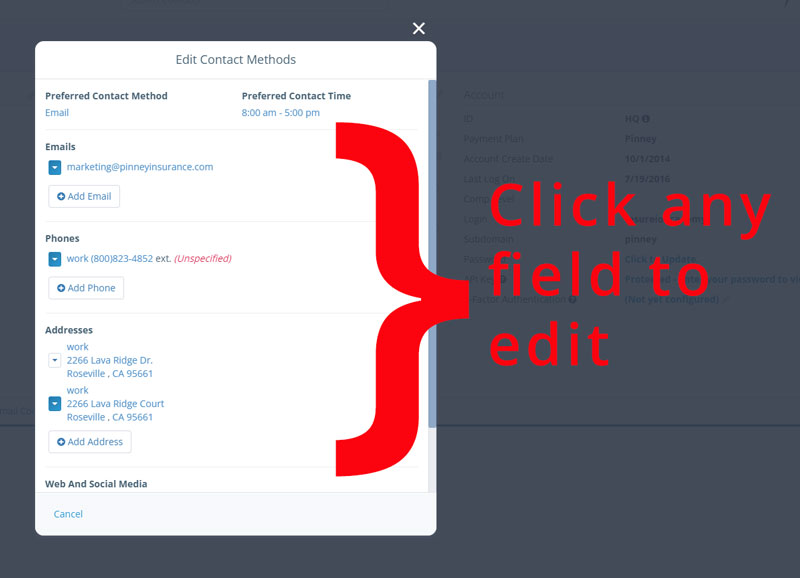
Preferred Contact Method: Select "phone call" or "email," then click the blue checkmark icon to save or the X icon to cancel.
Preferred Contact Time: Enter your preferred contact time, then click the blue checkmark icon to save or the X icon to cancel.
Emails: The information entered here is what we will use to contact you, should we need to. These are not necessarily the email addresses you would provide to a client - those will be entered in your brand profile. However, if nothing is entered in the brand profile, our marketing templates may pull this email as a default. To add an additional email address, click "Add Email" and enter the address. Click the blue checkmark icon to save or the X icon to cancel. Once you have entered at least one email address, you can set it as your primary email with the dropdown arrow to the left of the saved email address; the dropdown arrow will be blue once you have set a primary email. Some marketing and status templates use this as part of an email signature block.
Phones: The information entered here is what we will use to contact you, should we need to. These are not necessarily the phone numbers you would provide to a client - those will be entered in your brand profile. However, if nothing is entered in the brand profile, our marketing templates may pull this phone number as a default. To add an additional contact number, click Add Phone. Choose "home," "work," "mobile," or "fax" from the dropdown menu, and enter the number. If the number has an extension, please be sure it's included. Click the blue checkmark icon to save or the X icon to cancel. Once you have entered at least one phone number, you can set it as your primary number with the dropdown arrow to the left of the saved phone number; the dropdown arrow will be blue once you have set a primary phone. Some marketing and status templates use this as part of an email signature block.
Address(es): Click Add Address, then select "home," "work," or "mailing" from the dropdown menu. Fill in your street address, city, state, and zip. Click the blue checkmark icon to save or the X icon to cancel. The "work" address is the one we will use should we ever need to reach you by mail. Once you have entered at least one address, you can set it as your primary address with the dropdown arrow to the left of the saved address; the dropdown arrow will be blue once you have set a primary address. Some marketing and status templates use this as part of an email signature block.
Web And Social Media: This is where you enter your website URL and your social media profile links. The website URL isn't necessarily the website you send clients to - this will be entered in your brand profile. Some marketing and status templates use your website URL as part of an email signature block.
To add a new site or social media profile, click Add A Website Or Social Media Account. Select the appropriate category from the dropdown menu (website, LinkedIn, Facebook, or Twitter). Enter the information as specified below, then click the blue checkmark icon to save or the X icon to cancel.
For a URL: Enter a complete URL (http://www.yourwebsitehere.com). Don't forget to include the "http://" or "https://" and, if your address includes it, "www." Note: if you do not include a complete URL, your website address will not display as a hyperlink in any template-based emails sent to clients and prospects.
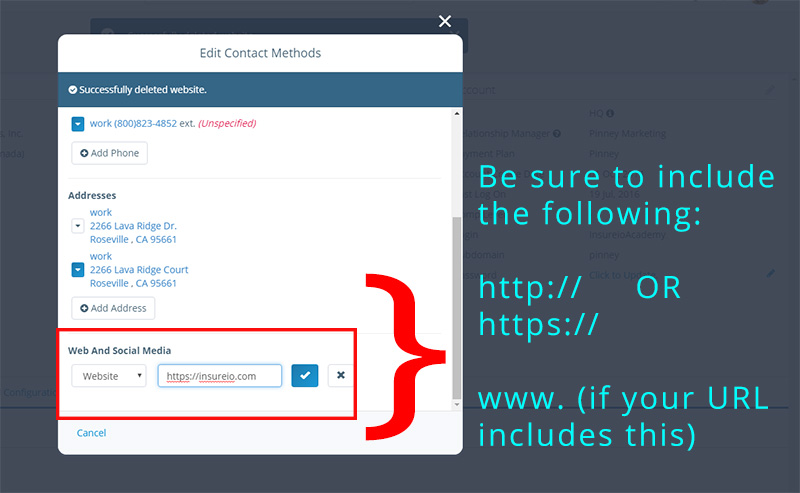
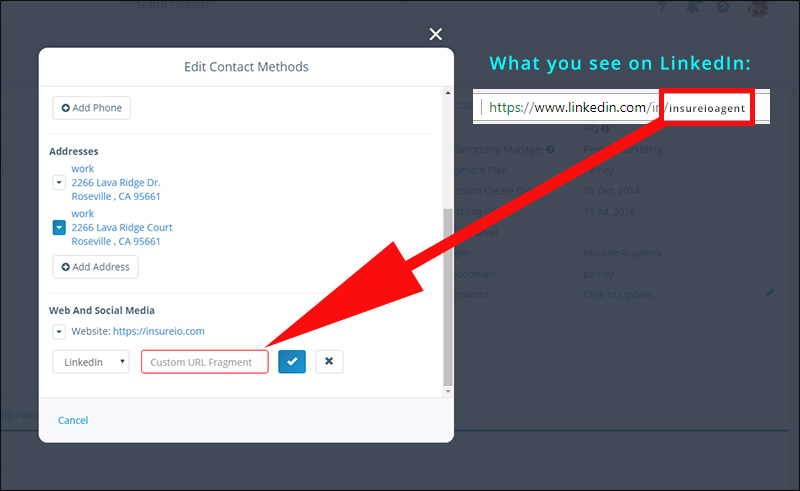
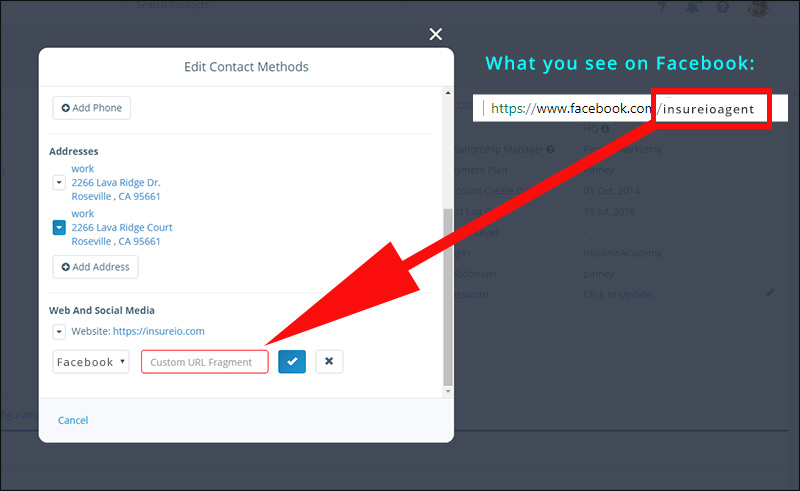
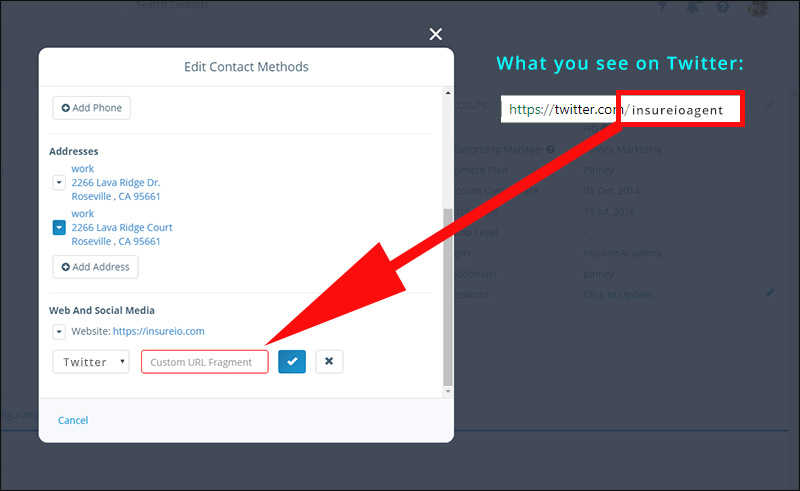
For social media profiles: Enter a portion of the URL for your social media profile, as shown in the examples below:
LinkedIn: http://www.linkedin.com/in/enter this portion of the URL
Facebook: https://www.facebook.com/enter this portion of the URL
Twitter: https://twitter.com/enter this portion of the URL
Assistant
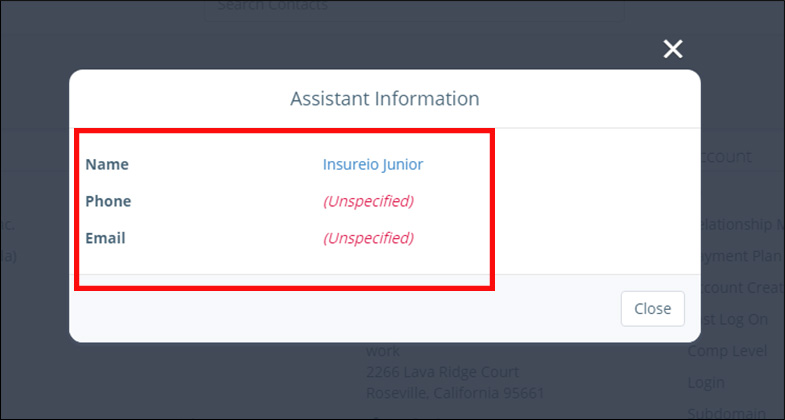
This section lets you include an assistant's name, phone, and email. To add or edit information, click the blue icon at the top right of the column. A data entry window will appear. Click any blue or red text to edit. To skip or cancel without saving, click outside the data entry window.
Account
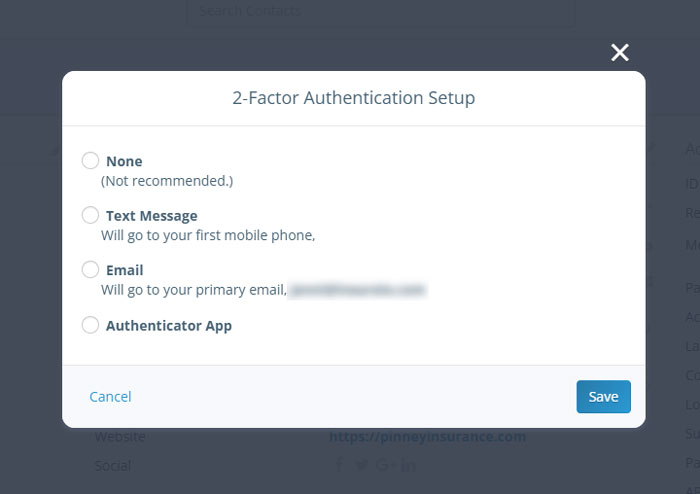
This section lets you view your account details, including your subscription level and login information. Here, you can change your password and set up 2-factor authentication. Your password field will appear blank because your password has already been saved. You only need to use this field to update your existing password.
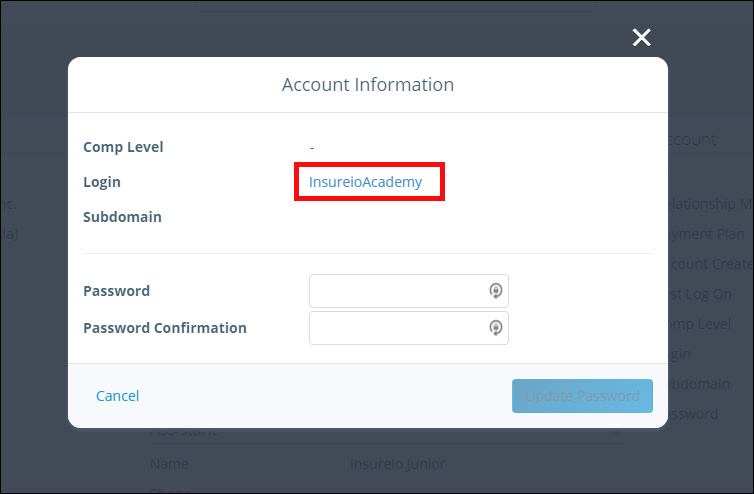
To change your login ID: Click the blue icon at the top right of the Account column. Click the blue text of your existing login ID. Type in a new login ID, then click outside the data entry window. Insureio will automatically save your new entry. To cancel without saving, delete any changes and click outside the data entry window.
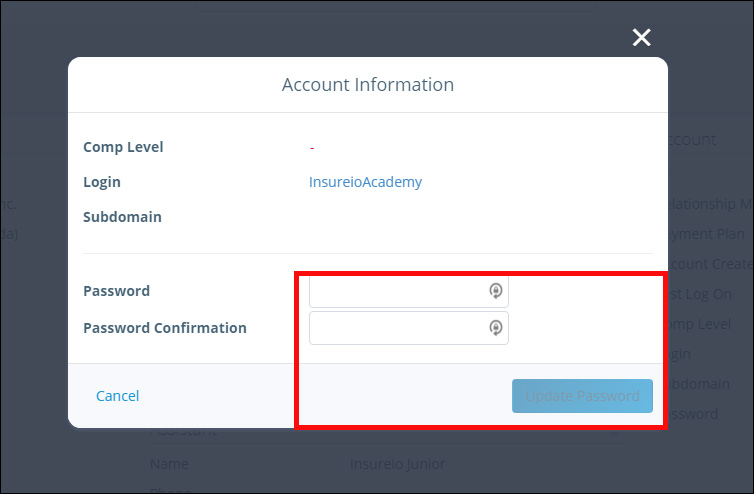
To change your password: Type a new password in the "Password" text box. Re-type your new password in the "Password Confirmation" text box. Click Update Password.
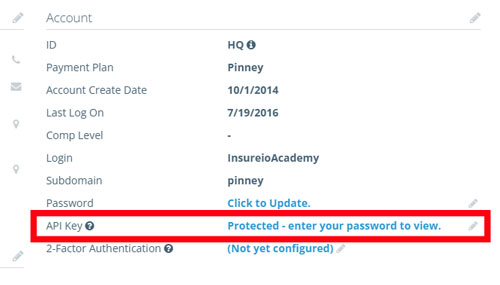
This section also contains your API key. To protect it, you will need to enter your password to view it. This key is unique to your account. It verifies your identity when you use the Insureio API. Treat this like a password. Do not store it with others. Only store it in secure locations that no one but you can access. If at any point your computer or API key become compromised, immediately reset both your API key and your password in this section here.
This section also contains the setup for 2-factor authentication. You'll need to re-enter your password to set this up. You can select authentication via text message, email, or authentication app.
