LAST UPDATED: 5/6/22
How to Auto-Advance a Status
You can auto-advance a consumer from one status into another status using a task as a trigger in your policy status rules. Scroll down to see best practices and considerations.
Jump to a section:
Auto-Advance a Status
Best Practices & Considerations
Auto-Advance a Status
1. Click Agency Management / Policy Status Rules in your left-hand main menu.

2. Find the status you want to advance FROM. Click the gear icon on the right, then select Edit Tasks.

3. Click New Task in the upper-right hand corner.

4. Fill out the task builder options:
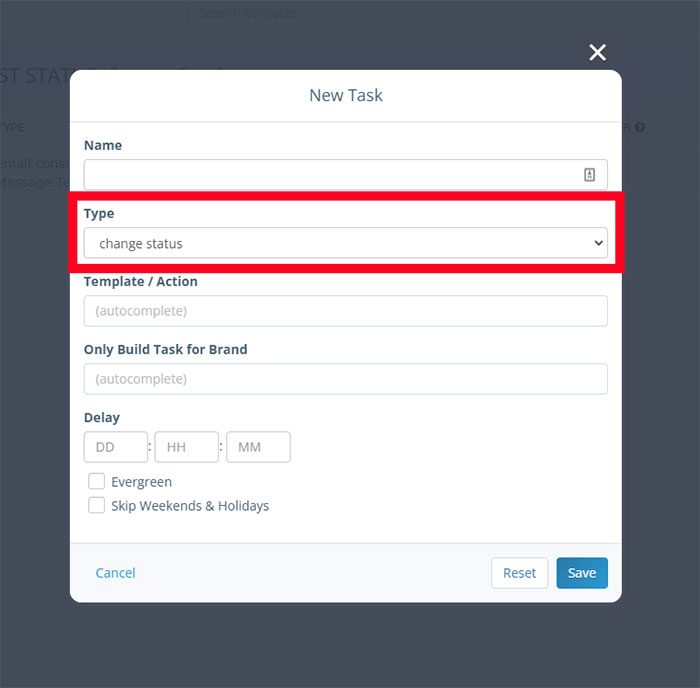
- Name: Create a descriptive name for this task (i.e., “Auto-advance to Marketing-Nurture Status”).
- Type: Select “change status” from the dropdown menu. Note that any non-evergreen tasks scheduled to run after this one within the same status will be cancelled when this task initiates a status change.
- Template/Action: Select the name of the status you want to advance TO.
- Only Build Task for Brand: If this task should only apply to contacts within a certain brand, select that brand here. If this task should apply to all contacts regardless of brand, leave this blank.
- Delay. How long should the system wait between the previous task and this one? Use the three boxes to input a number for days, hours, and minutes (i.e., to add a delay of 1 day, enter 1:00:00).
- Evergreen. Leave this blank.
- Skip Weekends & Holidays. Use this to indicate whether the task should skip holidays and weekends. This is best used with automated email sends to clients, leads, and prospects. To be sure an email or text message is only sent during the work week, and not on a holiday, check this box.
- Click the Save button to save your task.

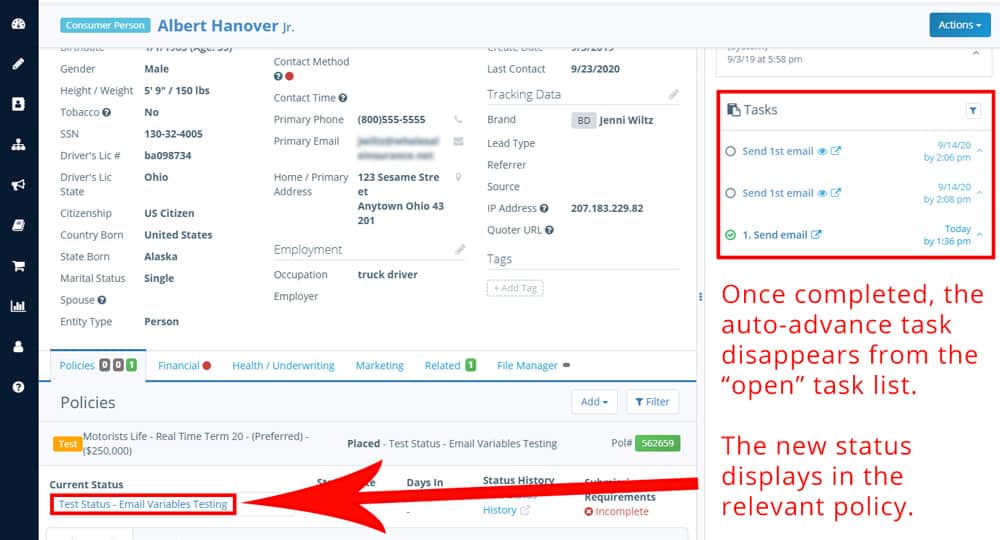
5. Once a consumer enters the originating status, you’ll see the auto-advance task appear in the Tasks pane in the consumer profile. That task tells you when the auto-advance will occur.
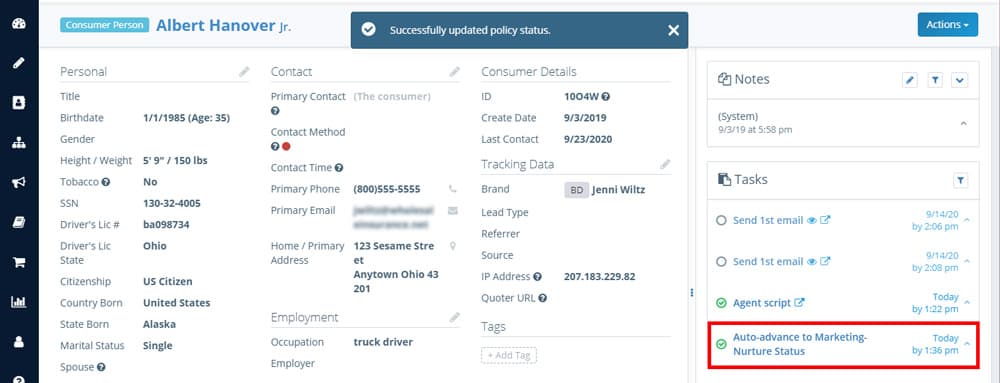
6. When that task fires, the auto-advance task will mark itself complete and disappear from the open tasks in the task pane for that consumer. Still need to see the task? Change the task filter in the top left of the Tasks pane to “complete” to see completed tasks instead. If you check the status of the relevant policy, it will have advanced to the status you selected in the auto-advance task.
TIP: Don’t see any of these changes after the task should have fired? Refresh your browser and check again.
Best Practices & Considerations
Consideration: Keep in mind that if you add an auto-advance task to a currently existing status, consumers already in that status will NOT be auto-advanced. Insureio won't work backwards - it will only apply that auto-advance task to consumers who land in the originating status going forward.
Best Practice: If your workflow for new leads includes calling and emailing a client and then changing their status to "Hot Lead," it's easy to forget to go back and change that if you're unable to reach them in a timely fashion. You want to keep trying, but you also don't want a clearly cold lead to stay in a "Hot Lead" status. Auto-advancing between a variety of hot/medium/cool/no response lead statuses can give you a more accurate picture of how aged your leads are, as well as help make reporting more accurate. From the agent's perspective, this makes working that lead 100% touchless. Just follow the task prompts in your dashboard, knowing that lead will automatically be moved through your sales cycle. This level of automation can help you and your team work through a more diligent and accurate follow-up campaign with minimal manual interaction.
Caution: Make sure a new lead doesn’t simply run through the statuses with little to no agent action being taken. Include tasks as call reminders in addition to automated emails and texts to reach that client.