LAST UPDATED: 6/15/22
Creating, Populating, and Using Marketing Campaigns
All Insureio marketing campaigns are built and stored in the Marketing section. From your left-hand navigation menu, click Marketing and then Marketing Campaigns. You can view any previously saved campaigns or create a new one. The video below will give you an overview of how to create a campaign and enroll a contact.
Important! Keep in mind that all emails sent by Insureio go out via *your* email account (the one you added via the Email Configuration process). All marketing campaigns are subject to the sending limits imposed by your email provider.
Jump to a section:
Before You Send: Enable Bulk Sending
Creating a Campaign
Populating a Campaign
Modifying or Deleting a Campaign
Managing Contact Enrollment in a Campaign
Before You Send a Blast: Enable Bulk Sending
Before sending your first campaign, make sure you've enabled blast distribution in your email settings. To check your settings, visit My Account / Email and look for the Bulk Sending feature. If you didn't enable this feature when setting your initial email configuration, it will be unchecked by default. 
Need to enable your bulk sending? Go to My Account / Email. Click the dropdown button on the far right to edit your settings.
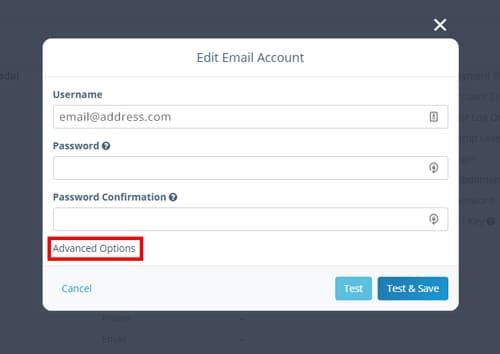
In the Edit Email Account dialog box, click Advanced Options.
Click the checkbox to enable bulk sending, as shown below. Click Test & Save.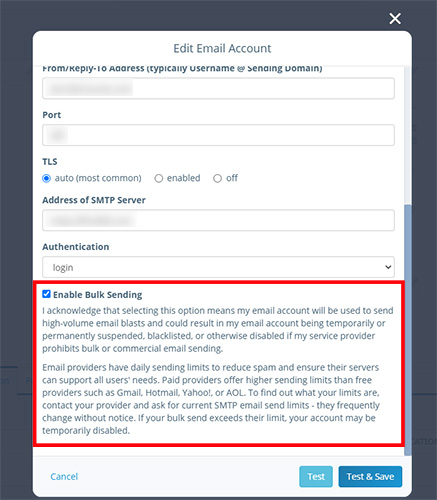
Now you're ready to send!
Creating a Campaign
1. Click Marketing and then Marketing Campaigns in your left-hand main menu.
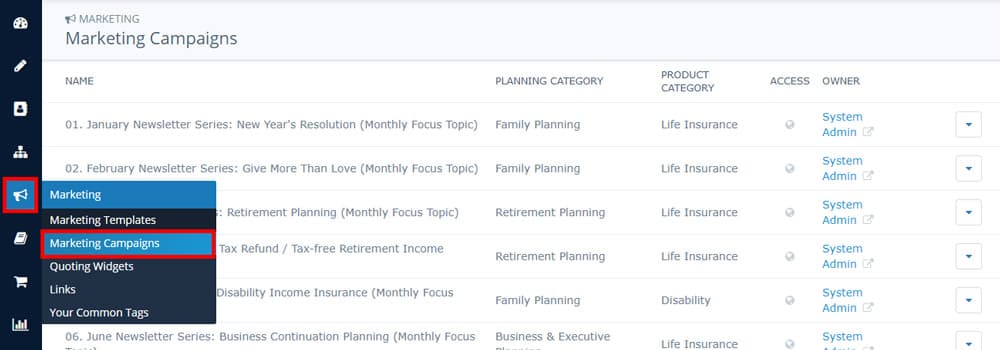
2. Click the blue New Campaign button.

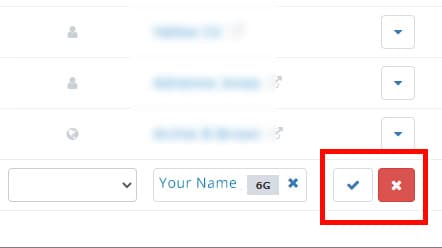
3. Fill out the series of blank fields that appear at the bottom of any previously created campaigns.
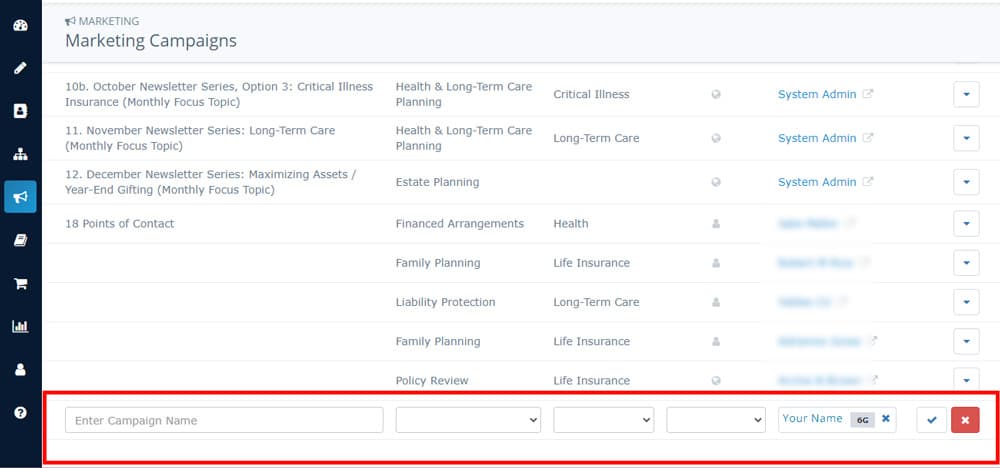
Here's how to fill in each of those fields:
- Name. In the first field, give your campaign an appropriate name. Remember, the more campaigns you have, the harder it will be to tell the difference between them based on name alone. We suggest naming campaigns based on descriptors such as the customer profile being targeted (“High Net Worth”), product being offered (“Life Insurance - Buy/Sell”), or subcategory being targeted (“Life Insurance for Moms”).
- Planning Category (optional). Use the dropdown menu to choose the planning need that best fits your campaign. Current choices include Estate Planning, Business & Executive Planning, Charitable Planning, Health & Long-Term Care Planning, Liability Protection, Policy Review, Family Planning, and Financed Arrangements.
- Product Category (optional). Use the dropdown menu to choose the product category that best fits your campaign. Current choices include Life Insurance, Annuities, Long-Term Care, Disability, Critical Illness, Medicare Supplement, Dental, Vision, Health, Home, or Auto.
- Owner. Who should have access to this campaign? If you have team members and/or a downline, select “user and descendants.” If it’s just you, leave the default of “user.”
4. Click the checkmark icon on the right to save your campaign. Click the red "x" icon to delete this new campaign.
Populating a Campaign
All campaigns are composed of tasks - these tasks tell the system to send an automated email, create an agent-follow-up, etc. Before you start adding tasks to your campaign, you'll need to know the name of any templates you want to include. Having those names handy before you get started will save you a lot of time. We suggest browsing the available templates first.
Browse for Templates
1. In the Marketing section of your left-hand main menu, click Marketing Templates.

2. As you browse the list of available templates, jot down the names of the ones you want in your new campaign.
Add Tasks to Your Campaign
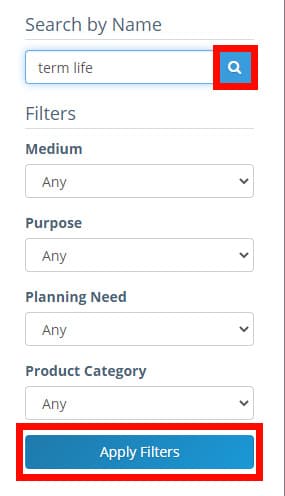
1. Locate the name of the campaign you want to populate in the Marketing / Marketing Campaigns section. You can use the search box at right to search by name, planning need, or category. Be sure you click the magnifying glass button instead of hitting return after you type in a search query.
2. Click the campaign name to open it. Any associated tasks will display under the campaign name.
3. Click the blue New Campaign Task button. You can populate campaigns with any combination of emails, text messages, tasks, scripts, status changes, or campaign auto-enrollments. Here are the fields you need to fill in to create a campaign item:
- Name. Provide a name for this particular task within the campaign. This is just for your reference, so we suggest naming tasks with their order in the campaign, and a brief description of what they're about. Examples include “Email 1: Introduction,” "Email 2: Why You Need Life Insurance," “Phone Call Follow-Up,” etc. You don’t need to include the name of a particular template- the task title is just to keep you organized.
- Assignee (optional). If the task needs to be performed by a Insureio user rather than the system, you can assign that user here. If the task will be automated, such as simply sending an email, you can leave this field blank.
- Role. Select the appropriate role for this task from the dropdown menu. In most cases, this will be “system.” All automated tasks, such as email or text message sends, should be set to “system.” If your task is a follow-up phone call that you assigned to a specific person in your agency hierarchy, for example, you could select that role here (assistant, case manager, etc.).
- Delay. You have the option to set a delay before this campaign element is processed by the system. The delay on each campaign item is triggered as soon as you enroll a contact in the campaign. To space out campaign items, simply use a longer delay for each subsequent item. This feature makes it easy to set up a seamless drip-marketing campaign (see our tip below). All times should be entered using a 24-hour clock. For example, enter “0” for no delay or “1” for a 24-hour delay. We recommend building in a small delay for the first campaign element in case you accidentally enroll someone in a campaign. TIP: To create a weekly drip email campaign, your second campaign element should have a delay of 7, your third element should have a delay of 14, etc. Here is a list of common delay entries:
- 1 = 24 hours
- .5 = 12 hours
- .25 = 6 hours
- .125 = 3 hours
- .063 = 1.5 hours
- .031 = 45 minutes
- .016 = 22.5 minutes
- .008 = 11.25 minutes
- .004 = 5.6 minutes
- Evergreen (optional). If you're creating a to-do as part of your campaign, you can check this box to make sure that task stays on your dashboard until you mark it complete. If you don't want the to-do to appear on your dashboard until it’s marked complete OR this campaign element isn’t a to-do, leave this box blank.
- Type. Specify the campaign element type from the dropdown menu. Options include to-do, email, sms, start campaign, change status, and more. In most cases, you’ll want to use email/sms or start campaign (to auto-enroll in a follow-up campaign).
- Template / Action. If you select a campaign element that's dependent on a template (such as an email, sms, status change, or campaign auto-enroll), choose that element here. You’ll need to know the name of the template, status, or campaign first – currently, you can’t preview any of them from this screen. Type the desired template name into the "Template" field. Insureio will pull up a list of matches and you can select the one you want.
- Skip Weekend & Holiday Sending (optional). If you know you only want your campaign items to fire during the week on a non-holiday, check this box. If you check the box for a campaign item with a delay and the delay expires on a weekend or holiday, Insureio will hold off on processing that campaign item until the next allowable time (i.e., a non-holiday weekday).
4. Click the checkmark icon on the right to save your changes. To cancel, click the red "x" icon at any time.
Modifying or Deleting a Campaign
1. Click the blue arrow to the right of any campaign name to reveal a dropdown menu. Use that menu to select Modify to edit your campaign. Select Remove to delete a campaign.

NOTE: "Modify" will let you change the name, planning category, product category, and access for a campaign. To edit an item within the campaign, click the campaign to open it, find the task you want to change, and use the blue arrow dropdown menu for that task (at the end of the row).
Managing Contact Enrollment in a Campaign
There are three ways a contact can be enrolled in a campaign:
- When a contact enters a status that contains an auto-enroll task. When that task fires, they'll be enrolled in the selected campaign. Click here to learn more about the auto-enroll feature.
- Via the bulk enroll function in the Marketing Campaigns section (described below).
- Via the Marketing tab in the contact's profile (described below).
Enrollment via Bulk Enroll
1. To use this function, you need a saved report that contains the contacts you want to enroll. Click here to learn how to build and save a report for an email blast.
TIP: You can build reports that gather contacts by status, tag, lead type, source, carrier name, and more. If you want to send an email to all your current clients, for example, build a report that gathers all contacts in "In Force" status and includes their name and email in the report.
2. Click the blue arrow to the right of any campaign name. From the dropdown menu, select Bulk Enroll.
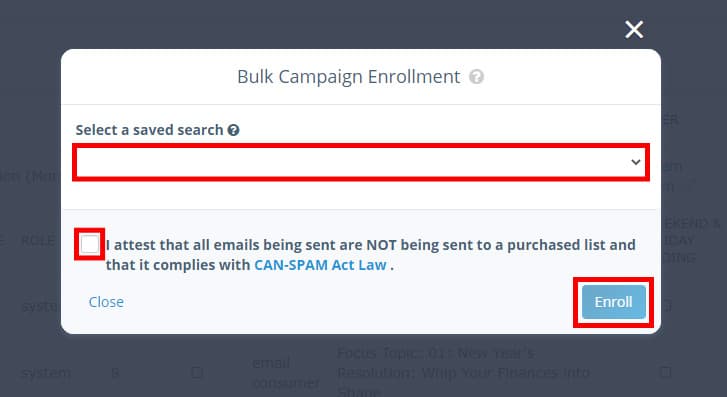
3. Select a saved search, check the CAN-SPAM disclosure box, and click Enroll.
Enrollment via the Contact Profile
1. Click Contacts Management in your left-hand navigation menu. If you know the name of the contact you want to enroll, use the "Additional Filter" box to search for that contact by name. Type their name (or as much of their name as you remember) into the box, be sure the selection filter is set to "name," and click the magnifying glass icon. Click on your contact’s name in the search results to pull up their record.
2. Once you're in a contact's profile, click the Marketing tab beneath their personal information. Look for the Campaign Subscription section to make the appropriate selection.
- To enroll this contact in a new campaign. Click Add A Parallel Campaign. Begin typing the name of the desired campaign into the search field. Select the appropriate campaign from the search results. Your contact is now enrolled in that campaign.
- To remove this contact from a campaign. Click the checkbox to the left of the campaign name. A pop-up window will ask, “Are you sure?” Click OK to proceed.
- To enroll the contact in a campaign that will run immediately after the current campaign. Click Add Next Campaign. Once every component (task, email, sms, etc.) of the first campaign has run, this contact will begin receiving the components of the second campaign.
- To enroll the contact in a parallel campaign that will run at the same time as the current campaign. Click Add A Parallel Campaign."Begin typing the name of the desired campaign into the search field. Select the appropriate campaign from the search results. Your contact is now enrolled in that campaign.
- To opt a contact out of all marketing. Click the red Opt Consumer Out of All Marketing button. A pop-up window will ask, "Are you sure?" Click OK to proceed. Once this option is applied, you'll see a red "Opt Back In" button instead. Click it to allow this contact to be enrolled in future marketing campaigns.
NOTE: Insureio will attempt to send an email to a recipient 4 times. After 4 failed delivery attempts, the system will stop sending to that email address. Your consumer will not receive the next email scheduled in a campaign.